Pushing Events via Cloud Connectors
Overview
A Cloud Connector provides a resilient method to push Event data from specific Streams (e.g., from assets connected to Octave edge devices) to external cloud systems and also to synchronize devices with your Cloud platform. Octave currently supports three types of Cloud Connectors:
-
HTTP Cloud Connector: allows you to send data to an external endpoint using REST requests. Here, you specify HTTP connection parameters and Octave will re-push Events if there is a brief outage on the external REST endpoint.
-
Azure IoT Hub Gateway Connector: works similarly to an HTTP Cloud Connector and it pushes Octave Events to Azure IoT Hub as "Device-to-Cloud Messages" (telemetry). As only authenticated devices can push data to IoT Hub, this connector handles the SAS Token authentication for each device. You need to assign IoT Hub device Ids to your devices in the Octave Cloud
-
Azure IoT Hub Device Twin & DPS Connector: this connector provides :
- Two-way mirroring of your Octave devices with their IoT Hub Device Twin. Any change in Octave or in IoT Hub will be reflected in the other system automatically.
- Reporting Telemetry from any chosen set of device Streams.
- Sending commands to a device through IoT Hub Direct Methods.
- with the DPS/PnP/IoT Central variant of the connector, you can benefit from easy Octave to IoT Hub device provisioning, load balancing and direct integration with IoT Central
For Octave devices to be mirrored to their IoT Hub Device Twin, the device must first be created in IoT Hub. You need to assign IoT Hub device IDs to your devices in the Octave Cloud.
Cloud Connectors inherit some concepts of Cloud Actions, in that they have a source Stream of Events to be processed and can define a JavaScript function to transform Events. Unlike Cloud Actions, Cloud Connectors publish their result to specified service end points, and some connectors also handle device authentication and mirroring with third-party endpoints (like IoT Hub).
Cloud Connector Dashboard Overview
The Cloud Connector creation screen (accessed via Build > Cloud > Connectors in the Octave Dashboard) has the following features:
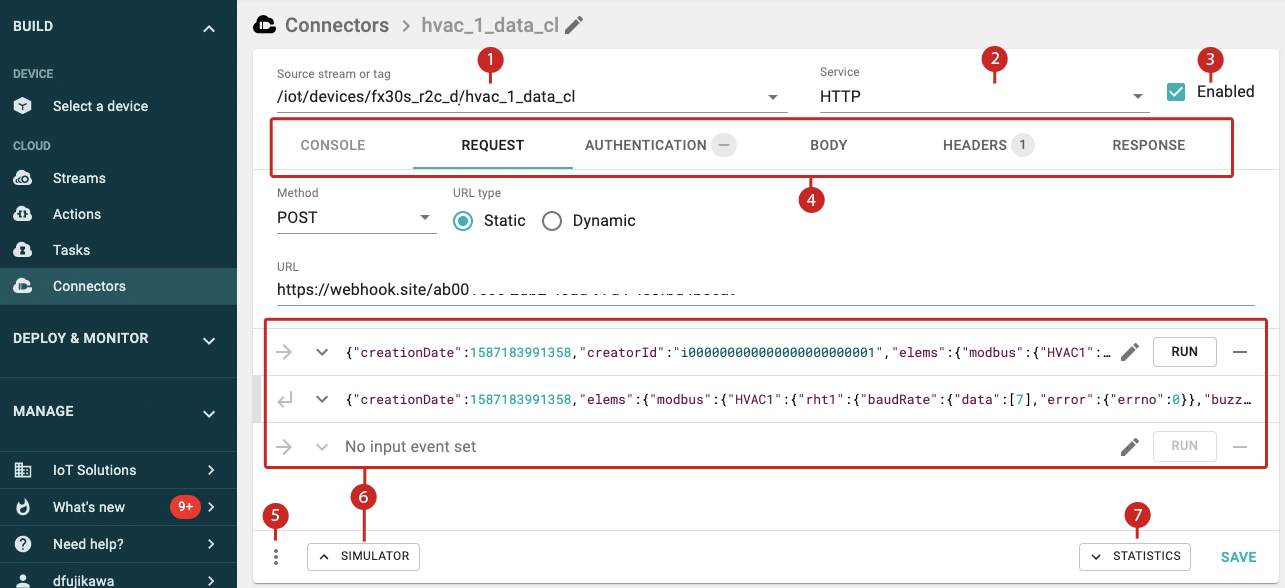
- Source Stream or Tag: specifies the source of the Events that the Cloud Connector should handle.
- Service: specifies the type of target to configure the Cloud Connector for (e.g., HTTP, Azure IoT Hub, etc.). Depending on the type selected, the configuration tabs (4) and fields will vary.
- Enabled Toggle: enables or disables the Cloud Connector.
- Service-specific Tabs: provides various configuration fields specific to the Service (2) selected.
- Menu Items: options to revert or delete the Cloud Connector.
- Simulator: allows you to test and debug an HTTP Cloud Connector using existing Events or writing your Event as input.
- Statistics: displays the Stats Screen where you can monitor and track errors for Cloud Connectors.
Creating an HTTP Cloud Connector
Follow the steps below to create an HTTP Cloud Connector in the Octave Dashboard:
- Navigate to Build > Cloud > Connectors.
- Click Add Cloud Connector.
- Select the HTTP Cloud Connector type. The New cloud connector editing screen appears.
Note
You can change your Cloud Connector type when configuring it.
- Select or start typing a name in the Source Stream or tag dropdown. This will be the source of Events. Set Source stream or tag to Stream to use the data values from a Stream in Octave. If the field is set to Tag, the data values will come from the tagged device's Stream (a device stream field will appear, allowing you to select the stream).
- Configure the type of REST request on the Request tab and specify a URL. Setting URL type to Static (the default) allows you to enter a static URL. Setting URL type to Dynamic displays a code editor in which you can programmatically create a dynamic URL based on an Event.
For example, the following code shows how the location of an Event could be included as a query parameter of the URL:
function (event){
    return "https://myserver.com/data?" + event.tags.location;
}
- Click the Authentication tab, select the type of authentication used by the external system, and populate the authentication-specific fields. Note that for the Octave authentication information, you can find your username and master token on the user screen in the Octave Dashboard..
- Click the Body tab and specify the type of content to return. Setting Content data to Event object (the default) will send the entire Event as a JSON object to the external system. Setting Content data to String returned from custom function displays a code editor in which you can programmatically customize what Event data you'd like to send to the external system.
For example, the following code shows how a new Event can be sent to the external system that contains only the region and sensor information from the original source Event:
function (event) {
   return {
       "region": event.tags.region,
       "value": event.elems.sensor
   }
}
- Click the Headers tab and verify or configure the header settings for the HTTP request.
Authorization and Content-type header entries will appear on the Headers tab if they were configured on the previous tabs. Modifying the values on the Headers tab, will cause the corresponding fields on the previous tabs to be updated as well.
Additional static headers can also be added here (e.g., content-coding).
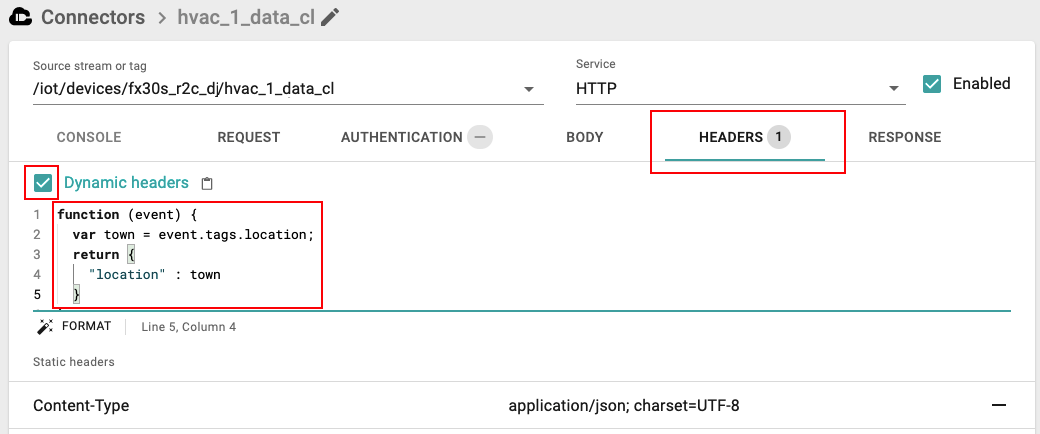
You can also optionally enable the Dynamic Headers checkbox which allows you to programmatically add headers dynamically based on the incoming Event. For example, the following screenshot shows how to dynamically add a header and populate it with location data from the Event:
- Click the Response tab.
The Success status codes and Ignored error status codes define the HTTP success and error response codes that the Cloud Connector expects to receive. If none of the specified codes are returned, Octave will resend the Cloud Connector Event up to three times. After three unsuccessful retries, the Cloud Connector will become disabled. You can re-enable the Cloud Connector by setting the Enabled checkbox and re-saving the Cloud Connector.
- Click Save to save the Cloud Connector. The Cloud Connector is now live. Note that you can enable or disable the Cloud Connector at any time by toggling the Enabled checkbox and re-saving the Cloud Connector.
Testing and Debugging an HTTP Cloud Connector Using the Simulator
The Simulator tab allows you to create one or more simulations to test or debug your HTTP Cloud Connector using existing Events or writing your own test Events as input. Doing so allows you try different inputs, write custom code (e.g., to display debugging information), and to see both the complete request and response.
Follow the steps below to simulate an HTTP Cloud Connector:
- Create or edit an existing HTTP Cloud Connector.
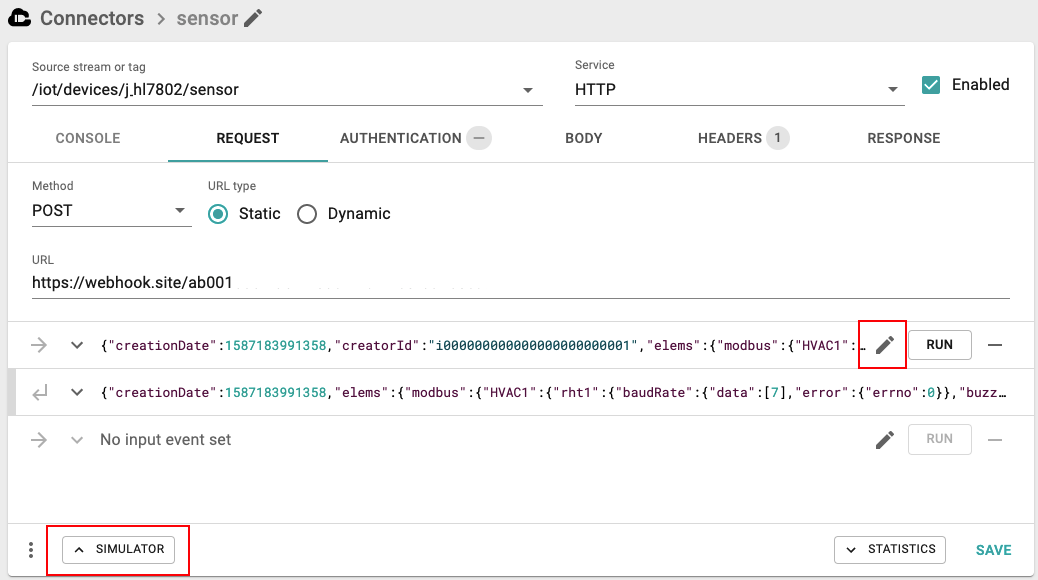
- On the HTTP Cloud Connector screen, click the Simulator tab.
- Configure your first input Event by clicking the edit button:
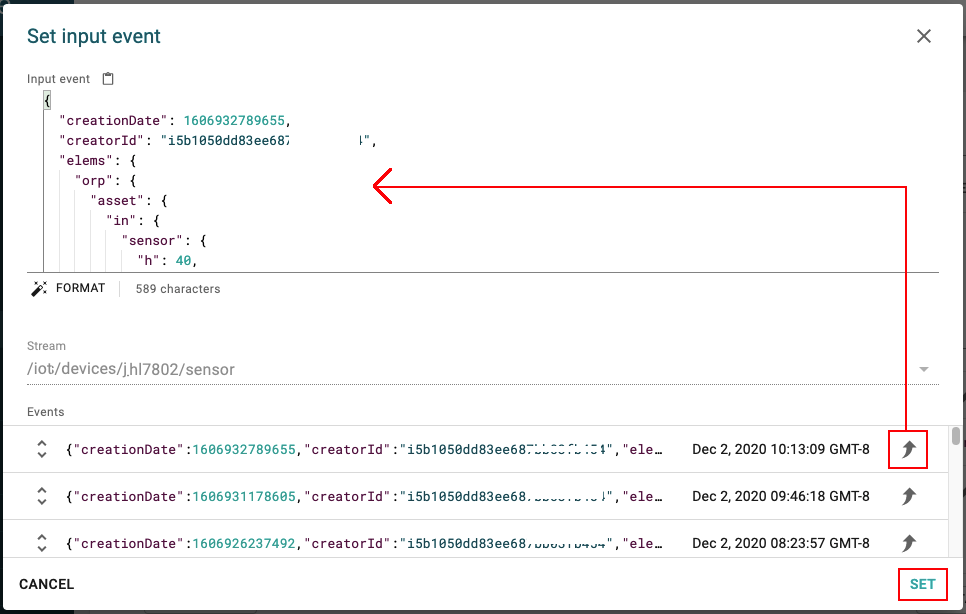
- Configure the Event using one of the following methods:
- Write the JSON for a custom Event in the Input Event field; or
- Locate an Event in the list and click the copy button to copy the Event's JSON to the Input Event field. Note that you can optionally modify the copied content as well.
- Click Set to use the Event for simulation and to close the popup:
- (Optional) Navigate to the Body tab, ensure String returned from custom function is selected, and add/modify the code to control what information the simulation will generate. For example, you could add the statement
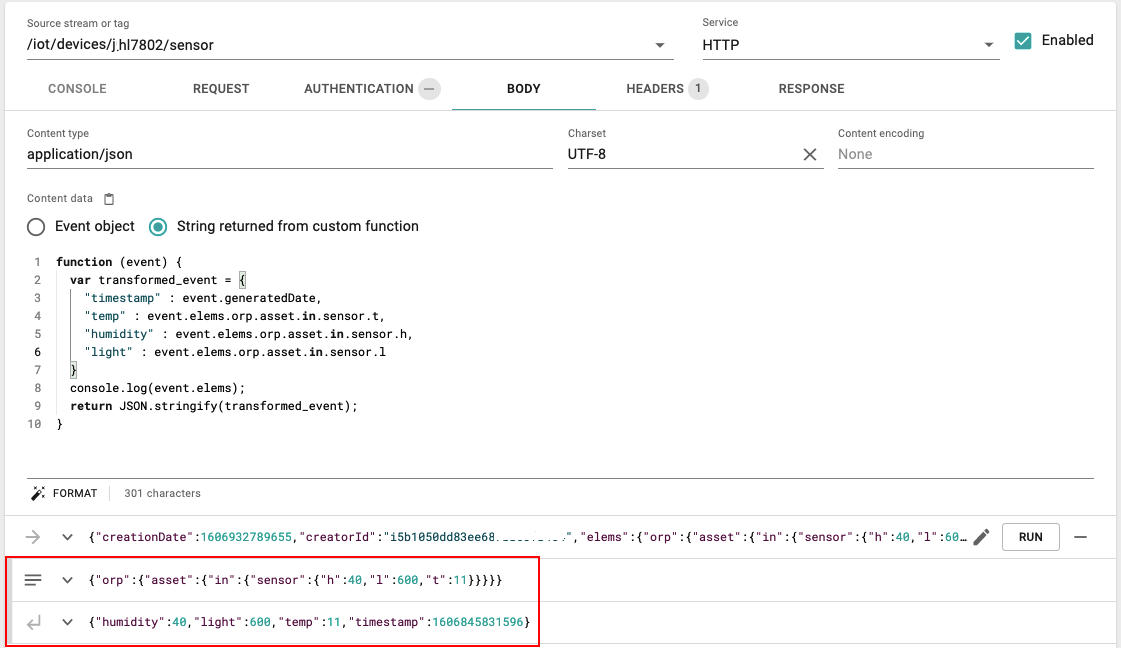
console.log(event.elems)to display the fields of the Event object. - Click Run to invoke the simulation with the configured Event.
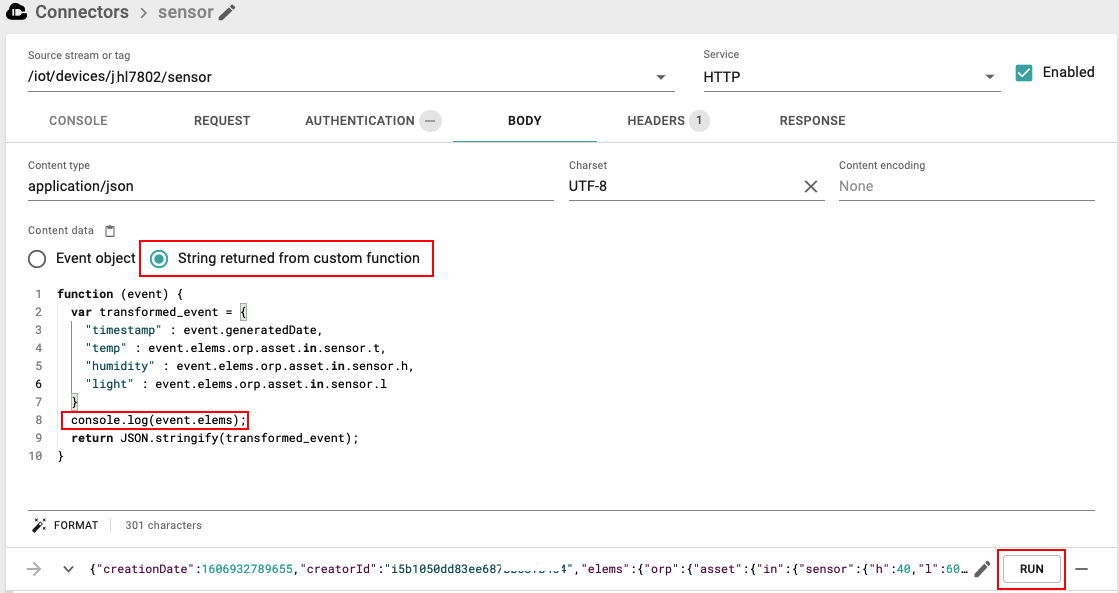
The output is shown below the Event. Console output is indicated by the icon with three lines and the complete request is indicated by the arrow icon; both can be expanded to display additional detail:
Note
You can optionally repeat Step 3 and onwards to configure multiple simulations.
Creating an Azure IoT Hub Gateway Connector
Follow the steps below to create an Azure IoT Hub Cloud Connector in the Octave Dashboard:
- Navigate to Build > Cloud > Connectors.
- Click Add Cloud Connector.
- Select the Azure IoT Hub Cloud Connector type. The New cloud connector editing screen appears.
Note
As the IoT Hub connector is "cloud-to-cloud", it uses one unique authentication key for all devices. Data however, appears as coming from each individual device on the IoT Hub side.
For the Octave IoT Hub Connector to report device data to your IoT Hub instance:
- the devices need to be declared in your IoT Hub
- the device "IoT Hub ID" must be assigned each Octave devices' "Azure IoT Hub" Custom ID
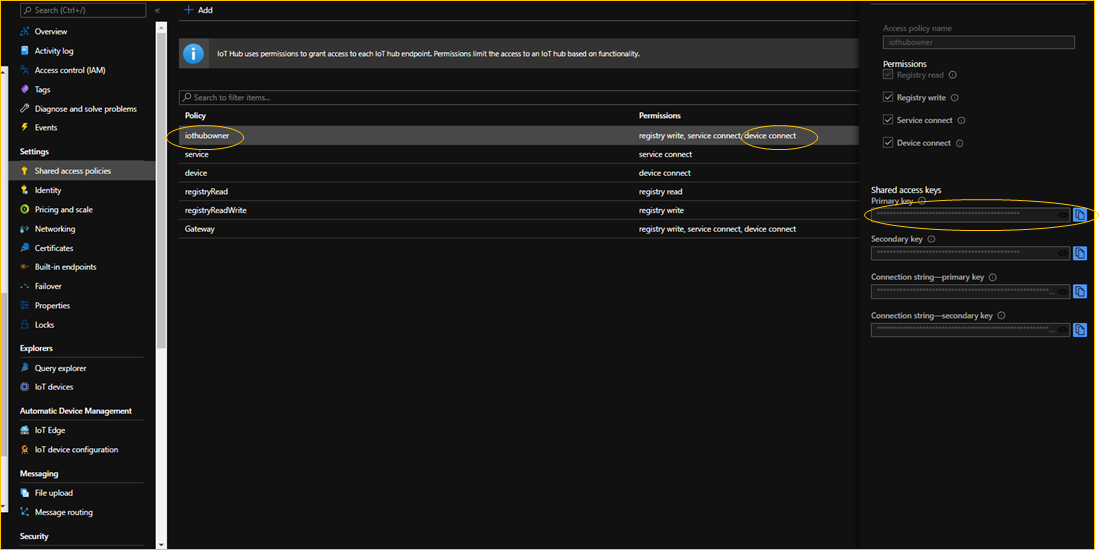
A global Shared Access Policy, enabling "Device connect" must be enabled on your IoT Hub. That Shared access policy must be provided in the IoT Hub Connector settings
- Select or start typing a name in the Source Stream or tag dropdown. This will be the source of Events. Set Source stream or tag to Stream to use the data values from a Stream in Octave. If the field is set to Tag, the data values will come from the tagged device's Stream (a device stream field will appear, allowing you to select the stream).
- Click the Properties tab and enter :
- your Azure IoT Hub name,
- the "Shared access key" and "Policy Name" of your IoT Hub's Shared access Policy. Any policy configured with "Device connect" can be used. Go to your Azure Portal to manage your IoT Hub and its Shared Access policies to retrieve these credentials.
- Click the Body tab and specify the type of content to return. Setting Content data to Event object (the default) will send the entire Event as a JSON object to the external system. Setting Content data to String returned from custom function displays a code editor in which you can programmatically customize what Event data you'd like to send to the external system.
For example, the following code shows how a new Event can be sent to the external system that contains only the region and sensor information from the original source Event:
function (event) {
   return {
       "region": event.tags.region,
       "value": event.elems.sensor
   }
}
- Click the Headers tab and verify or configure the header settings for the HTTP request. Additional static headers can also be added here (e.g., content-coding).
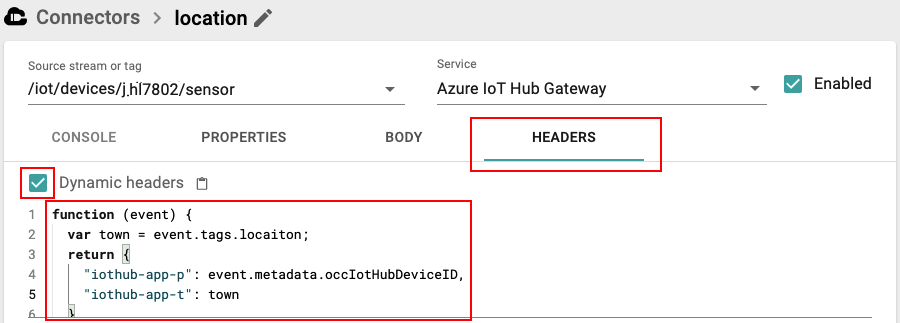
You can also optionally enable the Dynamic Headers checkbox which allows you to programmatically add headers (e.g., Azure IoT Application Properties) dynamically based on the incoming Event. For example, the following screenshot shows how to dynamically add two Application Properties and populate them with location data from the Event:
- Click Save to save the Cloud Connector. The Cloud Connector is now live. Note that you can enable or disable the Cloud Connector at any time by toggling the Enabled checkbox and re-saving the Cloud Connector.
Once the IoT Hub Cloud Connector is created, make sure that your IoT Hub Device IDs are assigned to each of your Octave devices.
Assigning your Azure IoT Hub Device ID to an Octave Device
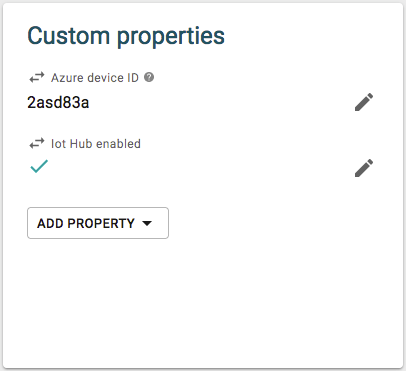
After you have created your Cloud Connector you must add the "Azure device ID" to your Octave device(s). You can find this ID in your Azure Portal interface, where you manage/declare your IoT Hub devices in Azure.
Follow the steps below to add the "Azure device ID" to your Octave device(s):
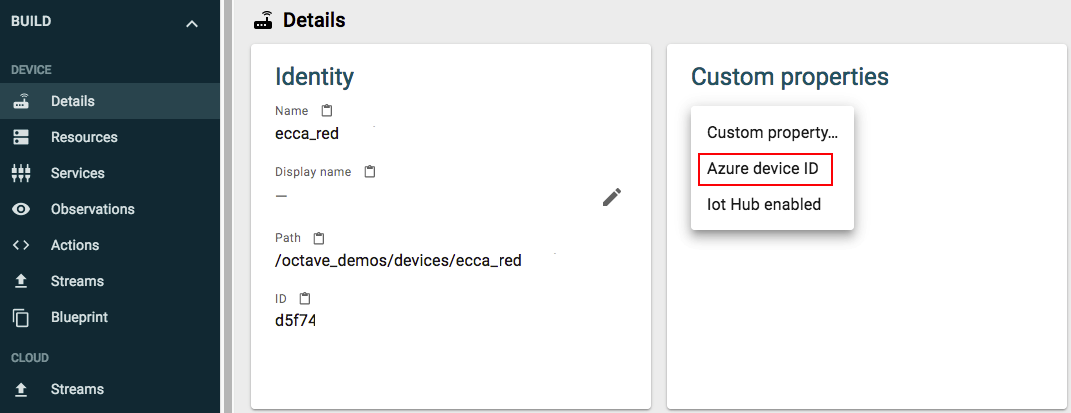
- Navigate to Build > Device > Details.
- Locate the Custom properties section and click Add Property.
- Click Azure device ID in the dropdown:
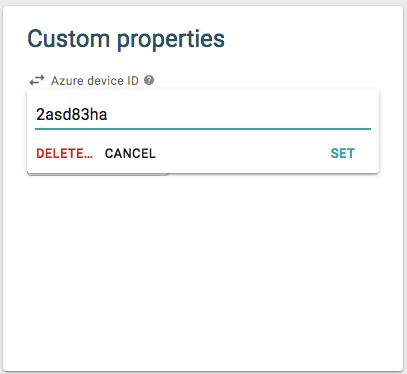
- Click the edit button to modify the property.
- Enter your IoT Hub device ID, and click Set:
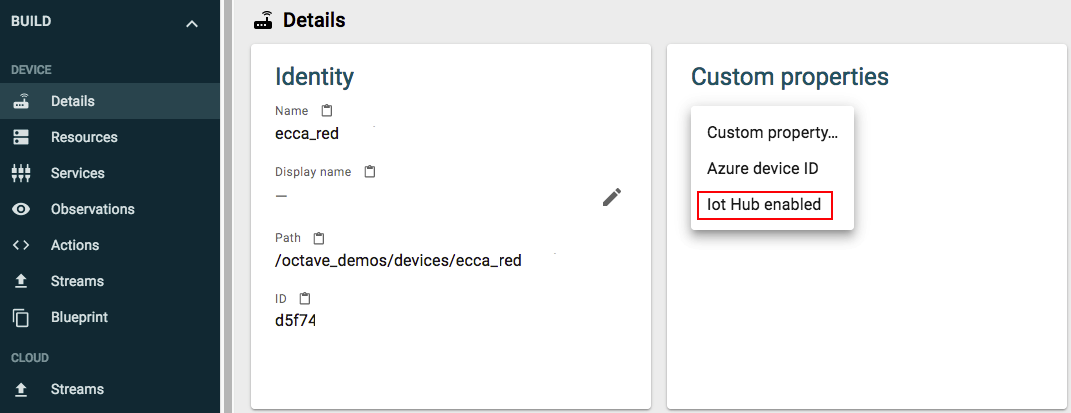
- Click IoT Hub enabled in the dropdown:
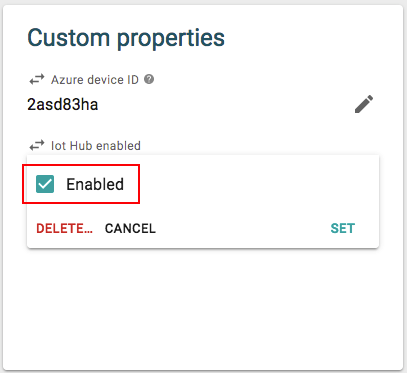
- Click the edit button to modify the property.
- Ensure Enabled is on and click Set.:
The custom properties are now set:
Creating an Azure IoT Hub Cloud Device Twin Connector
This section describes how to create an Azure IoT Hub device twin Cloud Connector. The IoT Hub Device Twin connector will always attempt to mirror the Octave device with its Device Twin.
Octave applies this type of Cloud Connector to all devices which have been assigned with a specific Tag/value pair, so you must first create and assign this Tag to your device(s). Before continuing, create the Tag as described here with an appropriate value (e.g., "DTwin" set to true).
After you have created and assigned the Tag, follow the steps below to create an Azure IoT Hub device twin Cloud Connector in the Octave Dashboard:
- Navigate to Build > Cloud > Connectors.
- Click Add Cloud Connector.
- Select the Azure IoT Hub device twin type. The New cloud connector editing screen appears.
- Select or start typing the name of your Azure IoT Hub device twin Tag in the Source tag dropdown. All devices with this Tag will become connected with this Cloud Connector. Note that Number of devices will auto populate when you select a Tag, indicating the number of devices in the deployment which currently have that Tag.
- Ensure that Enabled is on.
- Select the Properties tab and populate its fields:
- IoT Hub Name: the name of your Azure IoT Hub.
- Shared access policy name and Shared access key (owner rights on the shared policy): the "Shared access key" and "Policy Name" of your IoT Hub's Shared access Policy. Any policy configured with "Device connect" and "Registry Read" can be used. Go to your Azure Portal to manage your IoT Hub and its Shared Access policies to retrieve these credentials.

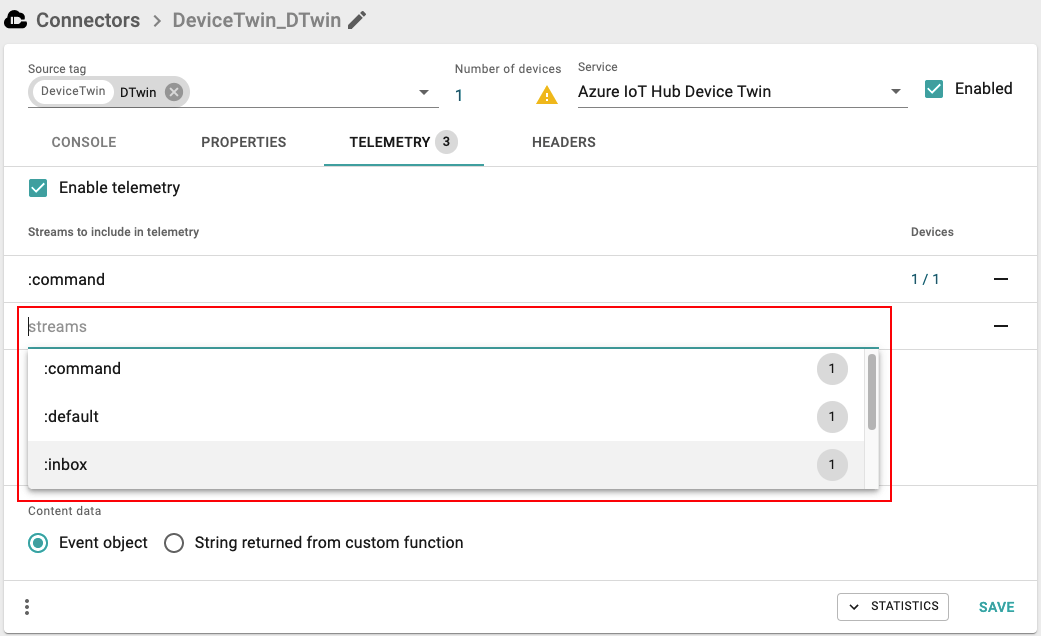
- Click the Telemetry tab in the Octave UI and set Enable Telemetry to enabled. You can chose to collect Events coming from various Streams to report them as Device-to-Cloud messages (Telemetry) in IoT Hub. The Events can be pushed as such or re-formatted thanks to custom JS functions for Body and Header as described in the next few steps.
- Click on the Streams field under Streams to include in telemetry and select a Stream. All devices with the Source tag and will emit events from this Stream; the Devices column indicates how many of the total number of devices include the Stream:
- (Optional) Repeat the previous step to add additional streams.
- Set Content data. Setting this to Event object (the default) will send the entire Event as a JSON object to the external system. Setting this to String returned from custom function displays a code editor in which you can programmatically customize what Event data you'd like to send to the external system.
For example, the following code shows how a new Event can be sent to the external system that contains only the region and sensor information from the original source Event:
function (event) {
   return {
       "region": event.tags.region,
       "value": event.elems.sensor
   }
}
- Click the Headers tab and verify or configure the header settings for the HTTP request. Additional static headers can also be added here (e.g., content-coding).
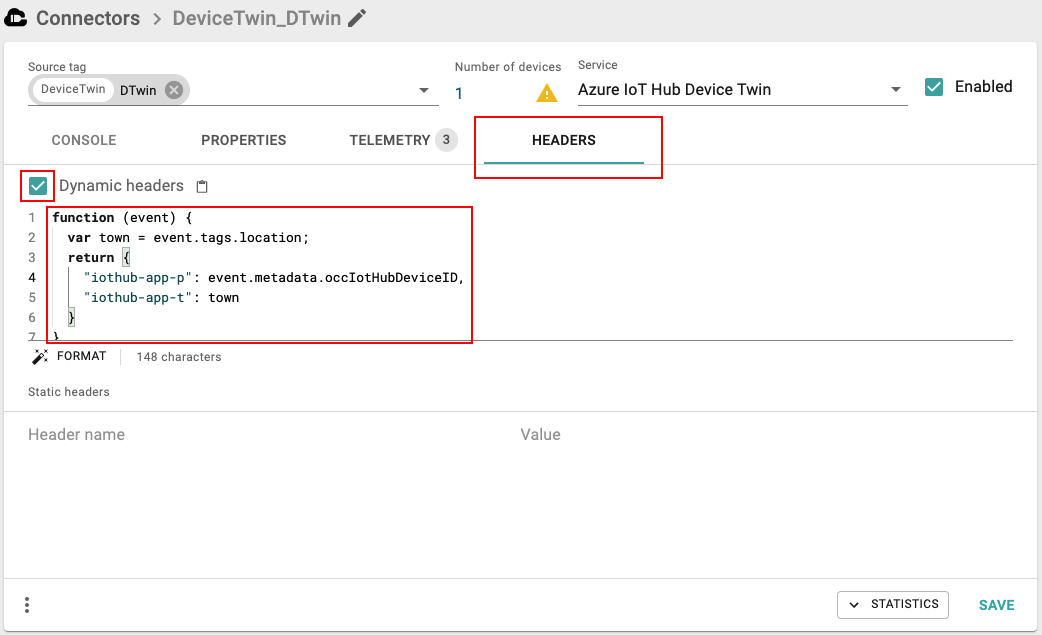
You can also optionally enable the Dynamic Headers checkbox which allows you to programmatically add headers (e.g., Azure IoT Application Properties) dynamically based on the incoming Event. For example, the following screenshot shows how to dynamically add two Application Properties and populate them with location data from the Event:
- Click Save to save the Cloud Connector. The Cloud Connector is now live. Note that you can enable or disable the Cloud Connector at any time by toggling the Enabled checkbox and re-saving the Cloud Connector.
Once the IoT Hub Cloud Connector is created, make sure that your IoT Hub Device IDs are assigned to each of your Octave devices.
Device Twin and Direct Methods
Device Twin capabilities and Direct Methods for Octave commands are enabled automatically as soon as the IoT Hub Device Twin connector is configured and enabled.
IoT Hub Device Twins:
- Any change in the Device Twin "desired properties" will result in an change of the Octave device
- Any change on the actual Octave device will result in the Device Twin "reported properties" to be updated.
Direct Methods to send Octave commands:
You can send Commands to your Octave device through IoT Hub Direct Methods. Use a command with Method Name "command", where the payload includes what you want to send to your device's command Stream.
Using Azure Device Provisioning Service (DPS), Plug and Play or IoT Central
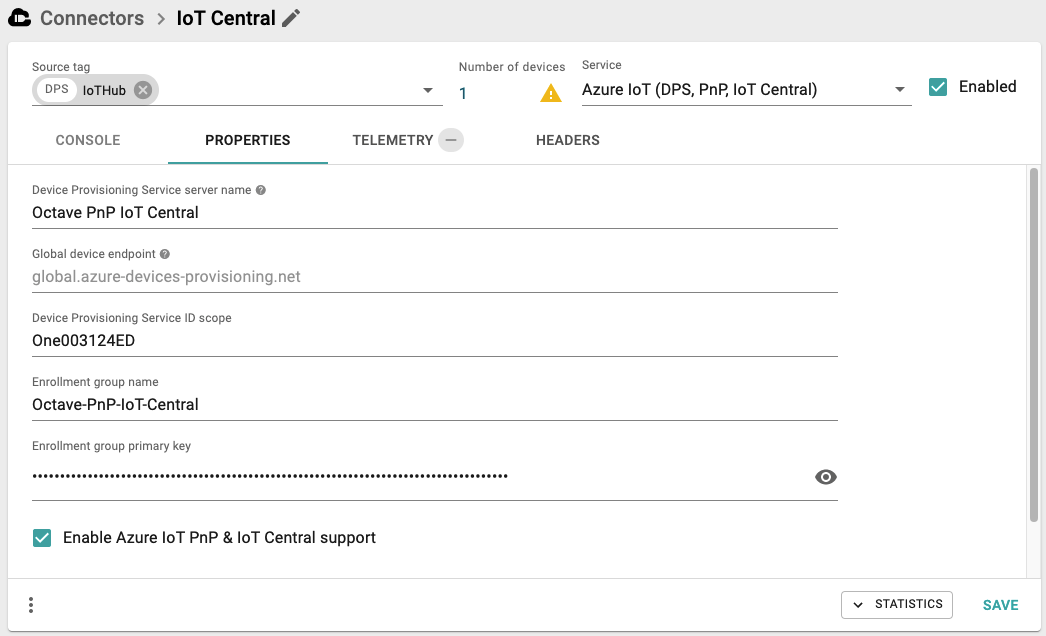
The most complete of Octave to Azure connectors is the Azure IoT (DPS, PnP, IoT Central) connector
In any case it will use DPS to enroll devices, whether you manage DPS on your side or it is handled for you (by IoT Central for instance)
With the Azure IoT (DPS, PnP, IoT Central) connector , you can benefit from the IoT Hub Device Twin Connector capabilities with a more enhancements:
- Simple provisioning with usage of DPS Enrollment groups. Enrollment group credentials are provided to the connector. DPS Registration ID configured on the Octave device is used for registration
- DPS handles the dynamic configuration and load balancing from Octave devices to the desired IoT Hubs, and the Octave to Azure DPS connector will connect them accordingly
- Support of Azure Plug-and-Play formats
- Support of IOT Central (using the IoT Central DPS + PnP)
Connect devices to IoT Hub with your own DPS
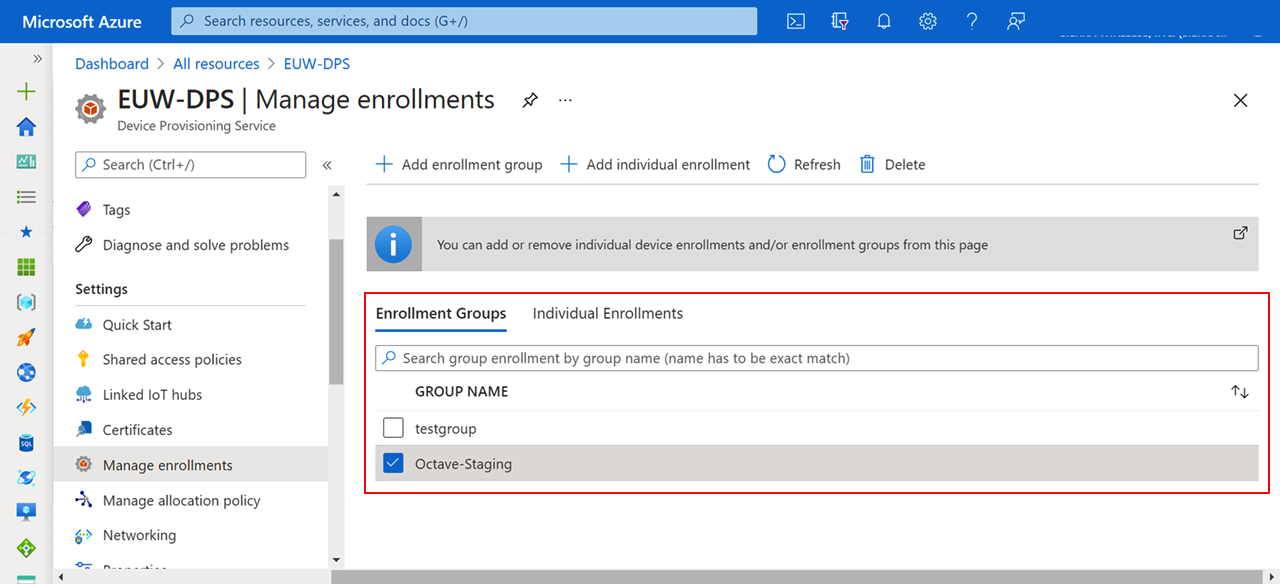
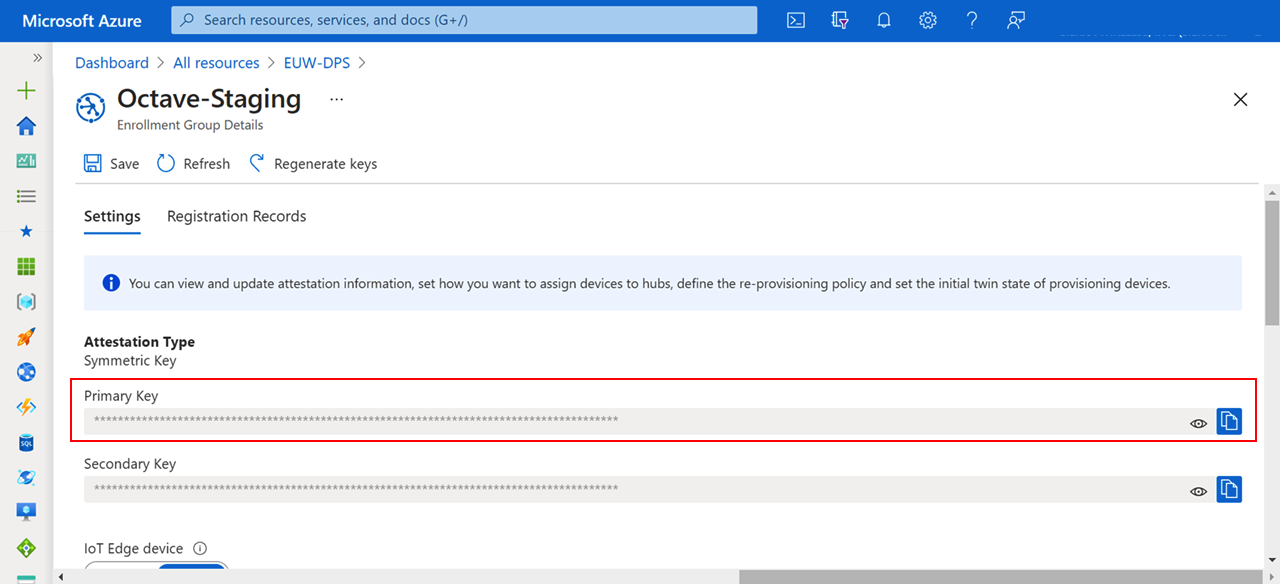
Octave's Azure IoT (DPS, PnP, IoT Central) connector uses enrollment groups as described here and a primary key (no certificates).
Follow the steps below to configure an Azure IoT (DPS, PnP, IoT Central) connector :
- Navigate to Build > Cloud > Connectors.
- Click Add Cloud Connector.
- Select the Azure IoT (DPS, PnP, IoT Central) type. The New cloud connector editing screen appears.
- Select or start typing the name of your Tag in the Source tag dropdown. All devices with this Tag will become connected with this Cloud Connector. Note that Number of devices will auto populate when you select a Tag, indicating the number of devices in the deployment which currently have that Tag.
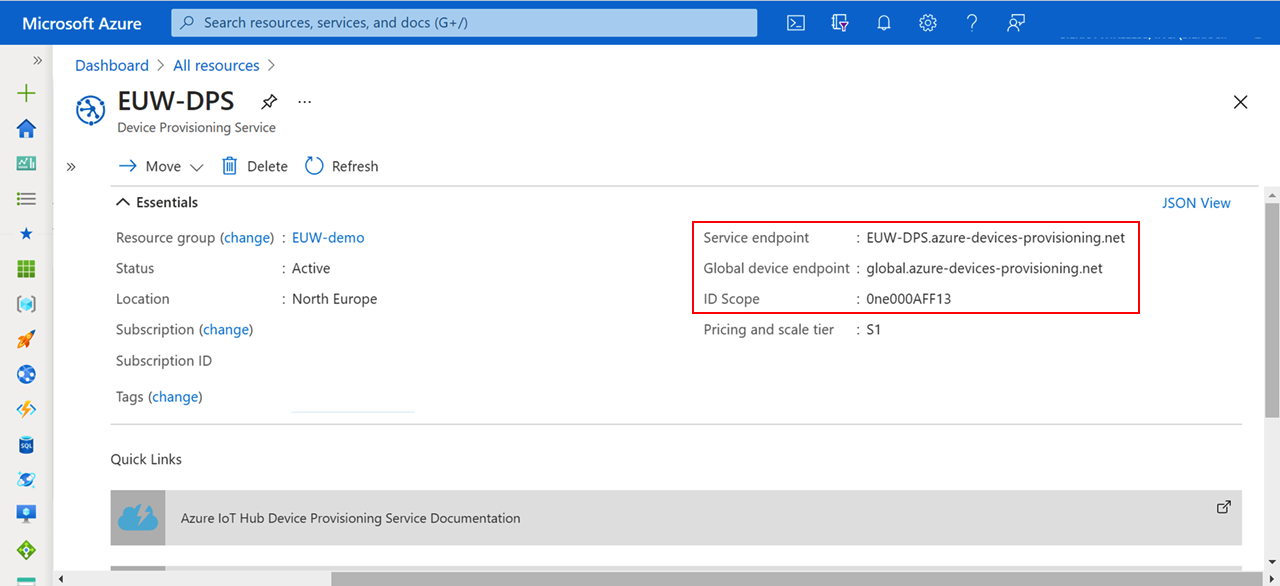
- Populate the DPS properties. The following screenshots show where to find this information in Azure:
- Click on the Telemetry tab, enable telemetry, and configure telemetry as described above in Creating an Azure IoT Hub Cloud Device Twin Connector.
- Associate the device as described above in Assigning Your Azure IoT Hub Device ID to an Octave Device.
Interface devices to IoT Central
An Azure IoT (DPS, PnP, IoT Central) connector allows both telemetry and device properties to be viewed and controlled directly from IoT Central via a PnP Device.
To accomplish this, you can create an Octave device template to control a device's properties (Resources) directly from IoT Central Dashboards.
The following subsections describe the steps to implement this:
- Prepare an IoT Central Connector: set up your device to work with IoT Central.
- Enable IoT Hub and provide the Azure IoT Hub Device ID to your Octave Devices.
- Model the Device in IoT Central: model the device's properties in IoT Central. Alternatively you can use our reference template as a starting point.
Prepare an IoT Central Connector
In order set up a digital twin, you must first prepare an IoT Central Connector to open up communications with your Octave edge device.
Follow the steps below to set up an IoT Central Connector:
- Get the ID Scope and SAS primary Key provided by your IoT Central application, and use them as the Device Provisioning Service ID scope
and Enrollment group primary key of your Octave connector. Also tick the Enable Azure Plug&Play and IoT Central support
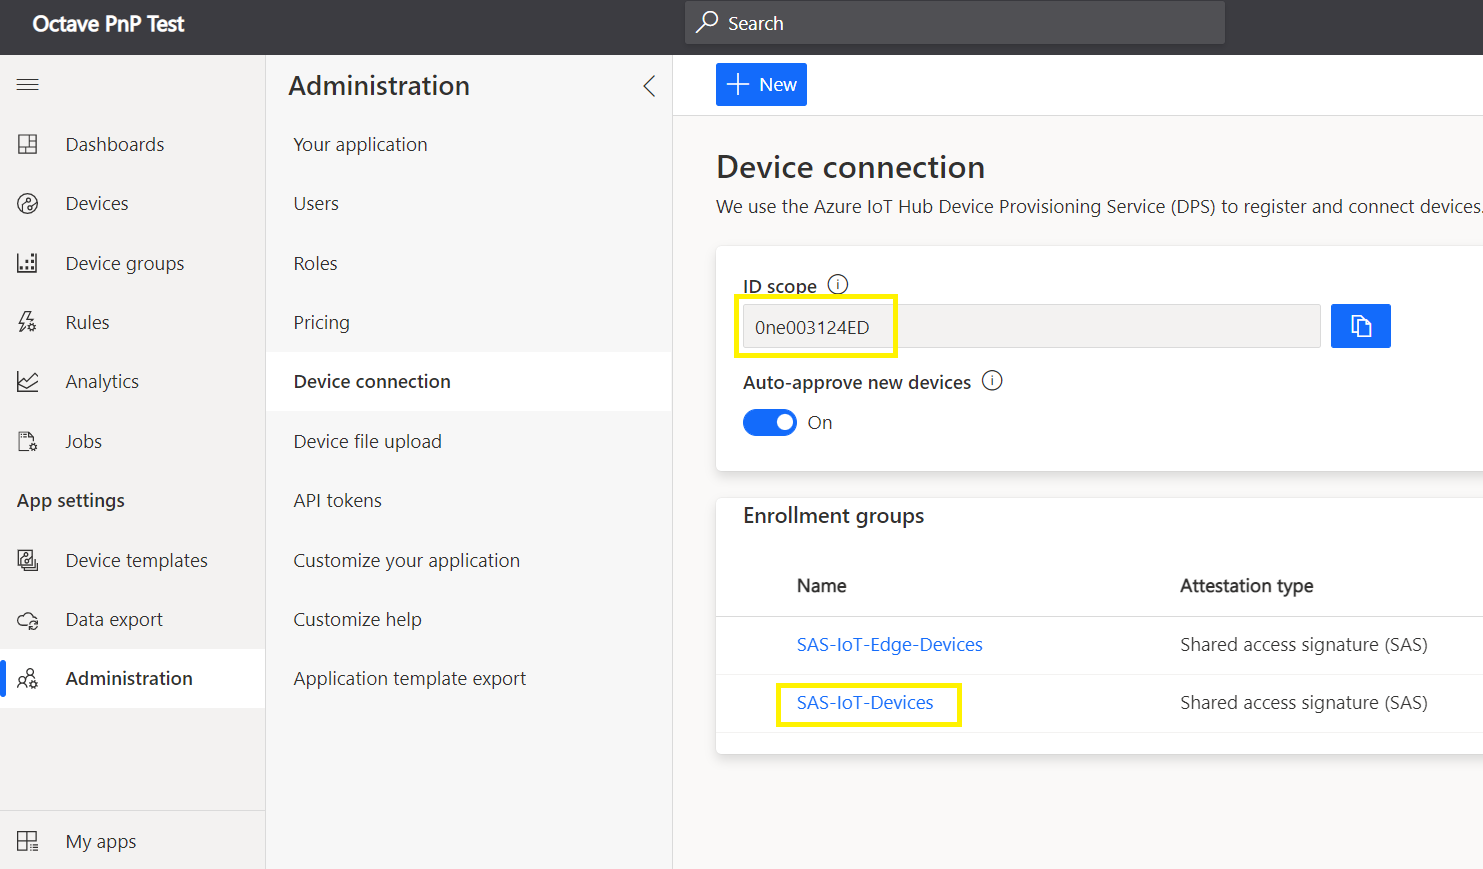
Device connection keys in IoT Central
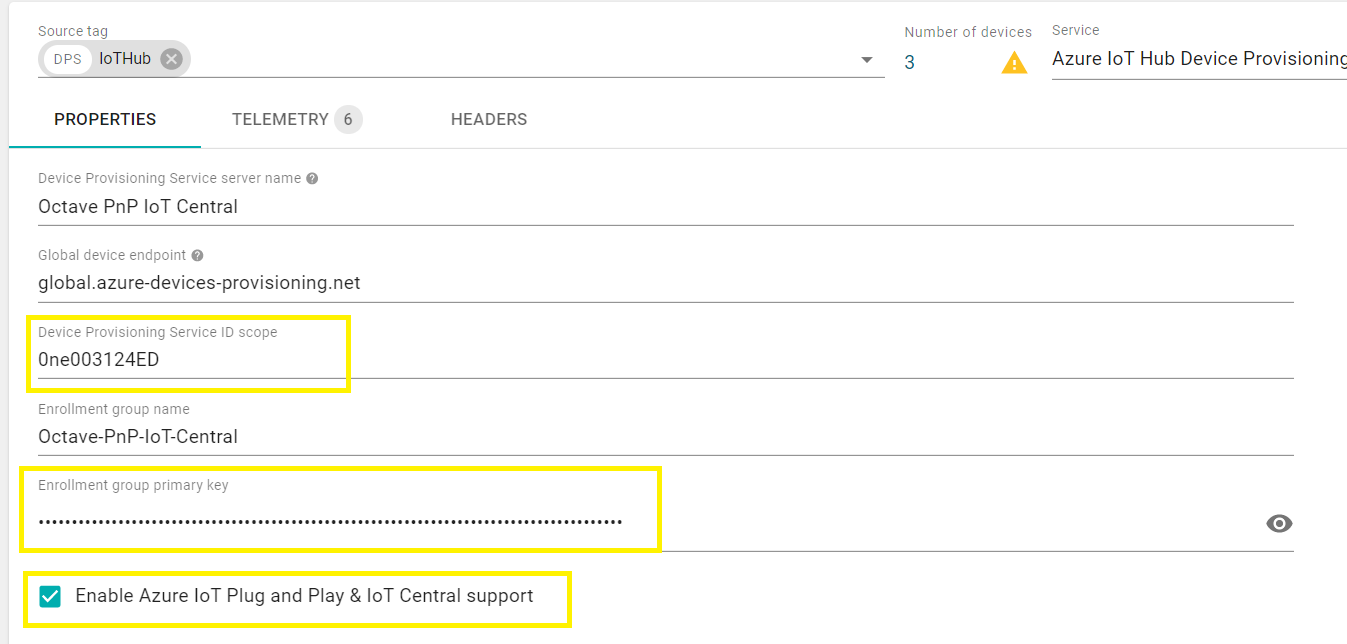
Configuration of the Octave connector
- Add the connector as a Tag to your Octave edge device. The device should now appear in the list of devices in your Azure IoT portal.
- See Allowing Devices in the IoT Central Application for information on how to allow device data to be received on the IoT Central application side.
- Follow the steps in the next section to model the device's properties in IoT Central.
Model the Device in IoT Central
After you have opened up communications between your device and IoT Central as described in the previous section, you must then model the device's properties in IoT Central that you want to twin.
This section provides steps to accomplish this using telemetry data (dew point, temperature, and acceleration data) as an example. Using this as a starting point, you should be able to modify the configuration for your particular use case.
Follow the steps below to model the device's properties in IoT Central:
- Fully configure your device in Octave as you would normally do (i.e., come up with a device Blueprint). This includes enabling IOs, configuring Modbus/USP/ORP and developing your Edge Actions. This initial configuration needs to be completed in Octave and cannot be done via IoT Central.
- Decide how to define your PnP model in IoT Central:
- Properties (generic): for all generic Octave Resources (e.g., cloudInterface, embedded Sensors, etc.) you can import predefined Octave DTDL models to avoid having to re-create them. These models include components for generic Octave Resources like cloudInterface and util.
- Properties (specific): if you need to control whether IOs are enabled, you can add them to your model using an io Component.
- Properties (specific virtual): for Virtual Resources, add a dedicated virtual Component in your PnP model to match your Virtual Resource settings.
Note:
Properties are handled by the Octave PnP connector as being Components at the root level. This is why any Property added to your models must be Components. For example, an Octave device has Resources like those below at the root level, each one having its own underlying tree:
- /cloudInterface/
- /utils/
- /io/
- /virtual/
- Model your device in IoT Central. The following sub steps show how to create a PnP Component called cloudInterface (corresponding to your Octave device's cloudInterface Resource) with an underlying Object structure corresponding to the underlying Resource tree in Octave. Note that partial maps will work if you only want to handle a subset of all Resources. In this example, only the developer_mode Resource and properties will be modeled.
a. Create a new component and set its name to cloudInterface (this matches the spelling and case as it is in Octave):
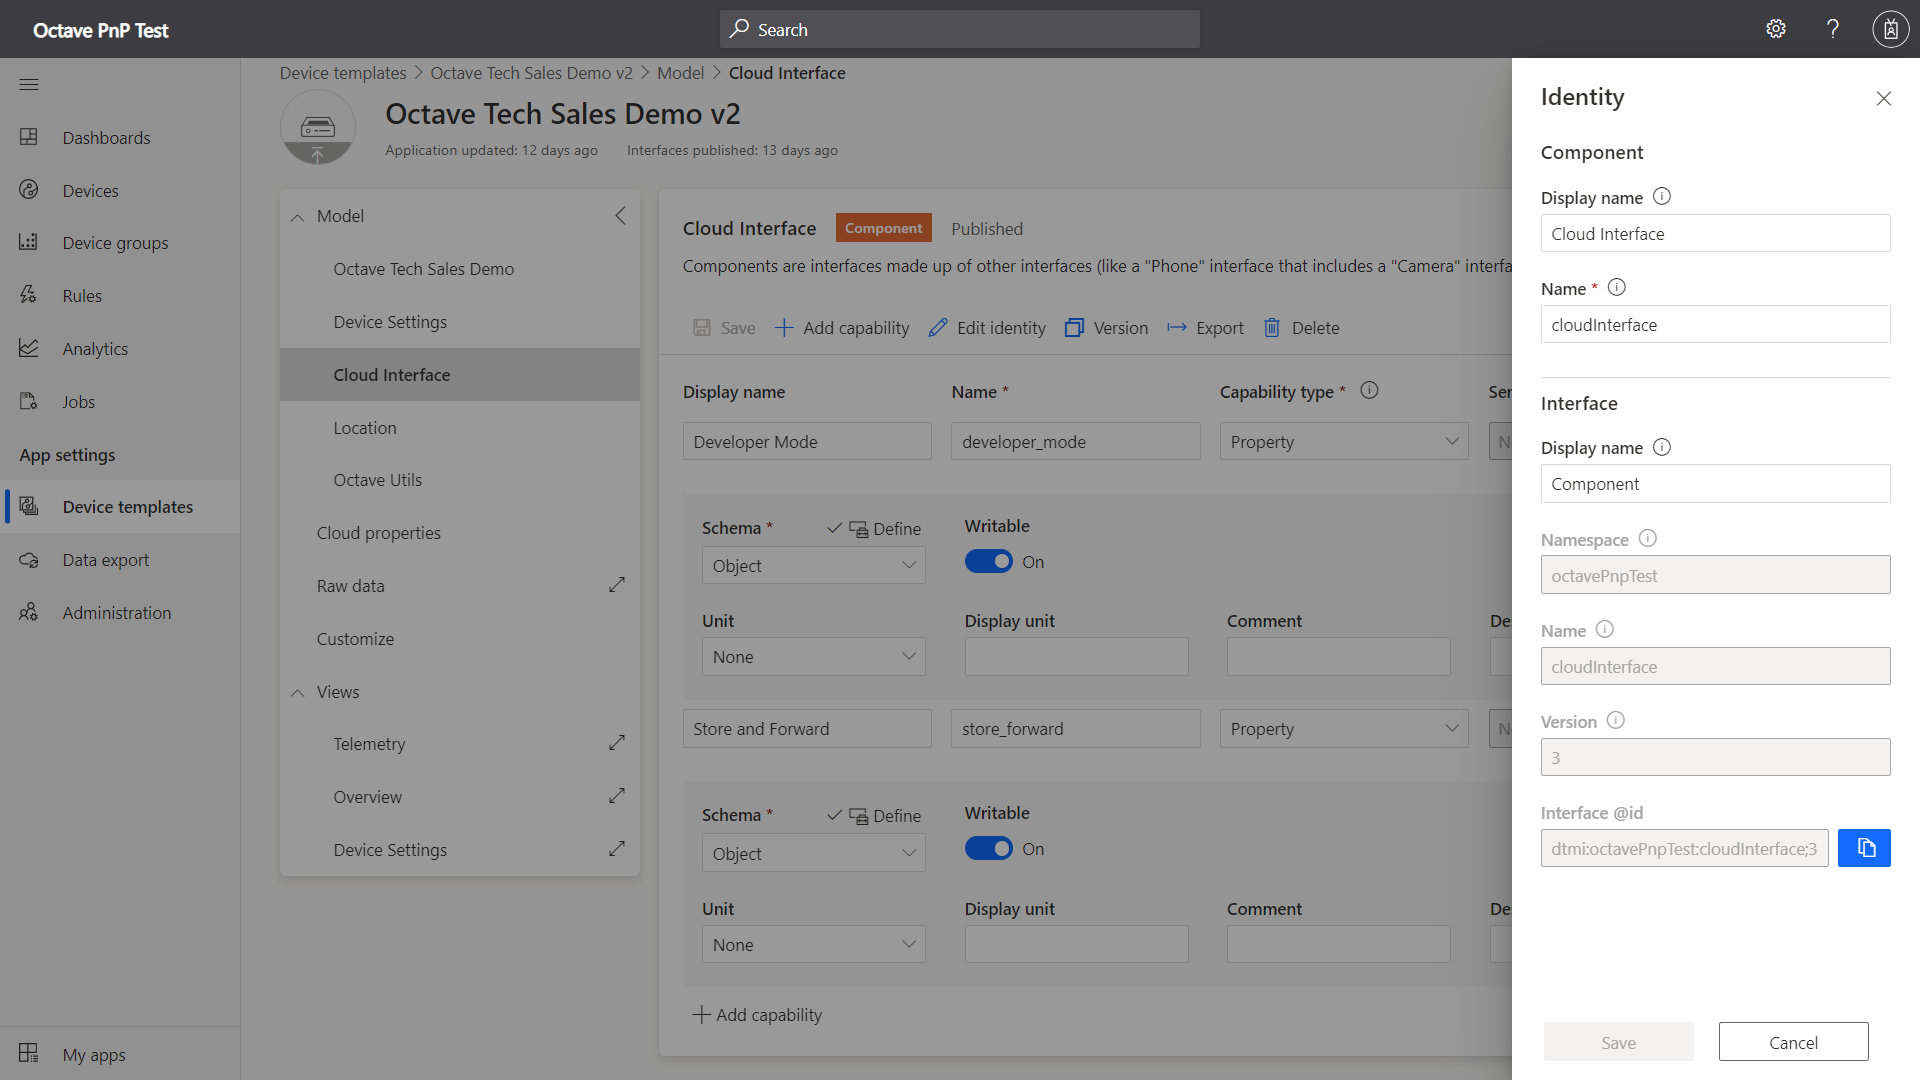
Creating a new Component.
b. Add an identity for the developer_mode Resource, ensuring that its name is spelled the same as it is in Octave, including the underscore:
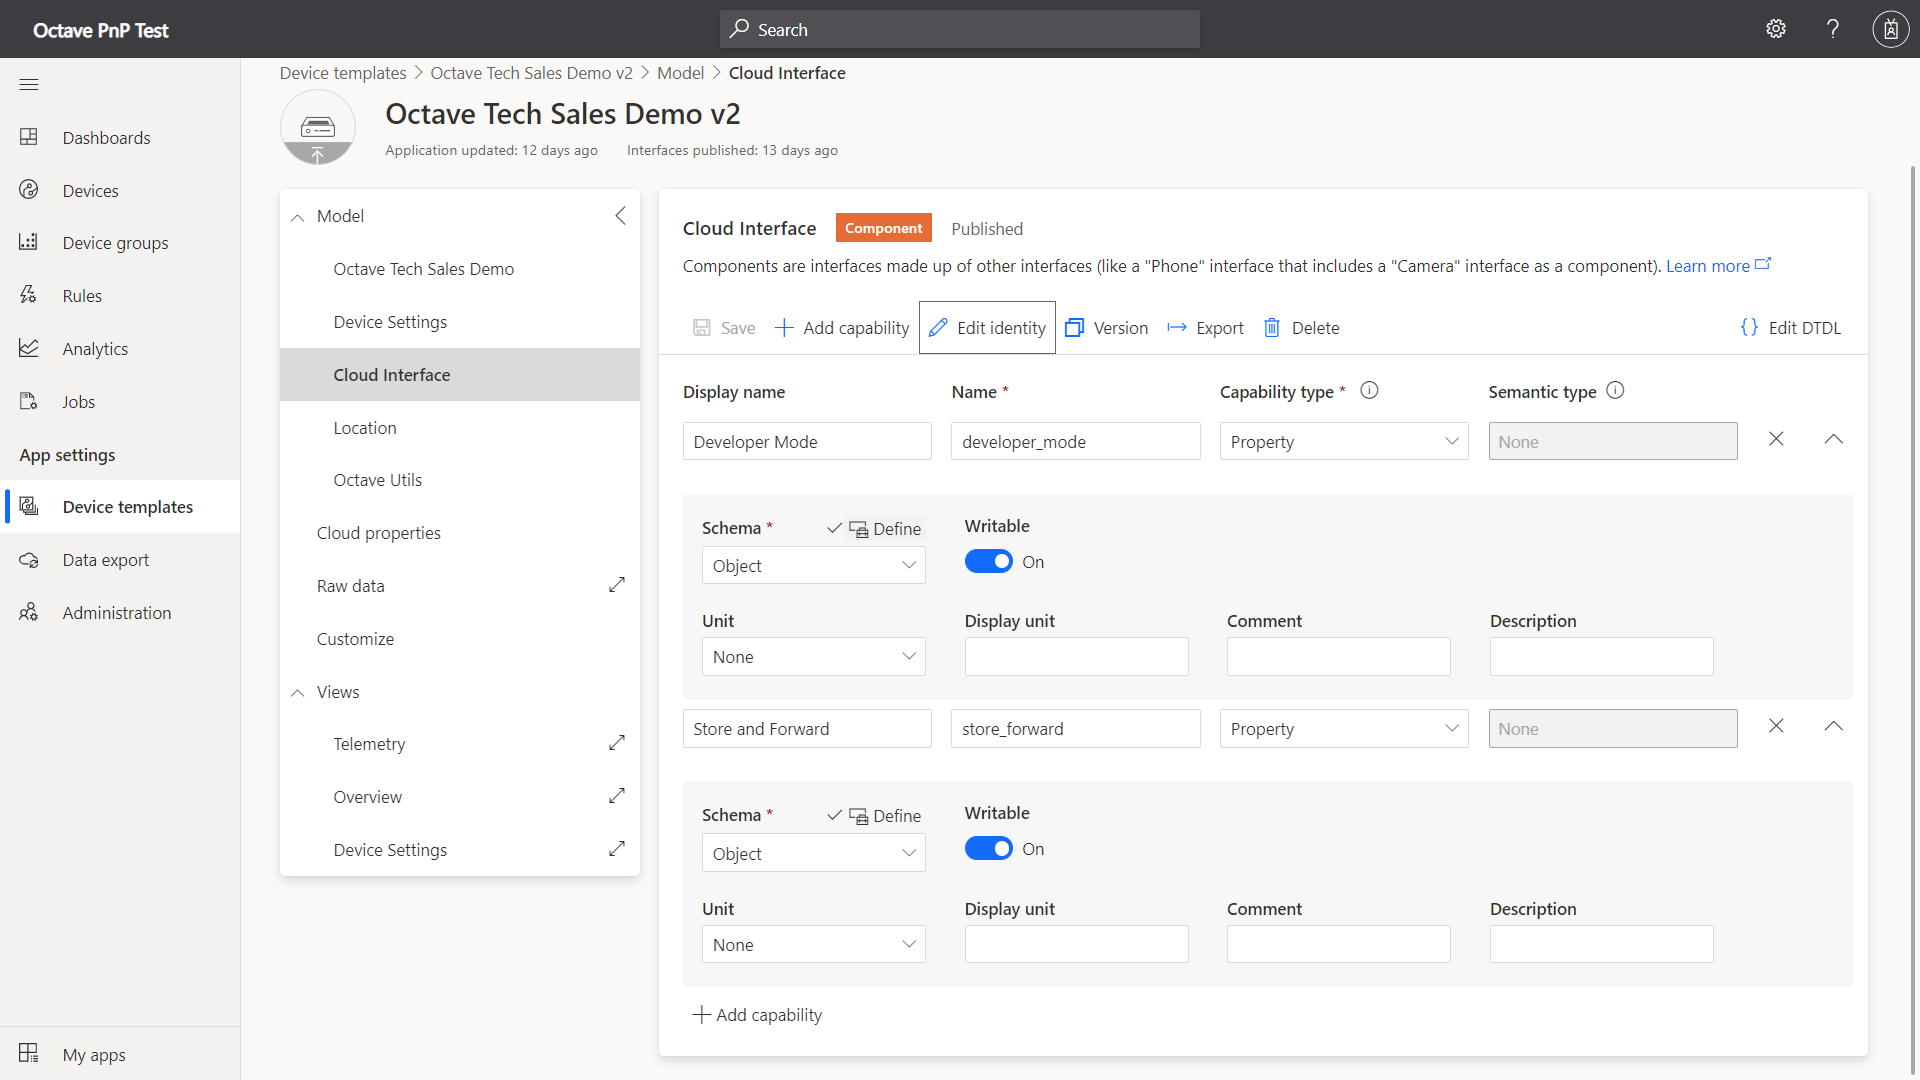
Creating an identity for the developer_mode Resource.
c. Add the properties of the Developer Mode resource ensuring that the name for each is spelled exactly as they are in Octave and that the Schema types also match those used in Octave:
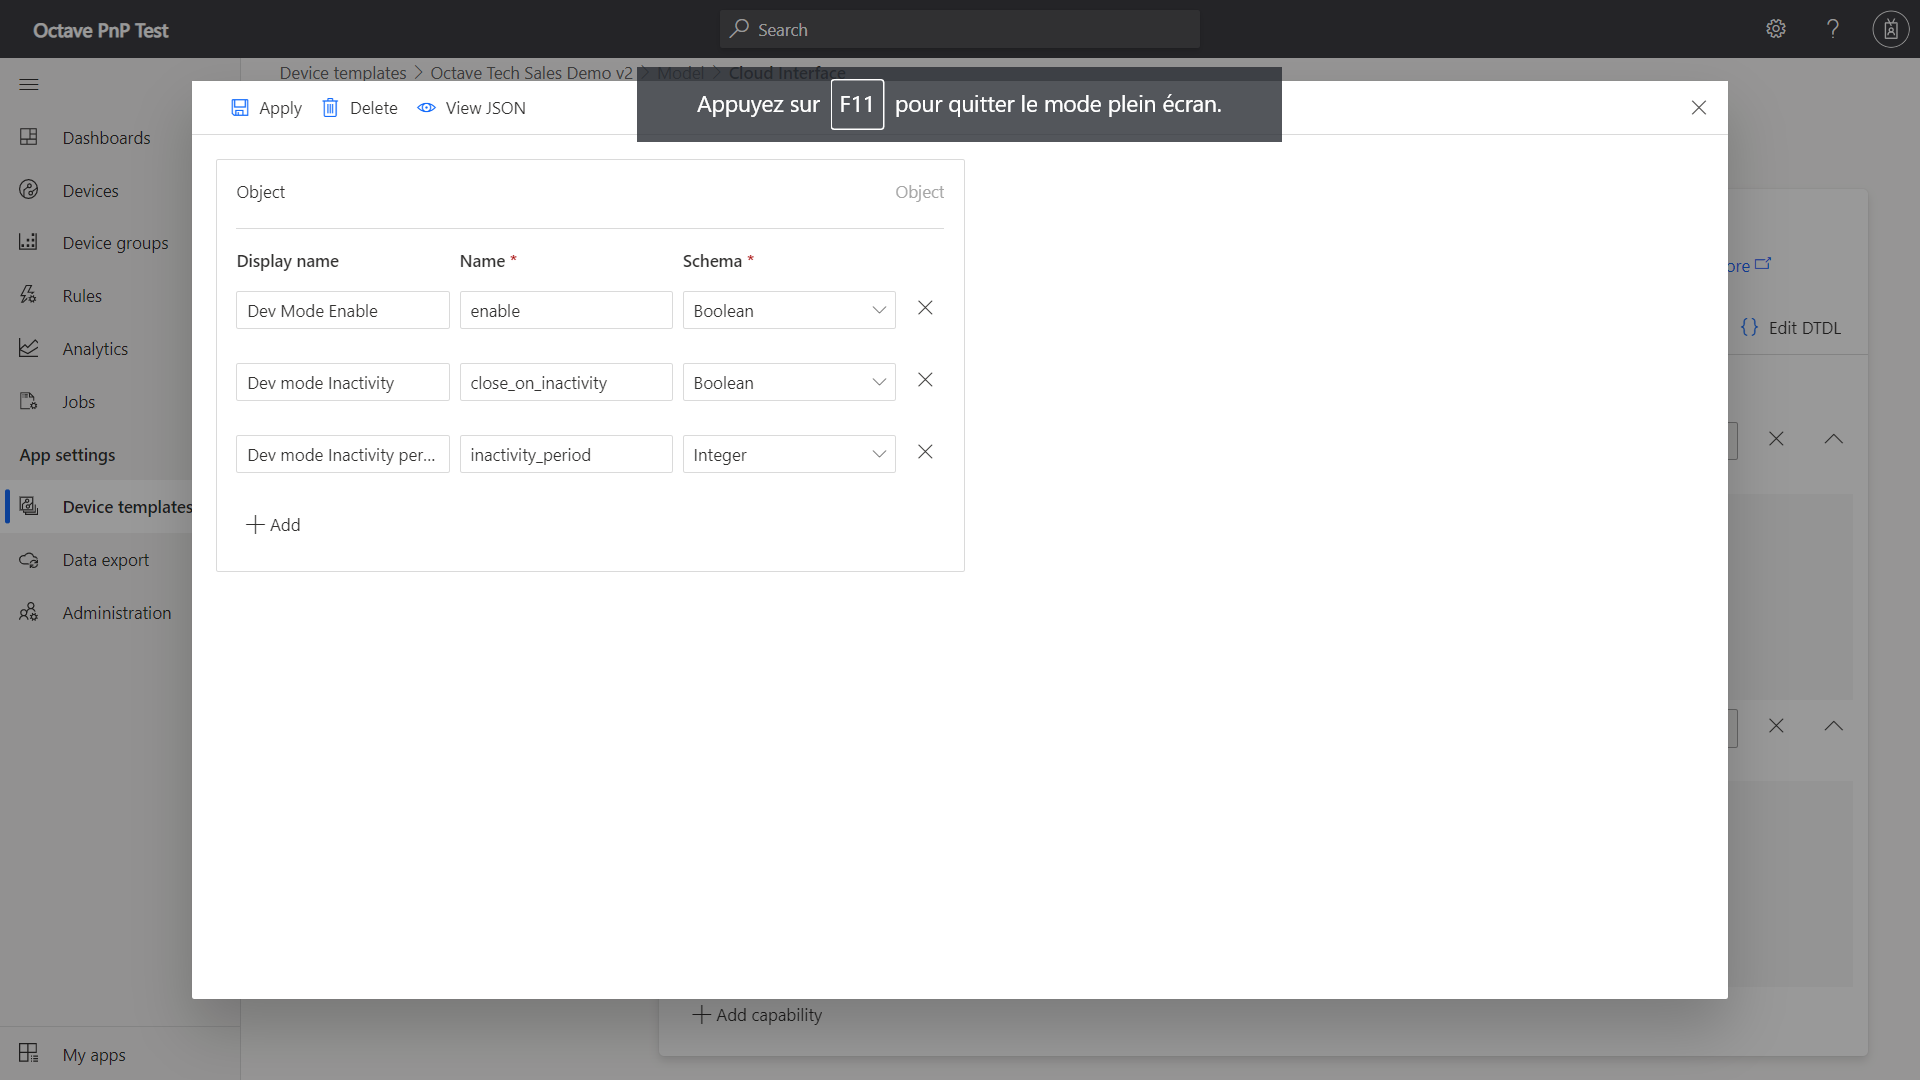
Adding the properties for Developer Mode.
- Configure your Telemetry model. The recommended approach is to send all Telemetry coming from various device streams in a payload formatted like that shown below, and to create a Telemetry type capability named "telemetry" at the root level of your PnP model.
Example of a recommended payload format:
"telemetry": {
"dewpoint": 10.7,
"alert": true,
"temperature": 23.9,
"accel": {"x":1,"y":1,"z":9}
}
In order to format the Telemetry forwarded by your connector, you can customize the "Content data" in the Connector Telemetry properties. You can use the following code snippet as an example to forward the contents of any Event under a "telemetry" key:
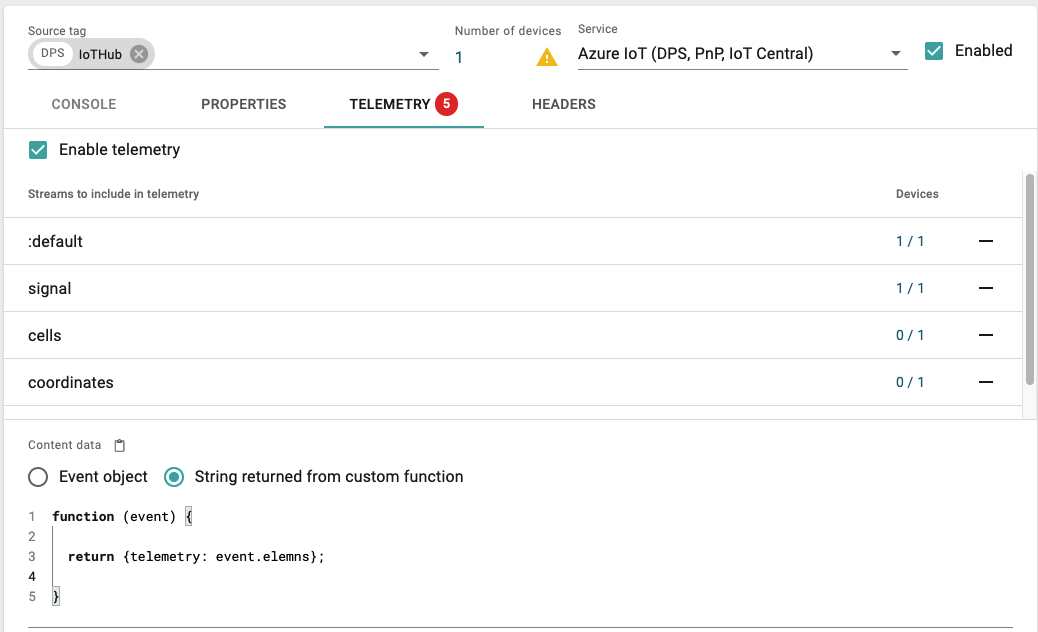
Customizing the Telemetry payload
function (event) {

	return {"telemetry": event.elems}

}
Any time you need to cascade your model a level down (as with accel in the example above) use an object property in which you define the underlying structure.
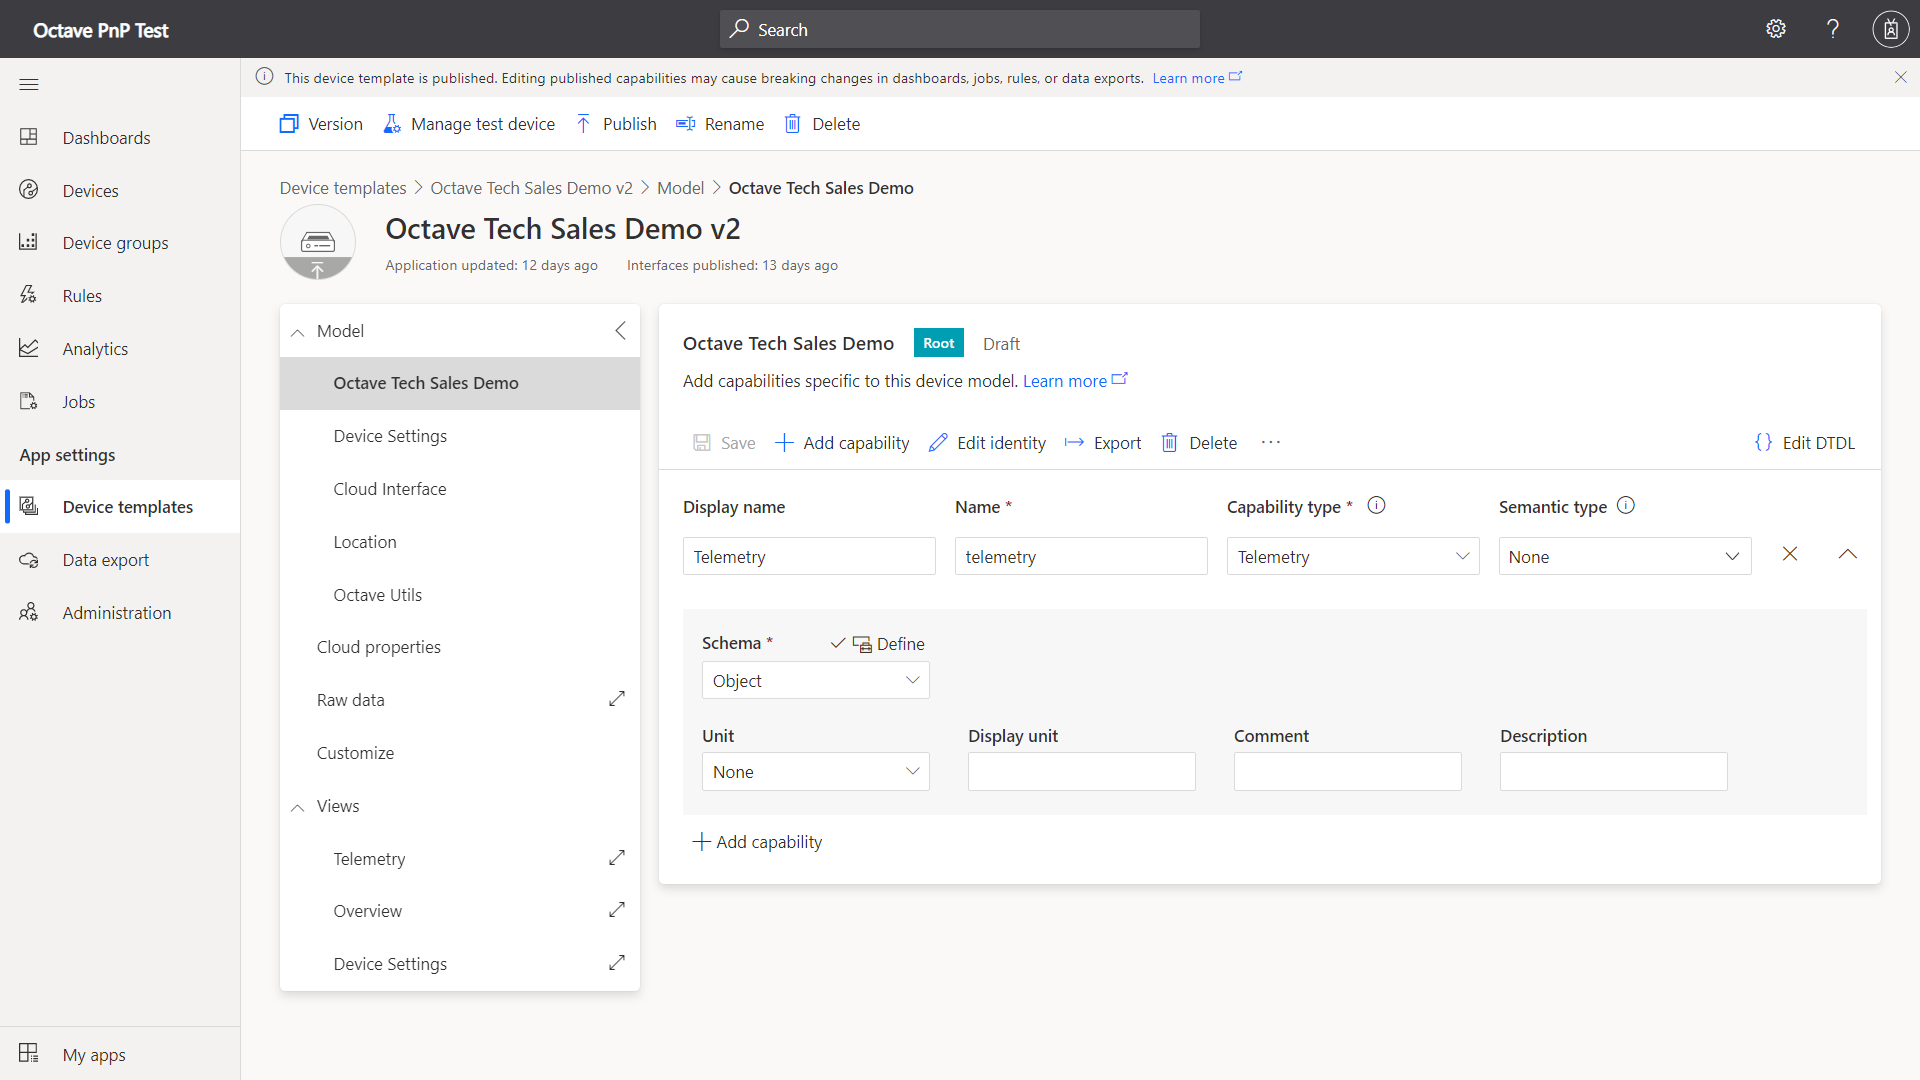
Adding an object to define the underlying structure.
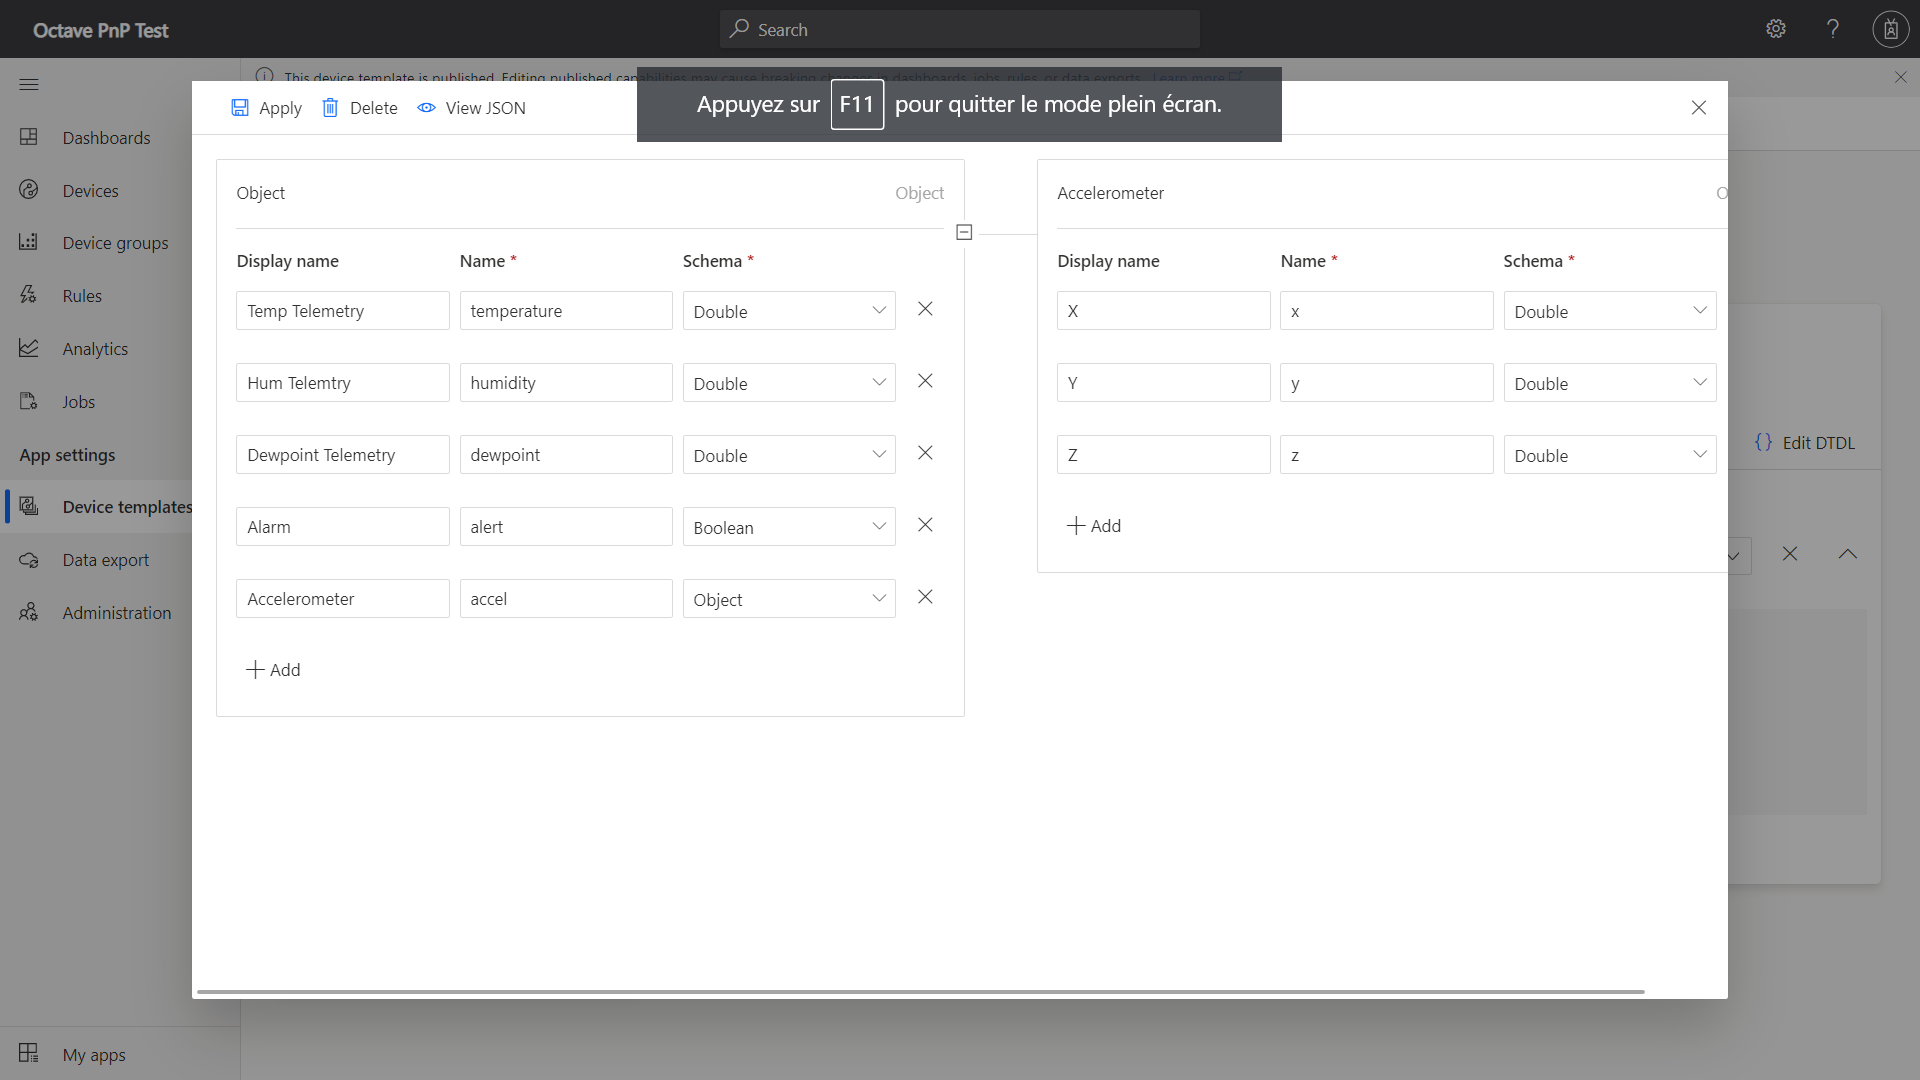
Adding the fields to the object.
A simple method is to collect data from all relevant Streams in the Connector configuration, and set the Connector's custom JavaScript to:
function (event) {

  return {"telemetry": event.elems}

}
Note
To control / view your device in IoT Central, you must create views as described here. Also, get used to updating your device template as described here.
Using a Reference Template
An alternative approach to that described in the previous section is to use the following sample template. This JSON contains a sample template that applies the above recommendations which you can copy and save to a .json file and then upload in IoT Central as a starting point. From there you can modify the configuration as required for your use case.
Example reference template:
[
{
"@id": "dtmi:octavePnpTest:OctaveTechSalesDemo339;2",
"@type": "Interface",
"contents": [
{
"@id": "dtmi:octavePnpTest:OctaveTechSalesDemo339:virtual;1",
"@type": "Component",
"displayName": {
"en": "Device Settings"
},
"name": "virtual",
"schema": "dtmi:virtual:virtual;1"
},
{
"@id": "dtmi:octavePnpTest:OctaveTechSalesDemo339:cloudInterface;1",
"@type": "Component",
"displayName": {
"en": "Cloud Interface"
},
"name": "cloudInterface",
"schema": "dtmi:octavePnpTest:cloudInterface;3"
},
{
"@id": "dtmi:octavePnpTest:OctaveTechSalesDemo339:alert;1",
"@type": [
"Telemetry",
"State"
],
"displayName": {
"en": "Alarm"
},
"name": "alert",
"schema": {
"@id": "dtmi:octavePnpTest:OctaveTechSalesDemo339:alert:schema;1",
"@type": "Enum",
"enumValues": [
{
"@id": "dtmi:octavePnpTest:OctaveTechSalesDemo339:alert:schema:alarm;1",
"displayName": {
"en": "Thresholds are exceeded"
},
"enumValue": 1,
"name": "alarm"
},
{
"@id": "dtmi:octavePnpTest:OctaveTechSalesDemo339:alert:schema:AllmeasurementsOK;1",
"displayName": {
"en": "All measurements OK"
},
"enumValue": 0,
"name": "AllmeasurementsOK"
}
],
"valueSchema": "integer"
}
},
{
"@id": "dtmi:octavePnpTest:OctaveTechSalesDemo339:location;1",
"@type": "Component",
"displayName": {
"en": "Location"
},
"name": "location",
"schema": "dtmi:location:OctaveTechSalesDemo57k;1"
},
{
"@id": "dtmi:octavePnpTest:OctaveTechSalesDemo339:util;1",
"@type": "Component",
"displayName": {
"en": "Octave Utils"
},
"name": "util",
"schema": "dtmi:util:OctaveTechSalesDemo5vo;1"
},
{
"@id": "dtmi:octavePnpTest:OctaveTechSalesDemo339:telemetry;2",
"@type": "Telemetry",
"displayName": {
"en": "Telemetry"
},
"name": "telemetry",
"schema": {
"@id": "dtmi:octavePnpTest:OctaveTechSalesDemo339:telemetry:schema;2",
"@type": "Object",
"displayName": {
"en": "Object"
},
"fields": [
{
"@id": "dtmi:octavePnpTest:OctaveTechSalesDemo339:telemetry:schema:temperature;2",
"displayName": {
"en": "Temp Telemetry"
},
"name": "temperature",
"schema": "double"
},
{
"@id": "dtmi:octavePnpTest:OctaveTechSalesDemo339:telemetry:schema:humidity;2",
"displayName": {
"en": "Hum Telemtry"
},
"name": "humidity",
"schema": "double"
},
{
"@id": "dtmi:octavePnpTest:OctaveTechSalesDemo339:telemetry:schema:dewpoint;2",
"displayName": {
"en": "Dewpoint Telemetry"
},
"name": "dewpoint",
"schema": "double"
},
{
"@id": "dtmi:octavePnpTest:OctaveTechSalesDemo339:telemetry:schema:alert;2",
"displayName": {
"en": "Alarm"
},
"name": "alert",
"schema": "boolean"
}
]
}
}
],
"displayName": {
"en": "Octave Tech Sales Demo"
},
"@context": [
"dtmi:iotcentral:context;2",
"dtmi:dtdl:context;2"
]
},
{
"@context": [
"dtmi:iotcentral:context;2",
"dtmi:dtdl:context;2"
],
"@id": "dtmi:virtual:virtual;1",
"@type": "Interface",
"contents": [
{
"@id": "dtmi:virtual:virtual:temperature_th;1",
"@type": "Property",
"displayName": {
"en": "Thresholds"
},
"name": "temperature_th",
"schema": {
"@id": "dtmi:virtual:virtual:temperature_th:schema;1",
"@type": "Object",
"displayName": {
"en": "Object"
},
"fields": [
{
"@id": "dtmi:virtual:virtual:temperature_th:schema:value;1",
"displayName": {
"en": "Temperature Threshold"
},
"name": "value",
"schema": "integer"
}
]
},
"writable": true
},
{
"@id": "dtmi:virtual:virtual:humidity_th;1",
"@type": "Property",
"displayName": {
"en": "Thresholds"
},
"name": "humidity_th",
"schema": {
"@id": "dtmi:virtual:virtual:humidity_th:schema;1",
"@type": "Object",
"displayName": {
"en": "Object"
},
"fields": [
{
"@id": "dtmi:virtual:virtual:humidity_th:schema:value;1",
"displayName": {
"en": "Humidity Threshold"
},
"name": "value",
"schema": "integer"
}
]
},
"writable": true
}
],
"displayName": {
"en": "Device Settings"
}
},
{
"@context": [
"dtmi:iotcentral:context;2",
"dtmi:dtdl:context;2"
],
"@id": "dtmi:octavePnpTest:cloudInterface;3",
"@type": "Interface",
"contents": [
{
"@id": "dtmi:octavePnpTest:cloudInterface:developer_mode;1",
"@type": "Property",
"displayName": {
"en": "Developer Mode"
},
"name": "developer_mode",
"schema": {
"@id": "dtmi:octavePnpTest:cloudInterface:developer_mode:schema;1",
"@type": "Object",
"displayName": {
"en": "Object"
},
"fields": [
{
"@id": "dtmi:octavePnpTest:cloudInterface:developer_mode:schema:enable;1",
"displayName": {
"en": "Dev Mode Enable"
},
"name": "enable",
"schema": "boolean"
},
{
"@id": "dtmi:octavePnpTest:cloudInterface:developer_mode:schema:close_on_inactivity;1",
"name": "close_on_inactivity",
"schema": "boolean"
},
{
"@id": "dtmi:octavePnpTest:cloudInterface:developer_mode:schema:inactivity_period;1",
"name": "inactivity_period",
"schema": "integer"
}
]
},
"writable": true
},
{
"@id": "dtmi:octavePnpTest:cloudInterface:store_forward;1",
"@type": "Property",
"displayName": {
"en": "Store and Forward"
},
"name": "store_forward",
"schema": {
"@id": "dtmi:octavePnpTest:cloudInterface:store_forward:schema;1",
"@type": "Object",
"displayName": {
"en": "Object"
},
"fields": [
{
"@id": "dtmi:octavePnpTest:cloudInterface:store_forward:schema:heartbeat_on_empty;1",
"name": "heartbeat_on_empty",
"schema": "boolean"
},
{
"@id": "dtmi:octavePnpTest:cloudInterface:store_forward:schema:period;1",
"name": "period",
"schema": "integer"
}
]
},
"writable": true
}
],
"displayName": {
"en": "Component"
}
},
{
"@context": [
"dtmi:iotcentral:context;2",
"dtmi:dtdl:context;2"
],
"@id": "dtmi:location:OctaveTechSalesDemo57k;1",
"@type": "Interface",
"contents": [
{
"@id": "dtmi:location:OctaveTechSalesDemo57k:coordinates;1",
"@type": "Property",
"displayName": {
"en": "Coordinates"
},
"name": "coordinates",
"schema": {
"@id": "dtmi:location:OctaveTechSalesDemo57k:coordinates:schema;1",
"@type": "Object",
"displayName": {
"en": "Object"
},
"fields": [
{
"@id": "dtmi:location:OctaveTechSalesDemo57k:coordinates:schema:enable;1",
"displayName": {
"en": "Enable Location"
},
"name": "enable",
"schema": "boolean"
},
{
"@id": "dtmi:location:OctaveTechSalesDemo57k:coordinates:schema:period;1",
"displayName": {
"en": "Location Period"
},
"name": "period",
"schema": "integer"
}
]
},
"writable": true
}
],
"displayName": {
"en": "Location"
}
},
{
"@context": [
"dtmi:iotcentral:context;2",
"dtmi:dtdl:context;2"
],
"@id": "dtmi:util:OctaveTechSalesDemo5vo;1",
"@type": "Interface",
"contents": [
{
"@id": "dtmi:util:OctaveTechSalesDemo5vo:cellular;1",
"@type": "Property",
"displayName": {
"en": "Cellular"
},
"name": "cellular",
"schema": {
"@id": "dtmi:util:OctaveTechSalesDemo5vo:cellular:schema;1",
"@type": "Object",
"displayName": {
"en": "Object"
},
"fields": [
{
"@id": "dtmi:util:OctaveTechSalesDemo5vo:cellular:schema:cells;1",
"name": "cells",
"schema": {
"@id": "dtmi:util:OctaveTechSalesDemo5vo:cellular:schema:cells:schema;1",
"@type": "Object",
"displayName": {
"en": "Object"
},
"fields": [
{
"@id": "dtmi:util:OctaveTechSalesDemo5vo:cellular:schema:cells:schema:enable;1",
"displayName": {
"en": "Cells Enable"
},
"name": "enable",
"schema": "boolean"
},
{
"@id": "dtmi:util:OctaveTechSalesDemo5vo:cellular:schema:cells:schema:period;1",
"displayName": {
"en": "Cells Period"
},
"name": "period",
"schema": "integer"
}
]
}
},
{
"@id": "dtmi:util:OctaveTechSalesDemo5vo:cellular:schema:signal;1",
"name": "signal",
"schema": {
"@id": "dtmi:util:OctaveTechSalesDemo5vo:cellular:schema:signal:schema;1",
"@type": "Object",
"displayName": {
"en": "Object"
},
"fields": [
{
"@id": "dtmi:util:OctaveTechSalesDemo5vo:cellular:schema:signal:schema:enable;1",
"displayName": {
"en": "Signal Enable"
},
"name": "enable",
"schema": "boolean"
},
{
"@id": "dtmi:util:OctaveTechSalesDemo5vo:cellular:schema:signal:schema:period;1",
"displayName": {
"en": "Signal Period"
},
"name": "period",
"schema": "integer"
}
]
}
},
{
"@id": "dtmi:util:OctaveTechSalesDemo5vo:cellular:schema:statistics;1",
"name": "statistics",
"schema": {
"@id": "dtmi:util:OctaveTechSalesDemo5vo:cellular:schema:statistics:schema;1",
"@type": "Object",
"displayName": {
"en": "Object"
},
"fields": [
{
"@id": "dtmi:util:OctaveTechSalesDemo5vo:cellular:schema:statistics:schema:enable;1",
"displayName": {
"en": "Statistics Enable"
},
"name": "enable",
"schema": "boolean"
},
{
"@id": "dtmi:util:OctaveTechSalesDemo5vo:cellular:schema:statistics:schema:period;1",
"displayName": {
"en": "Statistics Period"
},
"name": "period",
"schema": "integer"
}
]
}
}
]
},
"writable": true
},
{
"@id": "dtmi:util:OctaveTechSalesDemo5vo:sim;1",
"@type": "Property",
"displayName": {
"en": "Sim"
},
"name": "sim",
"schema": {
"@id": "dtmi:util:OctaveTechSalesDemo5vo:sim:schema;1",
"@type": "Object",
"displayName": {
"en": "Object"
},
"fields": [
{
"@id": "dtmi:util:OctaveTechSalesDemo5vo:sim:schema:info;1",
"displayName": {
"en": "Sim Info"
},
"name": "info",
"schema": {
"@id": "dtmi:util:OctaveTechSalesDemo5vo:sim:schema:info:schema;1",
"@type": "Object",
"displayName": {
"en": "Object"
},
"fields": [
{
"@id": "dtmi:util:OctaveTechSalesDemo5vo:sim:schema:info:schema:enable;1",
"displayName": {
"en": "Sim Info Enable"
},
"name": "enable",
"schema": "boolean"
},
{
"@id": "dtmi:util:OctaveTechSalesDemo5vo:sim:schema:info:schema:period;1",
"displayName": {
"en": "Sim Info Period"
},
"name": "period",
"schema": "integer"
}
]
}
}
]
},
"writable": true
},
{
"@id": "dtmi:util:OctaveTechSalesDemo5vo:time;1",
"@type": "Property",
"displayName": {
"en": "Time"
},
"name": "time",
"schema": {
"@id": "dtmi:util:OctaveTechSalesDemo5vo:time:schema;1",
"@type": "Object",
"displayName": {
"en": "Object"
},
"fields": [
{
"@id": "dtmi:util:OctaveTechSalesDemo5vo:time:schema:enable;1",
"displayName": {
"en": "Time Enable"
},
"name": "enable",
"schema": "boolean"
},
{
"@id": "dtmi:util:OctaveTechSalesDemo5vo:time:schema:period;1",
"displayName": {
"en": "Time Period"
},
"name": "period",
"schema": "integer"
},
{
"@id": "dtmi:util:OctaveTechSalesDemo5vo:time:schema:offset;1",
"displayName": {
"en": "Time Offset"
},
"name": "offset",
"schema": "integer"
}
]
},
"writable": true
}
],
"displayName": {
"en": "Octave Utils"
}
}
]
Connector Resiliency
Communication to external cloud systems can sometimes become temporarily interrupted (e.g., due to poor internet connectivity, etc.). Octave uses two mechanisms to deal with this in order to reduce and/or prevent unnecessary network traffic and handle retries:
Retry Timer
When a request to an external system fails, Octave performs a series of retries in an attempt to successfully fulfill the request. It does this using an exponential back-off (aka elastic) timer to gradually find an acceptable retry rate. This consists of five retries, where each occurs after the following periods: 1 second, 10 seconds, 100 seconds, 1,000 seconds, and 10,000 seconds.
Circuit Breaker
Octave also has a circuit breaker to disable the Cloud Connector if too many errors occur across that Cloud Connector's Events. Octave tracks the percentage of errors and disables the Cloud Connector when there are 10% errors on at least 100 events. This is computed on a 100-Event sliding window, and requires a minimum of 100 events.
A Cloud Connector can be Closed (working), Open (disconnected) or Half-open (trying to go to Closed state again). After the circuit breaker opens the Cloud Connector, it will remain in the Open state for five minutes before returning to Half-open. It will then make 10 attempts in Half-open state to return to Closed. If there are fewer than 10% errors on 100 or more events then it transitions to Closed, otherwise it transitions to Open.
If the Cloud Connector transitions from Half-open to Open three times, then it automatically remains in the Open state and becomes disabled.
Stats Screen
To help you monitor and track errors for Cloud Connectors, the Cloud Connector screen includes a rich statistics screen that can be accessed by clicking the stats button at the bottom:
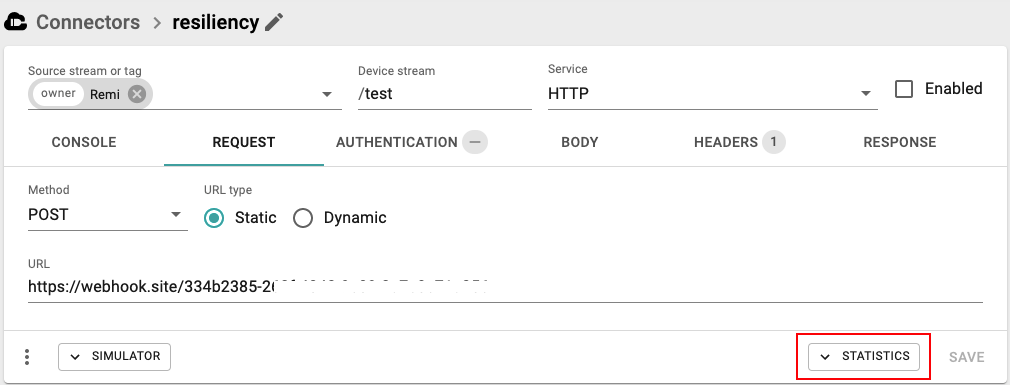
This displays graphs with the following information and features:
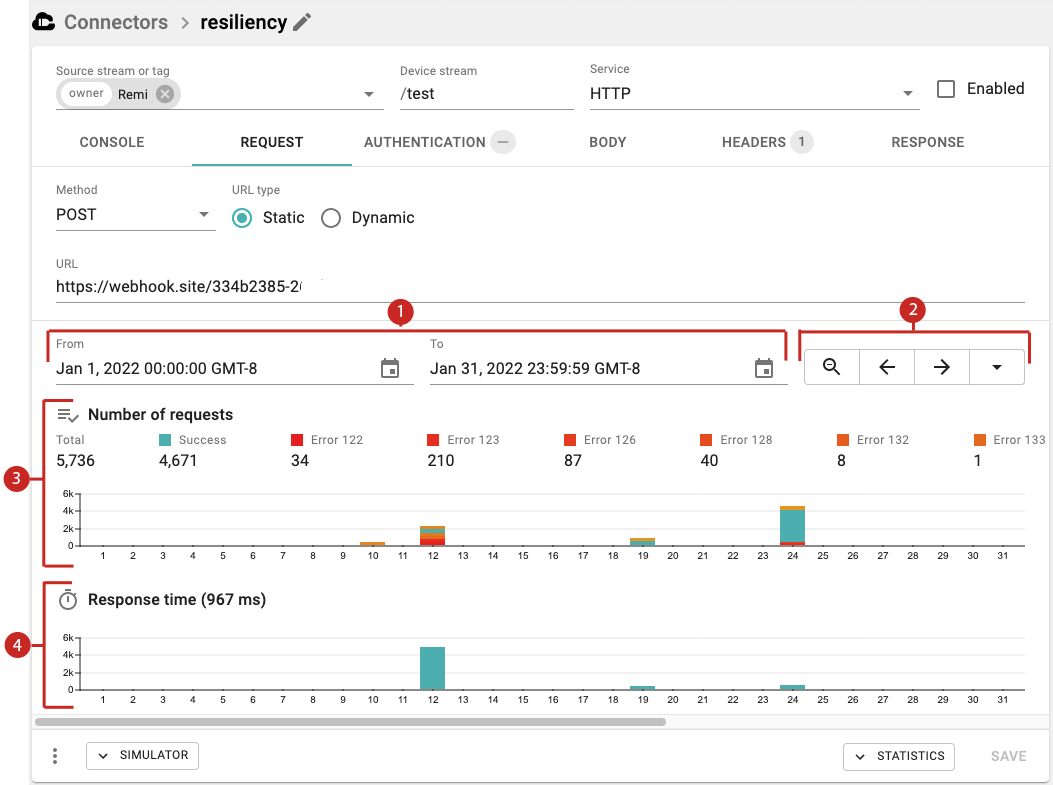
- From / To: Specifies the date/time range for which to display statistics for the Cloud Connector. The default is the current month. Click the calendar icons to specify different start/end dates and/or times.
- Date Range Controls: Provides the following functionality to change the current date/time range:
- Zoom out (magnifying glass icon): Zooms the graph out one level (e.g., if the current date/time range is for the current month, clicking this button will change the date/time range to the current year).
- Left/Right: Navigates to the next or previous date/time range (e.g., the next or previous month).
- Range dropdown: Allows you to set the date/time range to the current month or year, last 3 months, or last 12 months.
- Number of requests: Displays the following for the current date/time period:
- A legend with the total number of requests including the number of successful requests and as well as specific errors and each error's number of occurrences. Each type of error is assigned a unique color.
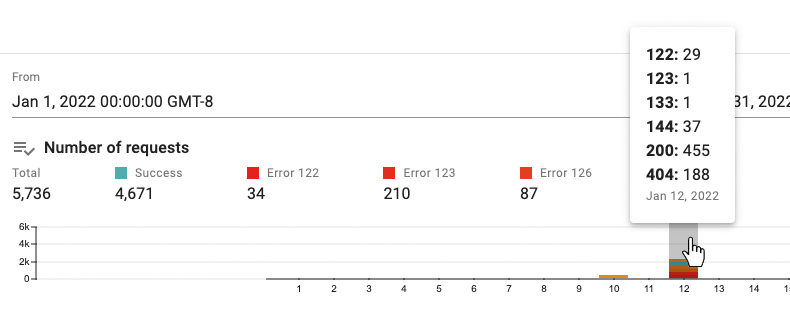
- A graph showing when the successful requests and errors occurred over the current date/time range. Each colored result depicted in the graph's bars corresponds to the items in the legend. You can hover over a bar in the graph to show a popup of specific errors for that month and the number of occurrences.
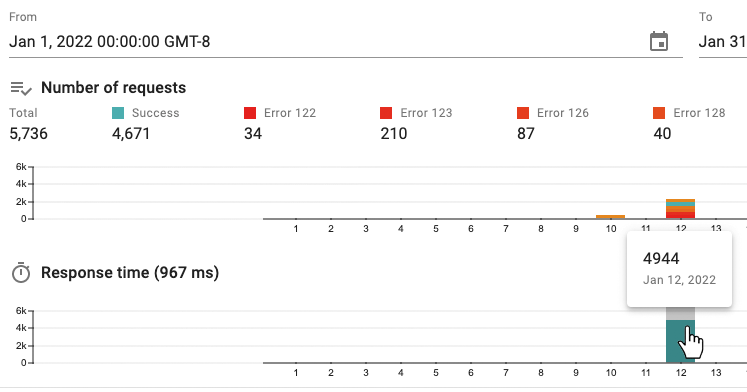
- Response Time: Displays the average response time for each period (e.g., day) within the specific date/time range. You can hover over each bar in the graph item to show a popup displaying the specific response time.
Note
You can also click on a bar in the graphs to zoom into the date/time range represented by that bar.
Creating a Cloud Connector via the Octave REST API
You can also programmatically create and manage cloud connectors using Octave's Cloud REST API . For more information see:
Setting up Connections to Third-Party IoT Platforms
Some third-party platforms can be integrated with Octave using Cloud Connectors so that Octave devices can communicate with those platforms. Below are URLs to the documentation provided by these third parties to set up these Connectors:
Updated over 3 years ago
