Timer Resources
Overview
This topic describes the Timer Resource available in Octave Edge Devices running firmware 3.1.0+.
The /timer/config Resource allows you to create up to 50 timers on which you can create Observations to invoke some action.
Usage Examples
The following are example use cases for employing a Timer:
- execute an Edge Action periodically.
- execute a routine when an Event has not arrived within a certain amount of time.
- do n measures of a sensor spaced by x minutes every y hours.
Creating a Timer
Follow the steps below to create a Timer:
- Navigate to Build > Device > Resources.
- Locate the
/timer/configResource. - Modify the JSON to include one or more fields, each defining a unique timer name and an object that defines the timer's properties. For example, the following shows the JSON to create two timers:
{
    "my_timer1" : {"period" : 10, "repeat":1, "autostart" : true},
    "my_timer2" : {"period" : 5.5, "repeat":0, "autostart" : false},
    "my_simple_timer" : {"period" : 60}
}
The properties to configure a timer are as follows:
- "period" : (mandatory) the length of time, in seconds, to run the timer for. The value must be positive.
- "repeat" : (optional) specifies how many times the timer will repeat. The value must be an integer set to 0 or higher. A value of 0 means to repeat indefinitely. A value of 1 causes the timer to run only once. If the property is not indicated in the configuration then the timer will run only once.
- "autostart" : (optional) if set to false, the timer needs to be manually triggered using a command (described below). If set to true, the timer is started automatically at system start. If the property is not indicated in the configuration then the timer needs to be manually started.
- Save the
/timer/configResource. After saving, a new Timer Resource will exist for each timer defined, where each is named according to the name(s) provided in the configuration (e.g., my_timer1, my_timer2, etc.).
Commanding and Viewing the Timer
Each Timer Resource contains the following:
-
<timer_name>/command: allows you to enter commands in string format for the timer.start: starts the timer. It has no effect if the timer is already running.stopstops the timer.restart: restarts the timer from 0.
-
<timer_name>/state/value: indicates the current state of the timer ("idle" or "running"). -
<timer_name>/value: this Resource is updated every time the timer fires. It contains the number of times the timer expired. Its default value is 0, and will also be 0 when a timer starts.
Observations attached to a timer
As <timer_name>/value Resource takes value 0 when the Timer is started or restarted, an Observation attached to this Resource will be called repeat+1 times.
Using the Timer
After a Timer Resource has been created and configured, you can then Create an Observation on that Timer's <timer_name>/state/value and/or <timer_name>/value properties to Stream Events. You can then create an Edge Action to perform logic in response to those Events.
Daisy Chaining Timers
Timers can be daisy chained so that one timer triggers another. This can be useful for cases where some operation needs to be invoked periodically, and the operation has multiple steps to perform (e.g., to take multiple Sensor readings).
In this section we show how to set up a pair of timers on an Octave Edge Device to accomplish this. The first Timer will fire automatically ever hour. When this timer fires, it will start a second timer that fires five times, each 10 seconds apart to read from a Sensor. To accomplish this, we we'll create Observations to detect when the Timers fire, and Edge Actions which are invoked by the Observations to perform the logic (i.e., to start the second Timer and to read from a Sensor).
Follow the steps below to implement this daisy-chained Timer configuration:
-
Ensure you have configured and enabled an Input pin on the Octave edge device from which you will read Sensor data. In this example, we'll use ADC0.
-
Create two Timers using the following configuration. Timer t1 will fire every hour, and Timer t2, will be started by the first timer:
{
    "t1" : {"period" : 3600, "repeat":0, "autostart" : true},
    "t2" : {"period" : 10, "repeat":5}
}
-
Create an Observation for the first timer called 1_h_timer_obs. Configure it to observe /timer/t1/state/value and send its Events to an Edge Action.
-
Create an Observation for the second Timer called sensor_read_obs. Configure it to observe /timer/t2/state/value and send its Events to an Edge Action.
-
Create an Edge Action for the first Observation, set its Source Observation to 1_h_timer_obs, and enter the following code. This code is invoked when the first timer (t1) fires and instructs Octave to start the second timer (t2):
function(event){
	// This is the moment to star the measurements
	// Start timer t2
	return{
		"dh://timer/t2/command": ["start"]
	}
}
- Create an Edge Action for the second Observation, set its Source Observation to sensor_read_obs, and enter the following code. This code filters out the the Timer value of 0, then reads the value of input ADC0, and sends that value to the Octave Cloud Stream:
function(event){

	// Skip the 0 timer value
	if(event.value == 0)
	{
		return {};
	}

	// Get the sensor value
	var adcValue = Resource.readValue("/io/ADC0/value");

	// Push the value to the cloud
	return {
		"cl://" : [ {"adc0" : adcValue} ]
	};
}
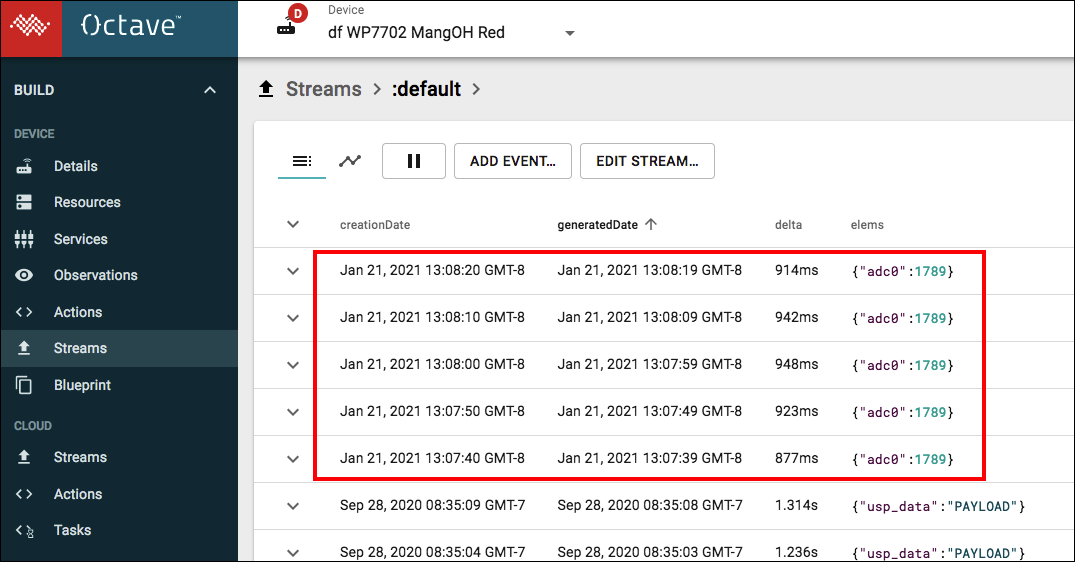
- Verify that the set up works by navigating to Device > Streams and selecting the :default Stream. You should see five Events corresponding to the five times that the second Timer fired, each showing a Sensor reading, in this example, for ADC0:

Updated over 3 years ago
