Determining Online/Offline Device State
Octave does not have a formal mechanism to “track” the online/offline status of Octave-enabled devices. Rather, it knows the time of the last communication for a given device through the device’s lastSeen attribute which is displayed on the Device screen in the Octave dashboard. The value of this attribute may be updated periodically when the device communicates (i.e., sends data) or when a device’s heartbeat occurs. However, communications over networks can be intermittent or the heartbeat period may vary due to how it has been configured by the user, so relying on such information to update the lastSeen attribute does not validate end-to-end connectivity.
Given these constraints, you can use the methods below to check the online/offline status of Octave-enabled devices. Method 1 includes a simple visual inspections of the Last seen field. However, this can then be followed up by other methods which provide more reliable approaches for determining the online/offline status on-demand.
Method 1 - Using the Dashboard to Check the Status
The following subsections provide methods for identifying device status within the Octave Dashboard.
Method 1a: A Simple Visual Inspection of the Device Report
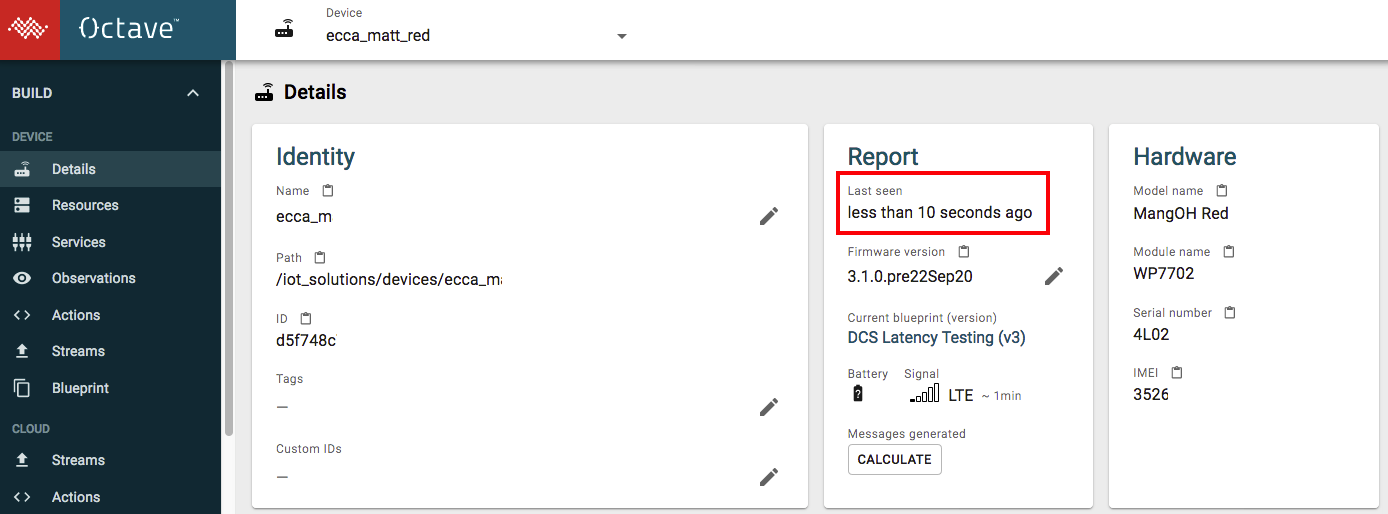
The simplest method to verify if a device is online or not is to view the Last seen field on the Build > Device > Details screen in the Octave Dashboard:

Generally the value for Last seen will range from a few seconds to Less than a minute ago depending on the device's connectivity speeds. Reported values which are longer than expected for a specific device may suggest that the device is offline.
Method 1b: Using the Device Monitoring Screen
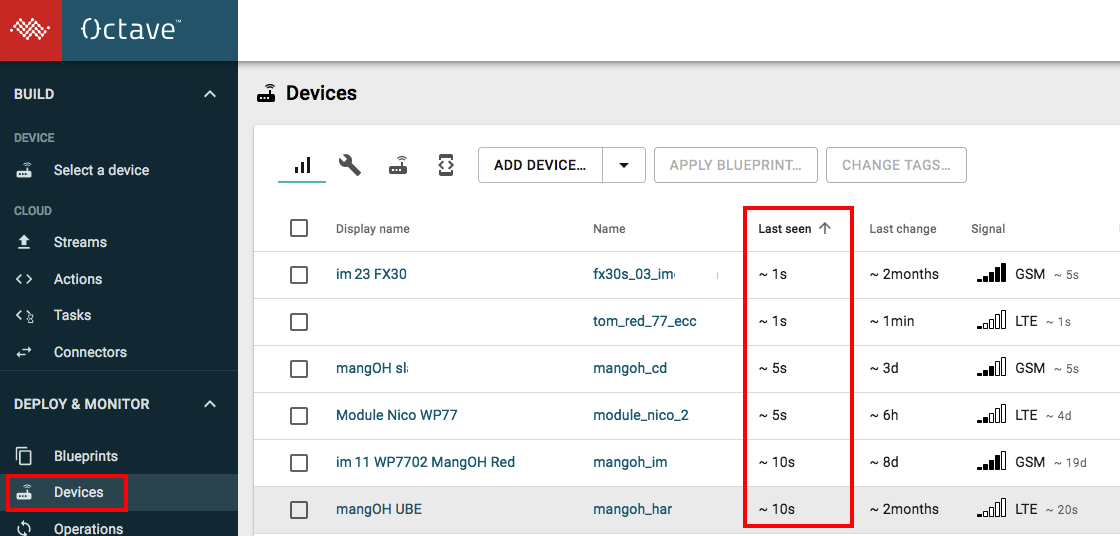
You can also view the Last seen field for devices in your deployment using the Device Monitoring screen:

Method 1c: Create a Task in the Dashboard to Continually Check the "Last Seen" Value
- Create a Stream under your company (e.g.,
/my_company/offline). - Create a Task.
- Enter the following code into the Task's function, replace the appropriate parts of the string:
/my_company/offlinewith the name of your company and the name of the Stream you created in Step 1, and save the Task. This function watches for devices which have been offline for five minutes and adds Events containing their device IDs to the/my_company/offlineStream:
function (events, raw)
{
	// A threshold of 5 minutes
   var offlineThreshold = Date.now() - (5 * 60 * 1000);

   // After a device has been offline for this time, we no longer need to report.
   // Note - you should expect some duplicates with this threshold.
   var alreadyReportedThreshold = Date.now() - (8 * 60 * 1000);

   var filterString = 'lastSeen<' + offlineThreshold + '&&lastSeen>' + alreadyReportedThreshold;

   var devices = Octave.Device.find({'filter' : filterString});
   var deviceIds = _.map(devices, function (device){ return device.id; });

   var result = {};
   if (deviceIds.length > 0){
       var event =  {
           elems : {
              'devices' : deviceIds
           }
        };
        result['/my_company/offline'] = [event];
   }

   return result
}
- Wait for the Task's periodicity to elapse.
- Navigate to Cloud Streams > <your_company> and select the Stream you created in Step 1. The Stream should contain one or more Events generated by the Task which look similar to the following output. The
deviceselement contains the list of device IDs which have been offline for atleast five minutes:
{
  "creationDate": 1610393109754,
  "creatorId": "i5b2...",
  "elems": {
    "devices": [
      "d5f..."
    ]
  },
  "generatedDate": null,
  "hash": null,
  "id": "e5ff...",
  "lastEditDate": 1610393109754,
  "lastEditorId": "i5b2...",
  "location": null,
  "metadata": null,
  "path": "/my_company/offline",
  "streamId": "s5f5...",
  "tags": {
  }
}
Method 2 - Create a Task Using the Octave REST API to Continually Check the "Last Seen" Value
You can create a Task using Octave's REST API to continually check the lastSeen property of one or more devices.
The following steps show how to set up a Timer function that detects devices which have been offline for 5 minutes.
- Open a command-line window and start constructing the cURL command to create a Task for your company's deployment:
curl -X "POST" "https://octave-api.sierrawireless.io/v5.0/my_company/task" \
    -H 'X-Auth-Token: <your token here>' \
    -H 'X-Auth-User: <your user name here>' \
    -H 'Content-Type: application/json; charset=utf-8' \
    -d $'{ \
	    "destination": "/my_company/task_output", \
    	"periodicity": "60000", \
      "js" : "<enter script here>"\
    	"displayName": "A sample task" \
	}'
Notes
- The values for
X-Auth-TokenandX-Auth-Usercan be found on the user screen in the Octave Dashboard.- The
periodicityof 60000 milliseconds means the task will fire every 60 seconds.
- Replace
<enter script here>for thejsfield with a script to continually check the lastSeen property of one or more devices. For additional information on adding functions to Tasks and formatting them through cURL, see Adding Code to a Task.
The following example script invokes Octave.Device.find() passing in a filter to return all devices which have been offline for 5 minutes. The script then gets the IDs of these devices and reports them to the company's cloud Stream (/my_company/offline):
function (){

    // A threshold of 5 minutes
    var offlineThreshold = Date.now() - (5 * 60 * 1000);

    // After a device has been offline for this time, we no longer need to report.
    // Note - you should expect some duplicates with this threshold.
    var alreadyReportedThreshold = Date.now() - (8 * 60 * 1000);

    var filterString = 'lastSeen<' + offlineThreshold + '&&lastSeen>' + alreadyReportedThreshold;

    var devices = Octave.Device.find({'filter' : filterString});
    var deviceIds = _.map(devices, function (device){ return device.id; });


    var result = {};
    if (deviceIds.length > 0){
       var event =  {
           elems : {
              'devices' : deviceIds
           }
        };
        result['/my_company/offline'] = [event];
    }

    return result
}
Note
Replace
my_companywith the name of your company shown in the Octave Dashboard.
- Execute the cURL command with the updated script.
- Note the
IDIn the response, which will be used in a subsequent step. - Navigate to the Build > Cloud > Streams screen in the Octave Dashboard and expand /:inbox/tasks.
- Verify that an Event is being generated by the Task every 60 seconds where the value of its elems > sourceId field matches the value of the
IDfield identified in Step 4. This means the Timer is running your code every 60 seconds. - Unplug a device and wait 5 minutes.
- While still on the Build > Cloud > Streams screen, navigate to <your company name> > offline. After the device has been off for 5 minutes, an Event should be generated here by the function specified in your Timer that lists the IDs of the device(s) which have been offline for 5 minutes. These device IDs will be listed in
elems>devices. For example, the following Event lists one device ID starting withd5c...:
{
  "creationDate": 1600980955446,
  "creatorId": "i5b2...",
  "elems": {
    "devices": [
      "d5c..."
    ]
  },
  "generatedDate": null,
  "hash": null,
  "id": "e5f...",
  "lastEditDate": 1600980955446,
  "lastEditorId": "i5b2...",
  "location": null,
  "metadata": null,
  "path": "/my_company/offline",
  "streamId": "s5f5...",
  "tags": {
  }
}
Method 3 - Using Command Notifications
You can test for online/offline status by sending a command to a device from the cloud and then watching for Events related to that command using a cloud-side script in Octave (Cloud Action, Cloud Connector, or WebSocket).
You can have your cloud-side script (e.g., Cloud Action) send a notification to a webhook on your external cloud system when the COMMAND_START action is received in the Event, and then have your external cloud system's code watch for a subsequent Event with a COMMAND_COMPLETE action indicating that the device is online. Your external cloud system's code can also start its own countdown so that if a subsequent event with the COMMAND_COMPLETE action is not received within a certain amount of time, then the device should be considered offline.
Alternatively you can include a time-to-live parameter within the Event, after which Octave will send another Event with the COMMAND_FAULT action, indicating that Octave was unable to send an Event to the device and therefore the device is likely offline.
Follow the steps below to implement this strategy using a Cloud Action:
- Create a Cloud Action setting its Source Stream or tag to the inbox Stream of your device (e.g.,
/my_company/devices/mangoh_jsmith/:inbox). - Implement the logic for your Cloud Action to watch for different values of
event.elems.action. In the example below, the code watches for different values ofevent.elems.actionand POSTs an appropriate string to a third-party cloud system:
function(event) {

  //set up the URL for your webhook - replace the URL with your own:
	var url = 'https://www.myexternalcloudserver.com/test';
	var payload;

	//check for specific COMMAND_FAULT in event indicating that the command timed out
	//note that you could optionally include other information related to the command such as the target device ID, stream ID etc.
	if(event.elems.action == "COMMAND_FAULT")
	{
	    payload = {'my_cmd_result': 'The command failed'};
	}
	else
	{
		//otherwise send the command action as is, which could be COMMAND_START or COMMAND_COMPLETE
		payload = {'my_cmd_result': event.elems.action};
	}

	var postBody = JSON.stringify(payload);

	var postHeaders = {
		'Content-Type': 'application/json'
	};

	//POST a message to your external cloud system with a payload containing the result of the command
	var result = Octave.Http.post(url, postHeaders, postBody);
}
- Follow the steps below to send a command to the device over a Cloud Stream using the Octave Dashboard:
a. Navigate to Build > Cloud > Streams
b. Expand /<your company>/devices/<your device name>/:command.
c. Click Add event and enter the following code replacingmangoh_jsmithwith the name of your device:
{
  "path": "/my_company/devices/mangoh_jsmith/:command",
  "streamId": "s5c7...",
  "metadata" : {"ttl":5000}
}
The values are set as follows:
path: the path to the Command Stream for the device.streamId: the ID of the device's Command Stream. You can get this ID from the URL of your browser window while you're on the Command Stream listing screen for your device (e.g.,https://octave.sierrawireless.io/cloud/streams/d5c75...).metadata(optional): by defining a field namedttlwithinmetadata, you can configure the time-to-live, in seconds, after which Octave will send another Event to the device's Command Stream withactionset toCOMMAND_FAULT.
Note
If a TTL is not specified, the command will wait for many days before failing. Therefore, a TTL with a reasonable value must be specified.
For additional information about specifying a TTL, see Sending an Individual Command.
Upon saving the Event, Octave will attempt to send it to the device's command Stream. The Cloud Action created in Step 2 will be invoked and will send a message to the external cloud system with my_cmd_result set to COMMAND_START.
If the Event is successfully delivered to the device, the Cloud Action will be invoked a second time and will send another message to the external cloud system with my_cmd_result set to COMMAND_COMPLETE.
If ttl was included in the Event and Octave was unable to successfully deliver the Event to the device, then the Cloud Action will be invoked after the time-to-live period and will send a message to the external cloud system with my_cmd_result set to The command failed.
Updated over 4 years ago
