Managing Resources via the Octave Dashboard
This topic describes how to work with Resources via the Resources screen in the Octave dashboard.
The Resources screen on the Octave Dashboard user interface (accessible by navigating to Build > Device > Resources) allows you to view and manage the Resources on your device.
Notable User Interface Elements
Main Controls and Layout of the Resources Screen
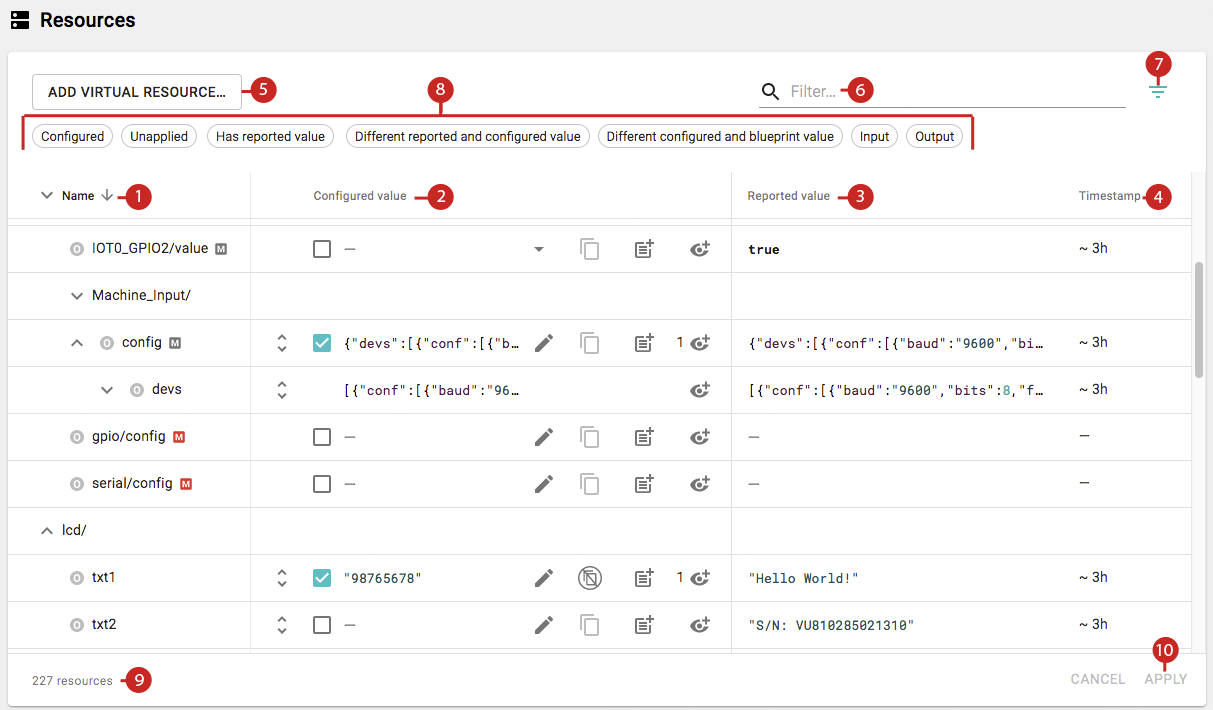
The following screenshot shows the main elements of the Resources screen for viewing and working with Resources:

- Name: displays the names of the Resources on the device. For additional information see Identifying an Element as a Resource or a Property below.
- Configured: displays the value that each Resource is configured with, along with a number of icons for editing Resources and identifying their state.
- Reported value (available only in non-Developer Mode): displays the last value reported by the device for that Resource.
- Timestamp (available only in non-Developer Mode): indicates how long ago the value for that Resource was updated.
- Add Virtual Resource: creates a new Virtual Resource.
- Filter: filters the list to include all Resources whose names contain the specified string. For additional information see Filtering Resources below.
- Filter Options Toggle: displays the filter options (described next).
- Filter Options: options for filtering the list based on the following criteria:
- Configured: shows Resources which have been modified and are about to be saved to a Blueprint using the Apply button.
- Unapplied: shows Resources whose Configured value have been modified but haven't been saved yet using the Apply button. This is useful for seeing all changes you're about to apply.
- Has reported value: shows only those Resources which have a value in the Reported value column.
- Different reported and configured value: shows Resources where the Configured value differs from the last Reported value. This is useful for checking that the values being reported align with the configured value (e.g., that a reported value is within an expected range, when configuring a value).
- Different configured and blueprint value: shows Resources where the Configured value differs from the device's Blueprint value.
- Input: shows Input Resources.
- Output: shows Output (Actuator) Resources.
- Resource Count: displays the total number of Resources on the current device.
- Apply: applies all changes that have been made to the Resource(s). This button will only be available if a change has been made to at least one Resource.
Resource Icons
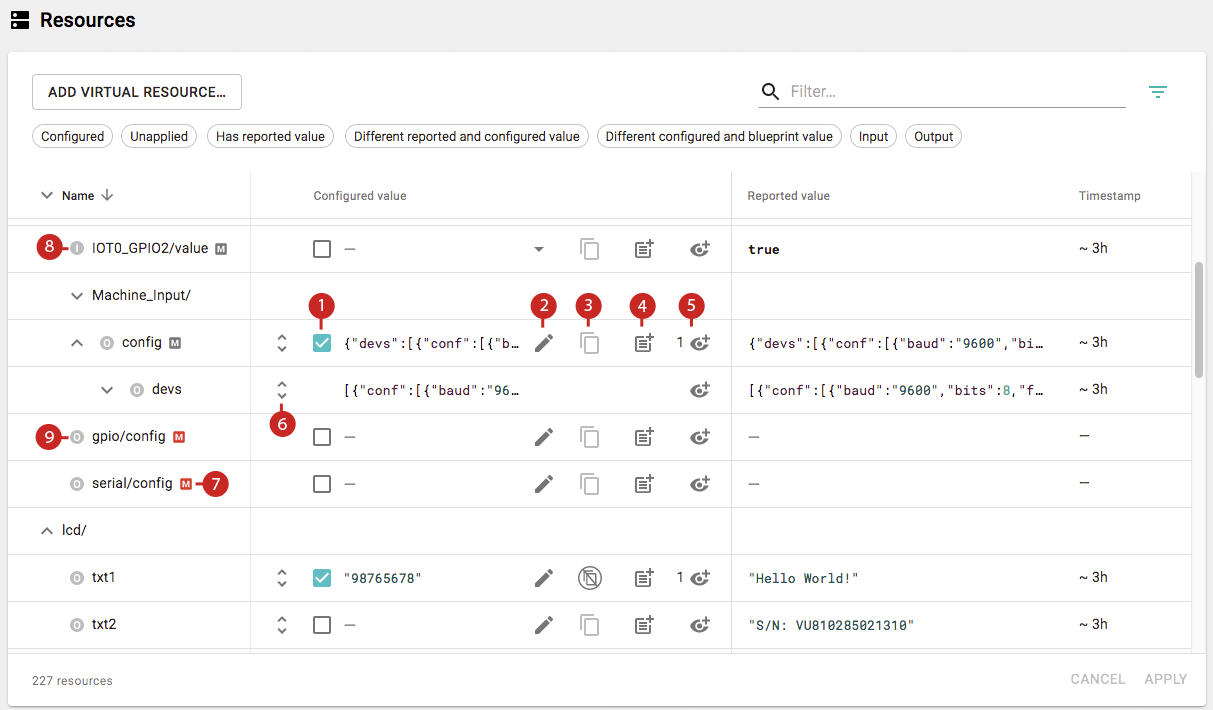
The following screenshot shows the key user interface elements on the Resources screen that help you to manage your Resources:

- The checkmark indicates that a value has been set for the Resource. Clearing the checkmark will clear the value. Note that you will then need to click Apply to commit the clearing of the value.
- The edit icon allows you to configure the value of the Resource. You can edit the values of multiple Resources before you click Apply.
- Indicates if the Configured value in the Blueprint has been applied to the device. In the following screenshot, the first icon indicates that the value has been applied to the device's Blueprint, while the second icon indicates that the value has not been applied to the device's Blueprint:

- Sends a command to a device to temporarily change a value.
- The eye icon indicates if there are one or more Observations on the device to monitor that Resource. If a number appears to the left of the icon, it indicates the total number of existing Observations for that Resource. You can click the icon to add another Observation for that Resource.
- Expands the value for the Resource. For example, if the value is in in JSON format, Octave will format and display it across separate lines.
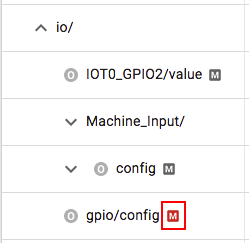
- "M" indicates that the property can be manually set. The icon will be red if the property is required in order for its parent to work. For example in the following, config must set in order for the gpio and serial Resources to work:

- The I icon indicates that the Resource is an input.
- The O icon indicates that the Resource is an output.
Notes
- The Resource screen is not updated in real time.
- In Developer Mode, values for all Resources are updated every minute.
- In normal (non-developer mode), only Resources with Observations will be updated.
- When using Blueprints, all devices will end up with same configured default values for their Resources at startup.
Identifying an Element as a Resource or a Property
With all of the elements shown on the Resources screen, it can sometimes be difficult to quickly distinguish which elements represent Resources and which elements represent properties of Resources. Below are two quick tips to help you make this distinction.
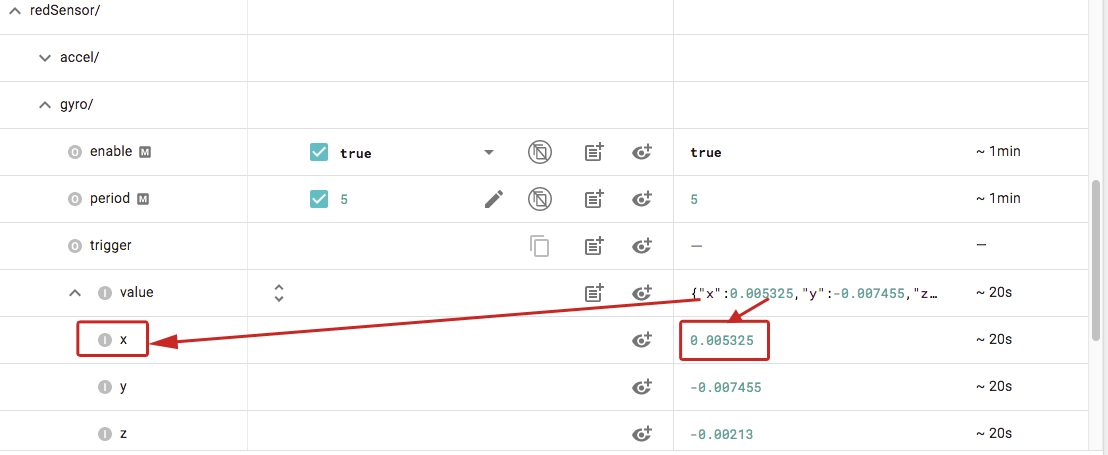
A Parent Element Is a Resource if it's an Object
If a parent in the hierarchy is an object, then it is a Resource and the child element is a property. For example, in the following image, x is a property of a Resource named value (its full path is /redSensor/gyro//value):

A Property Doesn't Have a Send Command
If an element is a property, then no Send button/icon will be displayed for that element, since commands can only be sent for Resources. The following example highlights the lack of a send button for the x property:

Filtering Resources
The search field on the Resources screen, allows you to filter the list of Resources shown:

In the screenshot above, gpio was entered to filter the list to show all Resource tree items representing GPIO entries. The filter can also be used to find all tree items with a given property. For example, entering enable will filter the list to show all tree entries that have the property enable.
Setting a Resource's Value
There are a number of options for changing the values of Resources, both temporarily and permanently (i.e., modifying the default device configuration values), as described in Controlling Device Properties.
Updated over 4 years ago
