Adding and Removing Devices
This page provides information on how to add and remove Octave edge devices in your Octave deployment.
Adding an Octave Edge Device to Your Deployment
Follow the steps below to add an Octave edge device to your Octave deployment:
- Access the Activate a Device screen using one of the following methods:
- Navigate to Build > Device > Details, click on the Device dropdown, and click Add Device:
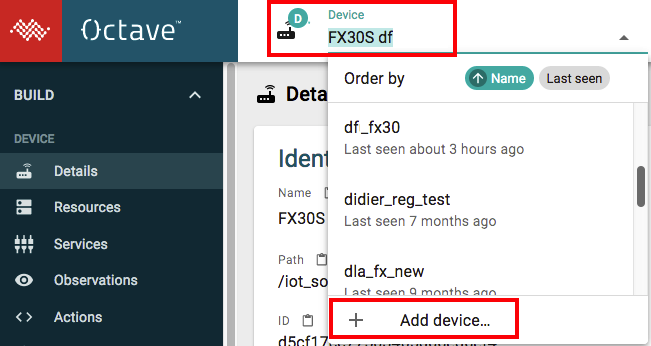
- Navigate to Deploy & Monitor > Devices and click Add Device:

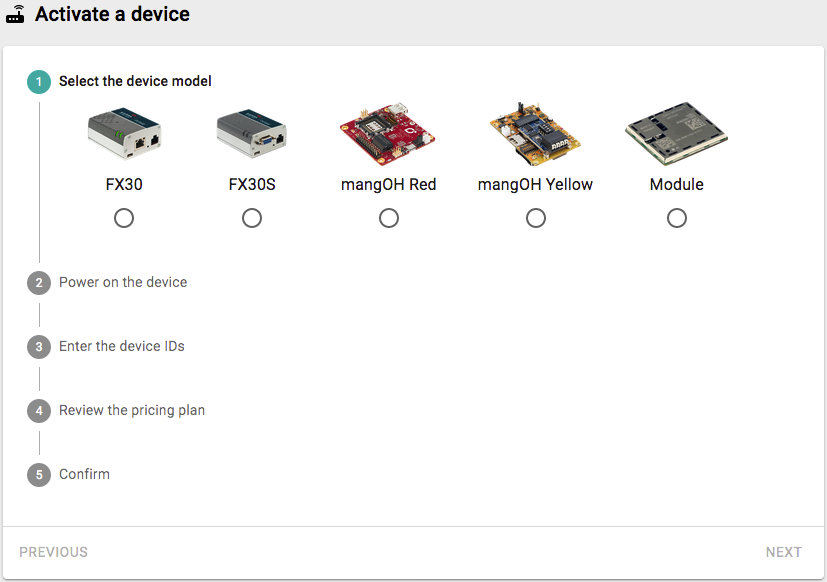
- Follow the steps on the Activate a Device screen:
Add Multiple Devices to Your Deployment in Bulk
Follow the steps below to add multiple Octave edge devices to your Octave deployment in bulk:
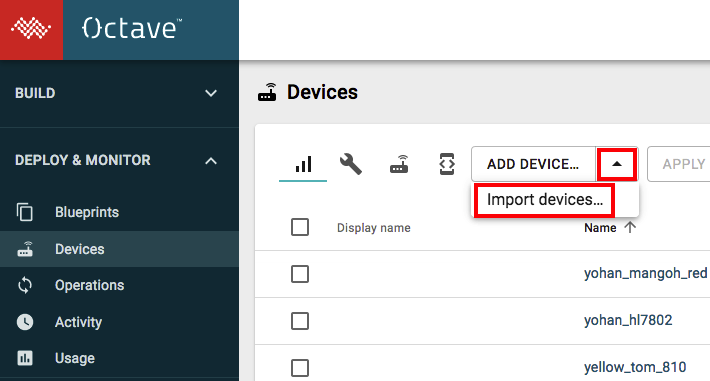
- Navigate to Deploy & Monitor > Devices, click the dropdown beside Add Device, and select Import devices:
- Perform one of the following steps:
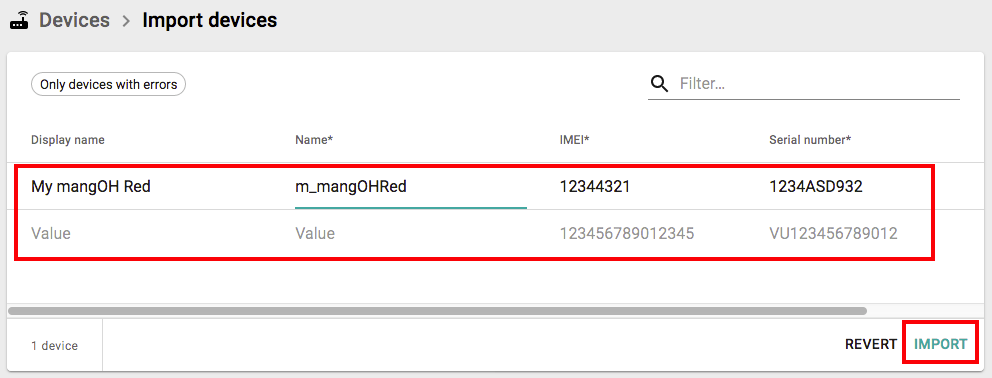
- Manually enter the information for each device and click Import:
- Drag or click (1) to upload a CSV file containing the information for up to 500 devices to import and then click Import (2):
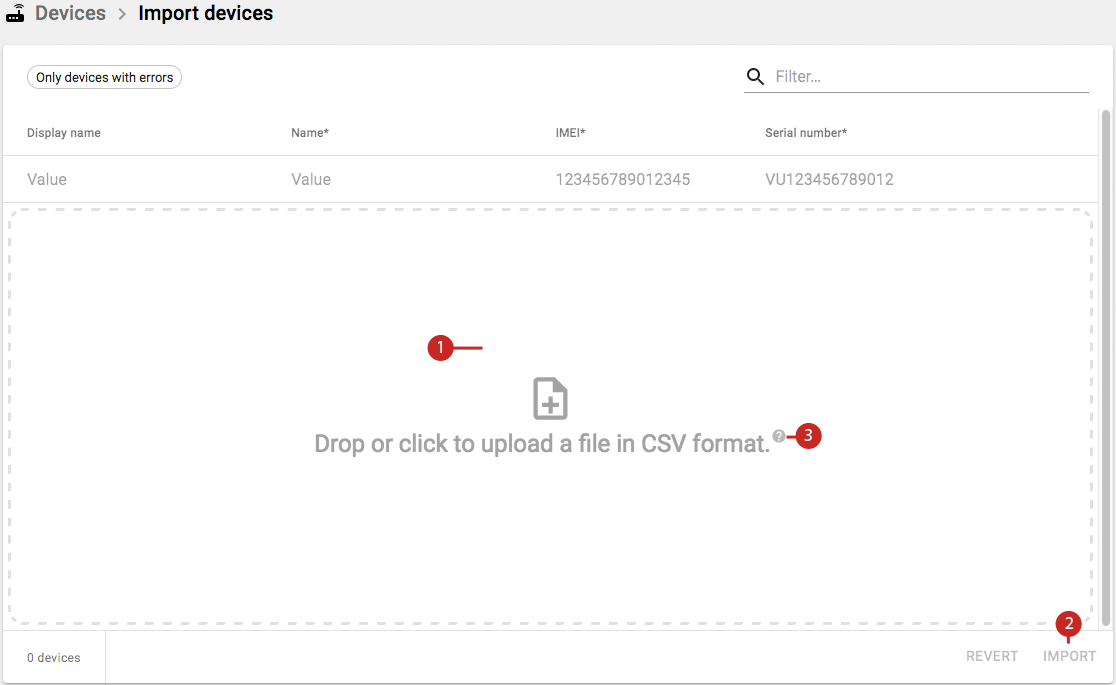
- (Optional): Click the question mark (3) to display information about the CSV format along with some example data. You can copy the example data to the clipboard by clicking the clipboard icon (4):
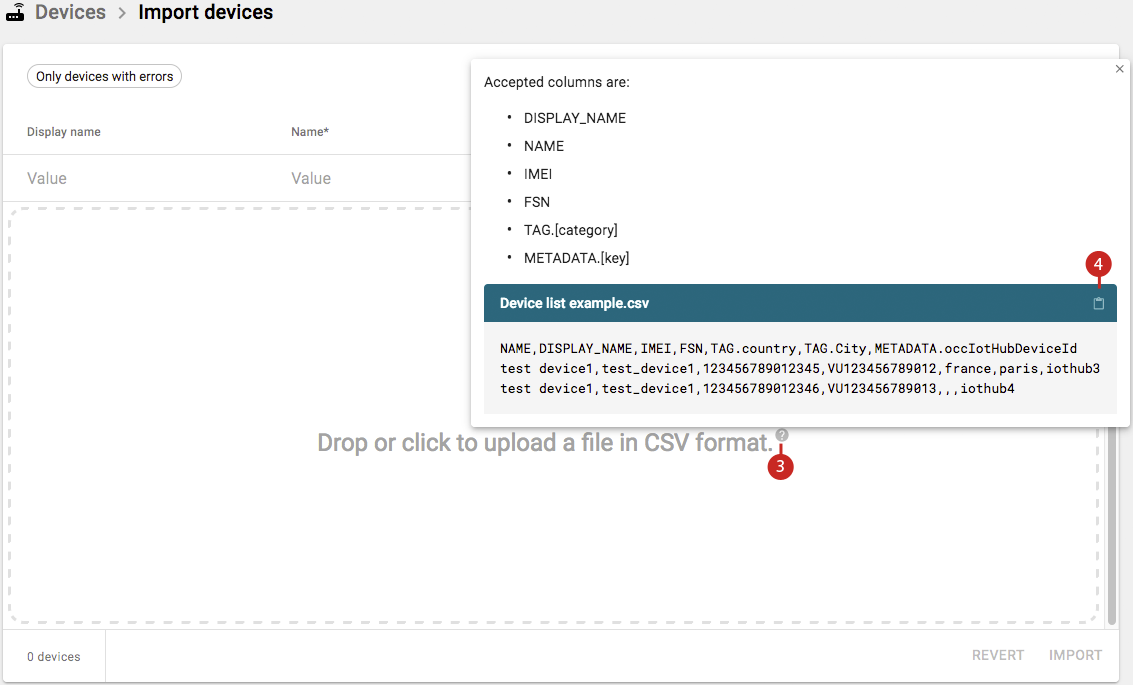
The CSV file must be formatted as shown in the following example:
| IMEI | FSN | NAME | DISPLAY_NAME | BLUEPRINT_ID | BLUEPRINT_VERSION | DEPLOY_FIRMWARE | TAG. (multiple unique allowed) | METADATA. (multiple unique allowed) |
|---|---|---|---|---|---|---|---|---|
| 321873090217545 | VU810385211123 | asset_1 | mangOH_Red1 | b5c12379220721249d5c8ffa3 | 5 | true | (column name: TAGS.location (field value: nyc) | (column name: METADATA.foo.bar) (field value: "[ ""hello"", ""world"" ]") |
The following table describes each column in the CSV file:
| Column Name | Type | Required | Unique Value Required | Description |
|---|---|---|---|---|
| IMEI | String | Yes | Yes | The IMEI of the device in IMEI Standard Format. Note: The IMEI and FSN together must form a unique pair of values that don't already existing in the deployment. |
| FSN | String | Yes | Yes | The device's serial number. The value must consist of 6 to 20 upper-case characters. Note: The IMEI and FSN together must form a unique pair of values that don't already existing in the deployment. |
| NAME | String | Yes | Yes | The name of the device. The name must be lowercase and contain only alphanumerical chars and underscores. |
| DISPLAY_NAME | String | No | Yes | The display name for the device. |
| BLUEPRINT_ID | String | No | No | The ID of a Blueprint to apply, if present. |
| BLUEPRINT_VERSION | Integer | No | No | The version of the Blueprint identified by BLUEPRINT_ID. If a BLUEPRINT_ID is specified but BLUEPRINT_VERSION, is absent, Octave will use the latest version. |
| DEPLOY_FIRMWARE | Bool | No | No | If true, Octave will perform a FOTA of any firmware attached to the Blueprint. The default is true. |
| TAG. (multiple unique allowed) | String | No | No | Defines a Tag for the device. Multiple unique values are allowed. |
| METADATA. (multiple unique allowed) | String | No | No | Defines metadata for the device. |
Notes
Octave allows you to display certain devices in your deployment on the import screen which can be useful when putting together the list of devices to import and avoids the need to return to the main device listing screen:
- Use the filter field near the top-right corner of the screen to display all existing devices in the deployment which have a name containing the value entered in the filter field.
- Enable Only devices with errors to show all devices in the deployment which have some sort of error (e.g., inconsistent format, duplicate names, etc…).
Remove an Octave Edge Device from Your Deployment
Follow the steps below to remove an Octave edge device to your Octave deployment:
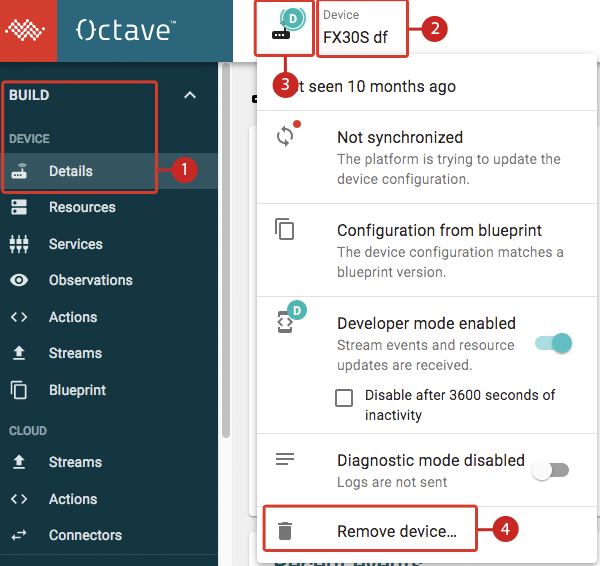
- Navigate to Build > Device > Details.
- Select the device to delete from the Device dropdown.
- Click on the gateway icon to display a dropdown showing the device's properties.
- Click Remove device.
Device local configuration
Removing a device does not reset it. If you add it again, a Blueprint or a Configuration must be applied, otherwise the device will use the previous configuration.
Note
After removing a device you can always add the device back in.
Note
When a device is deleted and added again or moved from one company to another, the device should be power cycled for its Resources to show up properly (i.e., if the device remains powered on during the migration, it will not properly appear in Octave with its full Resource tree until the device is power cycled).
This can be done by physically rebooting the device or by sending a reboot command by writing an Event with:
{"elems": { "/util/reboot/trigger": 1 }}to the device/:commandStream.
Adding and Removing Devices Programmatically
You can use the following endpoints from Octave's REST API to programmatically add and remove devices:
- POST /device/provision: adds a single device.
- POST /device/provision/bulk: adds multiple devices in bulk by uploading a CSV file of device information.
The following values can be returned in the body.state field of the response:
| Value | Description |
|---|---|
| STARTED | The device(s) are activating. |
| FINISHED | The device(s) are operational. |
| FAILED | The device(s) failed to activate. |
- DELETE /device/<device ID>: removes a single device.
After adding devices to the Octave programmatically, you will usually want to fully configure them right after, in a programmatic manner as well. The key steps are:
Updated over 2 years ago
