Creating and Managing Blueprints
A Blueprint captures an Octave edge device's Resources, Observations, Edge Actions, services, and firmware, as a versioned configuration template, that can be applied to other devices. This is useful for applying the same settings to multiple devices.
You can also copy a Blueprint and use it to create a new one or update an existing one either within your company or in a different company.
Creating a Blueprint
A Blueprint is created from an Octave edge device as follows:
- Navigate to Build > Device > Blueprint.

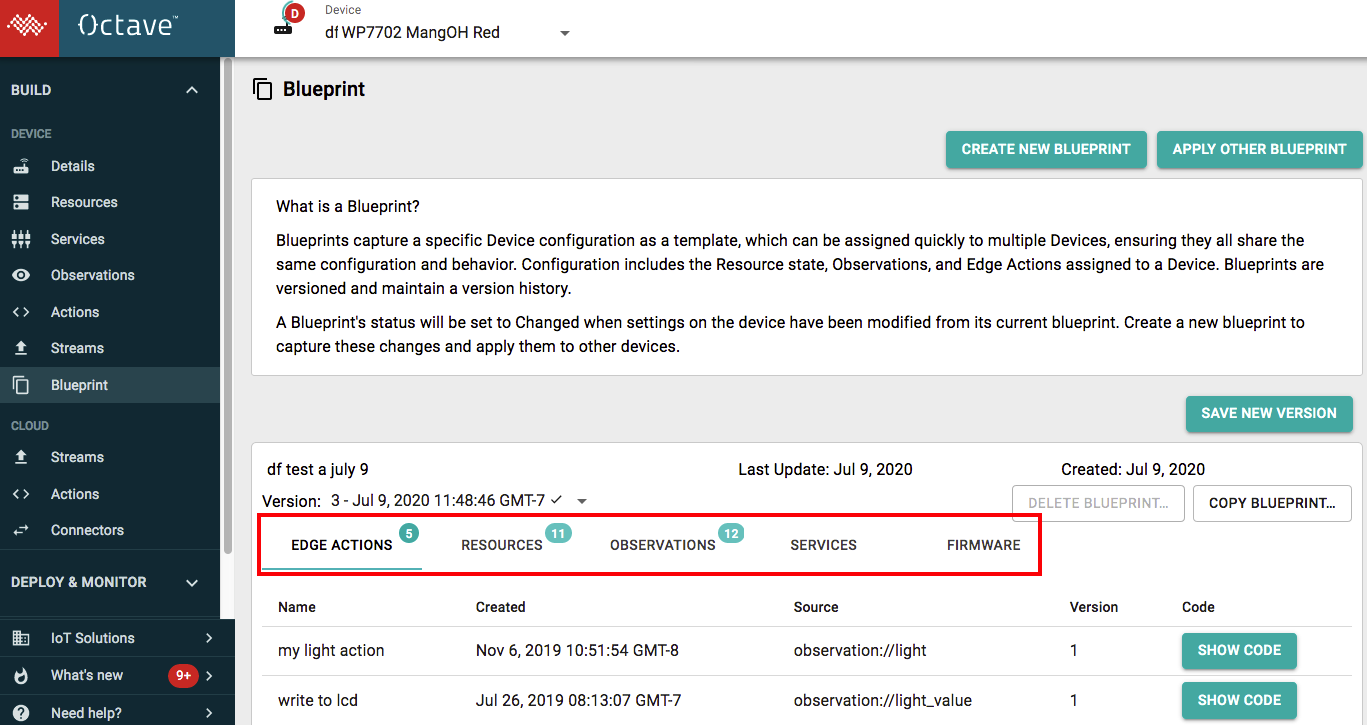
- Click Create new Blueprint, enter a Blueprint name when prompted, and click Create. The settings from the current device that will be used in the new Blueprint are shown at the bottom of the screen.
Octave "applies" the Blueprint to the current device when the Blueprint is first created. This indicates that the current configuration on the device now corresponds to the Blueprint. This newly created Blueprint becomes Version 1.
The bottom of the Blueprint screen allows you to click on Edge Actions, Resources, Observations, and Services to list the respective items associated with the Blueprint:

Update a Blueprint
To update a Blueprint with the device's current configuration settings, click Save new version:

Note
You can see the list of available Blueprints in the Version dropdown on the Blueprint screen in Octave. This field will be only be available if at least one Blueprint has been created.
Applying a Blueprint to Other Devices
After a Blueprint has been created and saved it can then be applied to one or more devices.
Applying a Blueprint via the Blueprint Screen
Follow the steps below to apply a Blueprint to a device via the Blueprint screen:
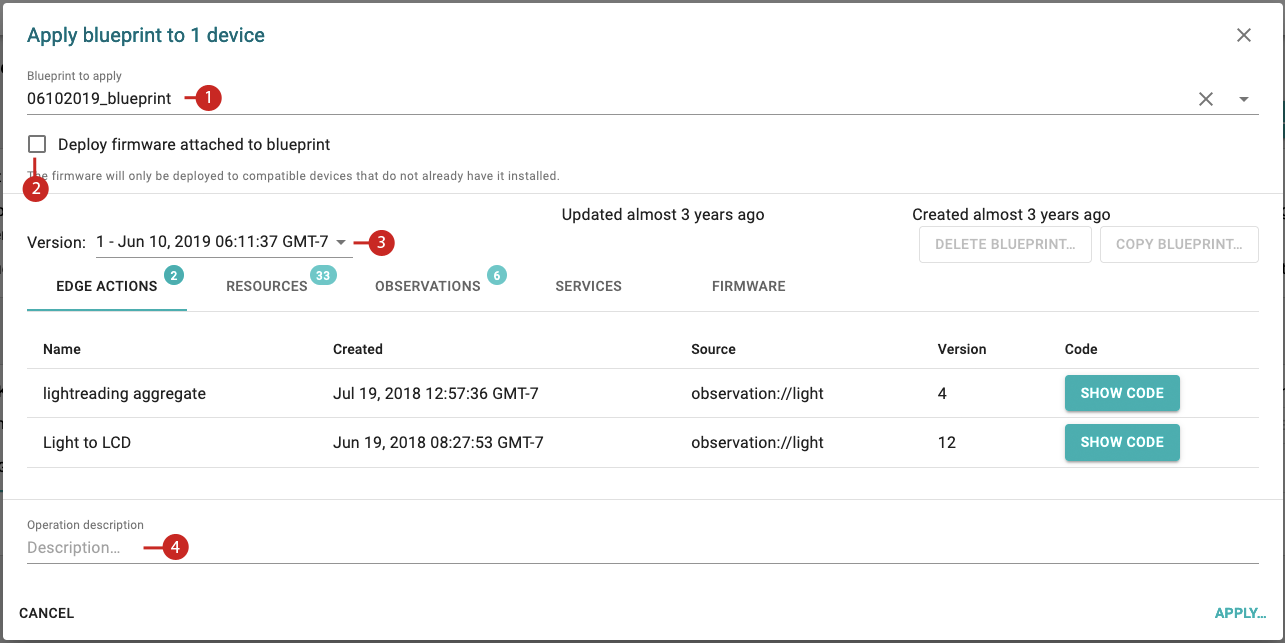
- While still on the Build > Device > Blueprint screen, click Apply Other Blueprint. The Apply Blueprint screen is displayed:

- Select a Blueprint (1).
- (Optional) Enable Deploy the firmware attached to the blueprint (2). This will deploy the firmware from the current device to selected devices.
- (Optional) Choose the Blueprint version (3) (the latest is selected by default).
- (Optional) Enter a description for the Blueprint operation and click Apply.
- Click Apply when the confirmation screen displays. This will apply the Blueprint to the device and install any firmware on it if this was enabled in Step 3.
Applying a Blueprint via the Device Monitoring Screen
You can also apply Blueprints to multiple devices:
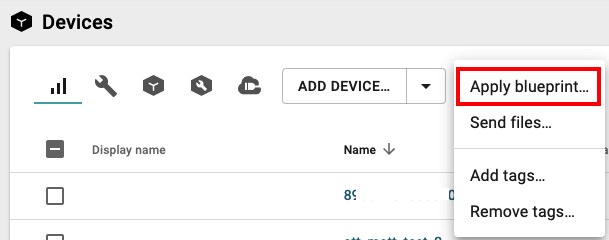
- Navigate to the Deploy & Monitor > Devices screen, select the devices to which you want to apply Blueprints, and select Add blueprint:

- Populate the fields of the Apply Blueprint popup as described in the previous section and click Apply to accept the fields.
- Click Apply when the confirmation screen displays.
Applying a Blueprint Programmatically
You can use the /blueprint/apply endpoint to programmatically apply a Blueprint to one more more devices:
curl --request PUT \
  --url https://octave-api.sierrawireless.io/v5.0/company_name/blueprint/apply \
  --header 'content-type: application/json' \
  --header 'x-auth-token: <Your Master Token>' \
  --header 'x-auth-user: <Your User ID>' \
  --data '{
    "blueprint": {"id": "bxxxxxxxxxxxxxxx", "version": 1},
    "deviceIds": ["dyyyyyyyyyyyyyy","dzzzzzzzzzzzzzzzzzzzz",.....]
}
Notes
- In order to invoke the endpoints, you must first obtain your master token and user ID. These are both available on the user screen in the Octave Dashboard.
- Octave supports a maximum Blueprint data size of 100,000 characters including comments and line feeds/carriage returns.
Copying a Blueprint
You can copy a Blueprint and then create a new Blueprint or update an existing one from it.
During this process can you specify if the resulting Blueprint should be in your current company or within a different company. This is useful for example, when Octave channel partners/integrators want to easily provide Blueprints to their end customers when developing in Octave.
Note
For more information about companies within Octave, see: Selecting a Company.
Follow the steps below to copy a Blueprint:
- Ensure that one or more Blueprints have been created in your Octave's company.
- Navigate to Deploy & Monitor > Blueprints, locate the existing Blueprint to copy and expand it using the arrow at the right. In the example below, a Blueprint called mangOH Master Config has been expanded:

- Click Copy Blueprint to display the Copy Blueprint popup. Set Destination company name (1) to the company where the Blueprint is to be created or updated. Selecting a company that is different from your existing company will copy/update the Blueprint to that company:

- Configure the options on the popup:
- Create a new blueprint: creates a new Blueprint based off the one selected in steps 2 and 3. Enter a name for the Blueprint in the New destination blueprint name field (4).
- Update an existing blueprint: updates an existing Blueprint within the destination company. When selected, the New destination blueprint name field will change to the Existing destination blueprint dropdown where you select the target Blueprint to overwrite with the source Blueprint selected in steps 2 and 3.
- Click Copy to create or update the target Blueprint. If copying or updating Blueprint in a different company, the new or updated Blueprint can then be accessed via the Deploy & Monitor screen.
Updated about 3 years ago
