Octave Resource Protocol Guides
Overview
This topic provides a tutorial to help you set up and experiment with Octave Resource Protocol (ORP).
ORP is a simple ASCII-based protocol built on top of HDLC-framed data sent via UART, to allow communications between an asset and an Octave edge device. ORP is useful for connecting micro-controllers and application processors to Octave.
In the tutorial, your development machine will act as the asset and will be connected to either a mangOH Red using a USB-to-UART bridge, or to an FX30S using a USB-to-serial cable.
Your development PC will run a Python or C program through which you can enter high-level commands to create and work with Resources. The program translates your commands into ORP's underlying packets and sends them to the Octave edge device using ORP.
The tutorial's program will provide you with an understanding of how you might write your own program to run on an asset to communicate over ORP.
Note
When experimenting with ORP, it can be useful to enable Developer Mode to see real-time updates of all creation, deletion, and value update events related to ORP on the Resources screen.
Define your ORP resource tree efficiently
With ORP, you have a large amount of resources (up to 32) to interface your asset to the Octave device.
If you have more parameters than 32, the recommended way is to use ORP resources of JSON format, to carry multiple datapoints all together in one single Resource.
Requirements
For this tutorial you will need:
- Development machine running Windows or Linux
- USB-to-UART bridge such as a CP2102 or a USB-to-serial cable
- mangOH Red (for a USB-to-UART bridge connection) or an FX30S (for a USB-to-serial connection)
- A copy of the ORP tutorial package from GitHub
- For Python you will need:
- Python 3
- (Optional) Virtualenv
- For C you will need:
- gcc, make
Setting up the USB Connection
Follow the steps below to connect your Octave-enabled device to your development PC:
- Connect the USB end of your USB-to-UART or USB-to-serial connection to your development PC, and connect the other end to your Octave-enabled device as follows:
- USB-to-UART: connect a wire between the UART TX pin on the CP2102 and Pin 10 (RX pin) on the mangOH Red, and a wire between the UART RX on the CP2102 and Pin 8 (TX pin) on the mangOH Red. Also connect a ground wire between both devices (e.g., connect a wire between the CP2102's ground pin and Pin 25 on the mangOH Red). The pinouts for the mangOH Red can be viewed here.
USB-to-UART Grounding
Ensure that the ground wire connection is made between the mangOH and your CP2102. Without it, the example application used later in this tutorial will not send/receive ORP commands/responses correctly.
- USB-to-serial: plug the RS-232 end of the cable into the respective port on your FX30S.
- (For USB-to-UART connections). Ensure that your development machine has the correct drivers installed for your USB-to-UART bridge (e.g., CP210x USB to UART Bridge VCP Drivers).
- Power on your Octave-enabled device and ensure that you can view the mangOH Red via the Octave dashboard and that the device is actively reporting.
- Identify the name of your USB-to-UART or USB-to-serial connection on your development machine using the appropriate platform-specific steps below. This name will be used later in this tutorial when running the example program.
Linux:
Open a terminal window, run the following command to obtain a list of devices:
ls -l /dev/serial/by-id/
Locate the device in the output. The following shows examples of how the device might appear:
crw-rw-rw-  1 root  wheel           21,   4 29 Sep 08:15 tty.SLAB_USBtoUART
...

crw-rw-rw-  1 root  wheel           21,   6 29 Sep 08:16 tty.usbserial
...


lrwxrwxrwx 1 root root 14 Sep 23 13:18 usb-Silicon_Labs_CP2104_USB_to_UART_Bridge_Controller_0138DD7D-if00-port0 -> ../../ttyUSB1
...
Windows
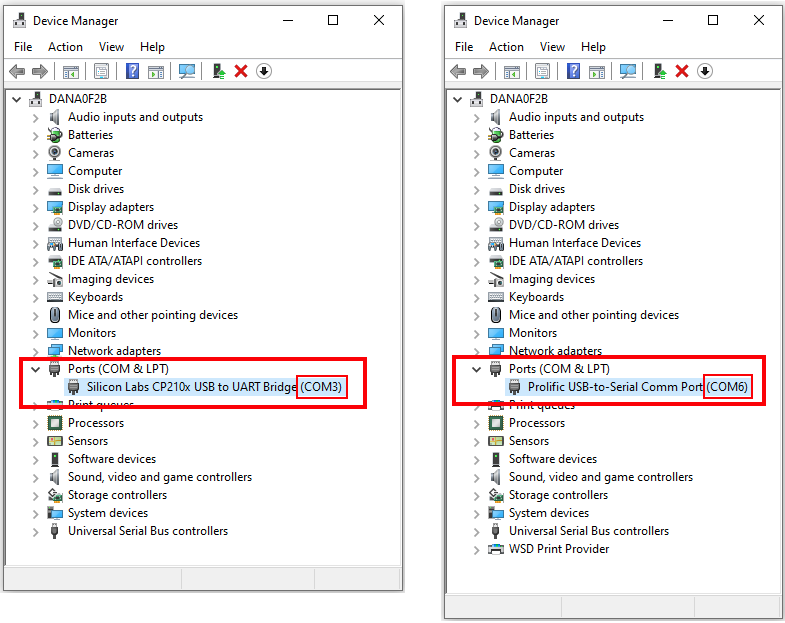
Open Device Manager, expand Ports, locate your USB-to-UART or USB-to-serial cable, and identify the COM port assigned to it. For example, in the screenshot on the left below, a USB-to-UART bridge has been assigned to COM3. In the screenshot on the right, a USB-to-serial cable has been assigned to COM6. You will use the COM port (e.g., COM6) as the name of your device later in this tutorial when running the example program.
Configuring UART in Octave
Follow the steps below to complete the configuration of your UART connection on the Octave side:
- Select your mangOH Red or FX30S in the Octave dashboard, and then navigate to Build > Device > Services and locate the Octave Resource Protocol section.
- Click on UART1.
Note
Ensure the device's UART is not already allocated in a Service, otherwise the UART cannot be configured.
- Set Baud Rate to 9600, Parity to None, Data bits to 8, and Stop bits to 1. For an FX30S, Routing will be automatically set to Rear port. The Standard must be set to RS-232.
The following screenshots show what these UART configurations look like in Octave:
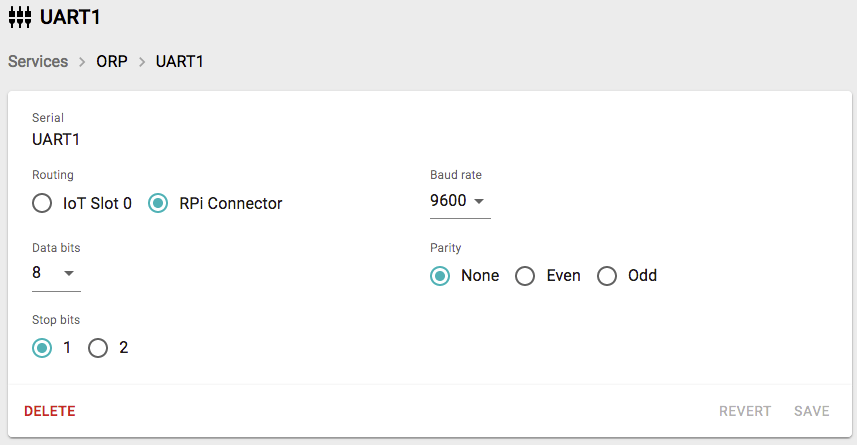
Example UART configuration for ORP via UART on a mangOH device.
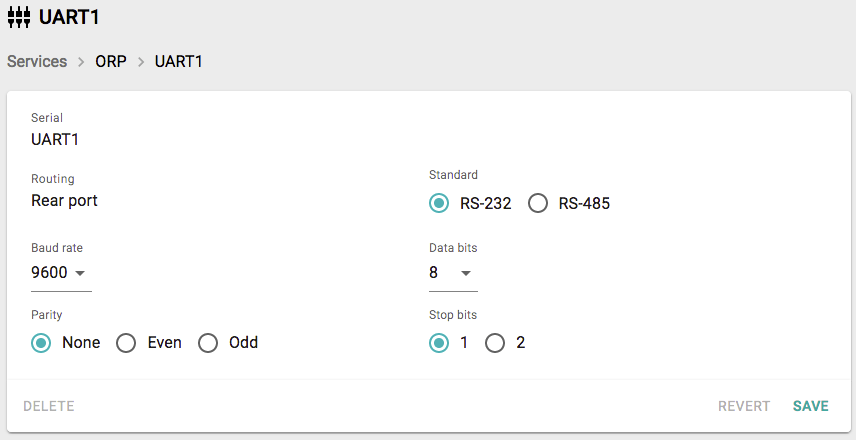
Example UART configuration for ORP via serial for an FX30S
- Click Save to save the UART service.
Installing and Running the Examples
Python
Follow the steps below to set up a Python environment and run the Python example:
- Open a terminal window and navigate to the directory where you cloned or downloaded the ORP tutorial package from GitHub to your development machine (e.g.,
C:\octave-orp-master\clients\python). - (Optional) Create a new Python environment and activate it:
virtualenv env

.\env\scripts\activate.bat
- Install the Python dependencies
pip install six
pip install pythoncrc
python -m pip install pyserial
- Run the example program, passing in the name of your USB-to-UART or USB-to-serial connection that you identified earlier on your development PC to the
--devargument.
For example, the following shows how to run the program with a USB-to-UART or USB-to-serial connection on COM3 of a Windows development machine:
python orp_test.py --dev COM3 --b 9600
C Program
Follow the steps below to set up and run the C program example:
- Open a terminal window and navigate to the directory where you cloned or downloaded the ORP tutorial package from GitHub to your development machine (e.g.,
/octave-orp-master/clients/python). - Consult the package's README.md file for instructions on building and running the sample client.
- Run the example program, passing in the name of your USB-to-UART or USB-to-serial connection that you identified earlier on your development PC to the
-dargument.
For example, the following shows how to run the program with a USB-to-UART or USB-to-serial connection on /dev/ttyUSB0 of a development machine:
./bin/orp -d /dev/ttyUSB0 -b 9600
Sending ORP Commands Using the Example Program
The example program allows you to create, update, query, receive notifications for, and delete Octave Resources over ORP by entering commands; its usage is summarized here:
create input|output|sensor  trig|bool|num|str|json <path> [<units>]
delete resource|handler|sensor <path>
add handler <path>
push trig|bool|num|str|json <path> <timestamp> [<data>] (note: if <timestamp> = 0, current timestamp will be used)
get <path>
example json <path> [<data>]
reply B|C|y
The following examples show how to use these commands and how to verify the results in Octave.
Example 1: Creating a Resource
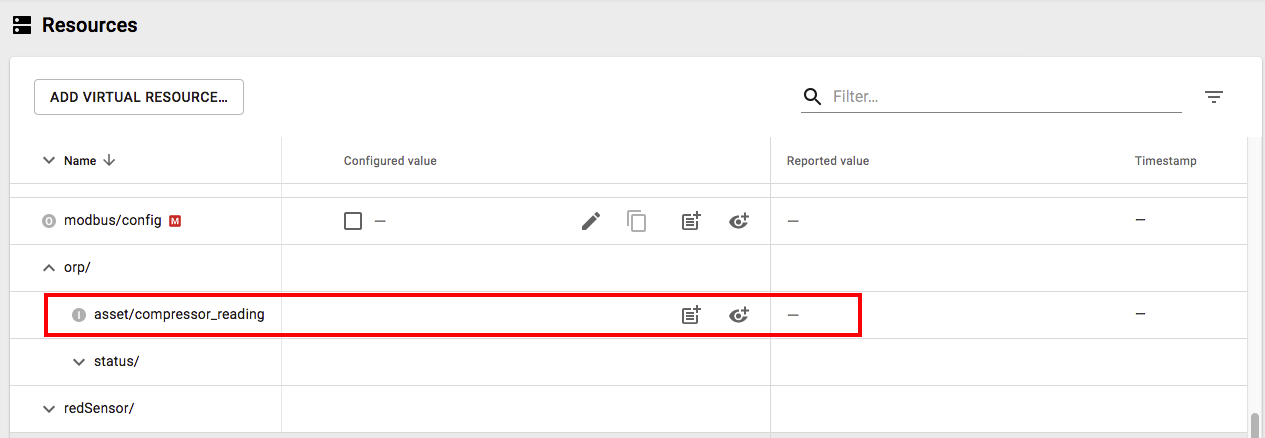
Invoke the create command to create a new Resource. In this example, a new numeric Input Resource named compressor_reading will be created with no value assigned:
create input num compressor_reading
Response:
Sending: IN02Pcompressor_reading
Received     : i@01
Message type : response create input
Status       : OK
Sequence     : 1
The Resource is created under orp/asset:
Note
- Resources created using ORP on an Octave edge device are not persisted across reboots of that device.
- Remote clients have read/write access only to orp/asset. Other paths under orp are read-only.
Example 2: Add a Handler to Watch for Changes on a Resource
Invoke the add handler command on the Resource to watch for changes to its value. After this has been added, any updates to the value (e.g. when a value is pushed as described in the next example) will invoke the handler, and the example program will display the information received by the handler.
add handler compressor_reading
Response
Sending: H.02Pcompressor_reading
Received     : h@01
Message type : response add handler
Status       : OK
Sequence     : 1
Example 3: Updating (Pushing) a Value of a Resource
Invoke the push command along with the type of Resource and path to set the value of the Resource. In this example, we pass a value of 0 for the timestamp (which will use the current time stamp for the Event) and update the compressor_reading with the value 12345:
push num compressor_reading 0 12345
Response:
Sending: PN03Pcompressor_reading,D12345
Received     : p@01
Message type : response push
Status       : OK
Sequence     : 1
If a handler has been previously set up for the Resource as described in the previous example, then the updated information received by the handler will be displayed by the example program:
Received     : [email protected],Pcompressor_reading,D12345.000000
Message type : handler call
Status       : OK
Sequence     : 1
Timestamp    : 1600960797.106510
Path         : test1
Data         : 12345.000000
The updated Resource is updated in Octave:

Example 4: Getting the Value of a Resource
Invoke the get command and specify the path of the Resource to get its current value:
get compressor_reading
Response
Sending: G.014Pcompressor_reading
Received     : [email protected],D1234.000000
Message type : response get
Status       : OK
Sequence     : 1
Timestamp    : 1600963360.968803
Data         : 12345.000000
Example 5: Setting Example JSON
You can create a Resource that stores JSON data and then set its example JSON value:
create input json my_input '{"value1":1}'

example json my_input '{"value1":99}'
Response
A response similar to the following will appear for the example command:
Sending: EJ012Pmy_input,D'{"value1":99}'
Received     : e@01
Message type : response set example
Status       : OK
Sequence     : 1
In the Octave dashboard, the Last reported value for this asset should display the JSON that you assigned using the example command.
Example 6: Deleting a Handler
Invoke the delete command and specify handler along with the path of the associated Resource to delete an existing handler:
delete handler compressor_reading
Response
Sending: K.04Pcompressor_reading
Received     : k@01
Message type : response remove handler
Status       : OK
Sequence     : 1
Example 7: Deleting a Resource
Invoke the delete command and specify resource along with the path of the Resource to delete:
delete resource compressor_reading
Response:
Sending: D.07Pcompressor_reading
Received     : d@01
Message type : response delete resource
Status       : OK
Sequence     : 1
The Resource is removed from orp/asset.
Streaming Data from ORP Resources
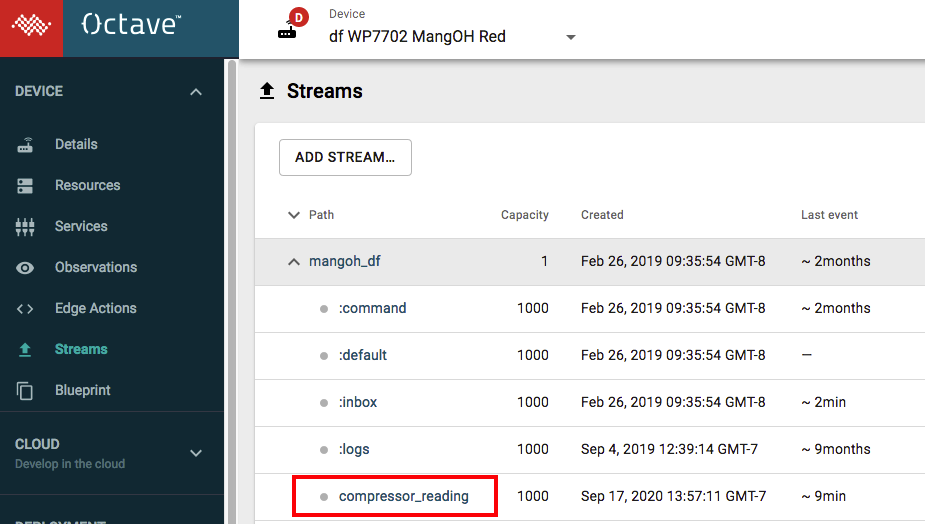
Events from an ORP Resource can be streamed by creating an Observation on that Resource.
Follow the steps below to make this work:
- Navigate to Build > Device > Resources and locate the ORP Resource under orp/asset/. If you don't already have Resource, create the
compressor_readingexample described above. - Create an Observation on that Resource.
- Simulate a change of value such as pushing a value to that Resource.
- Navigate to Build > Device > Streams, locate the stream for the Observation you created in Step 2, and click on the Stream name to see the Resource's Events:
Routing Internal Resources to ORP Resources
You can route values from internal assets to ORP assets using Observations.
The steps below illustrate how to route readings from a mangOH Red's light sensor to an ORP asset:
- Create an ORP sensor asset using the example program. In this tutorial, an asset named
light_readingis created:
create sensor num light_reading

Sending: SN020Plight_reading
Received     : s@01
Message type : response create sensor
Status       : OK
Sequence     : 1
- Navigate to Build > Device > Resources and expand the redSensor > light Resource.
- Create an Observation on the Resource's value property.
- Set the Observation's Send events to field to Resource, set the Destination Resource to the ORP asset you created in Step 1, and save the Observation. Note that destination Resource will contain the full path of the ORP asset (e.g., /orp/asset/light_reading/value).
After completing these steps, Octave will now route values from the mangOH Red's light sensor to the light_reading ORP asset.
Updated about 3 years ago
