Sending Files via the Octave Dashboard
This topic describes how to send files using the Octave dashboard.
File Transfer Campaign
Now that the Remote Asset is integrated with the Octave file transfer feature (i.e., start-up, file-sending control (optional), and file-transfer sequences are integrated), you can lead a file transfer campaign with your Asset using Octave’s GUI as described in the sections below or via Octave's REST API.
File Transfer Functions Overview in the Octave GUI
The Octave GUI supports all functions needed to upload files to Octave Cloud, send files to Octave Edge devices, and follow-up on the operation progress and status.
The Operations section in Devices is where you retrieve all operations applied to a given device (firmware updates, file transfers, application of Blueprints, configuration changes, etc.):
The Files section in the Deploy & Monitor category is where you can upload files and manage your repository of files in Octave Cloud:
The Operations section in Deploy & Monitor is where you retrieve all operations applied in your company (firmware updates, files transfers, application of Blueprints, configuration changes, etc.):
File Management
The Octave Files section in the Deploy & Monitor category is the main screen through which you will manage your files in Octave Cloud. The following screenshot shows the main elements of this section:
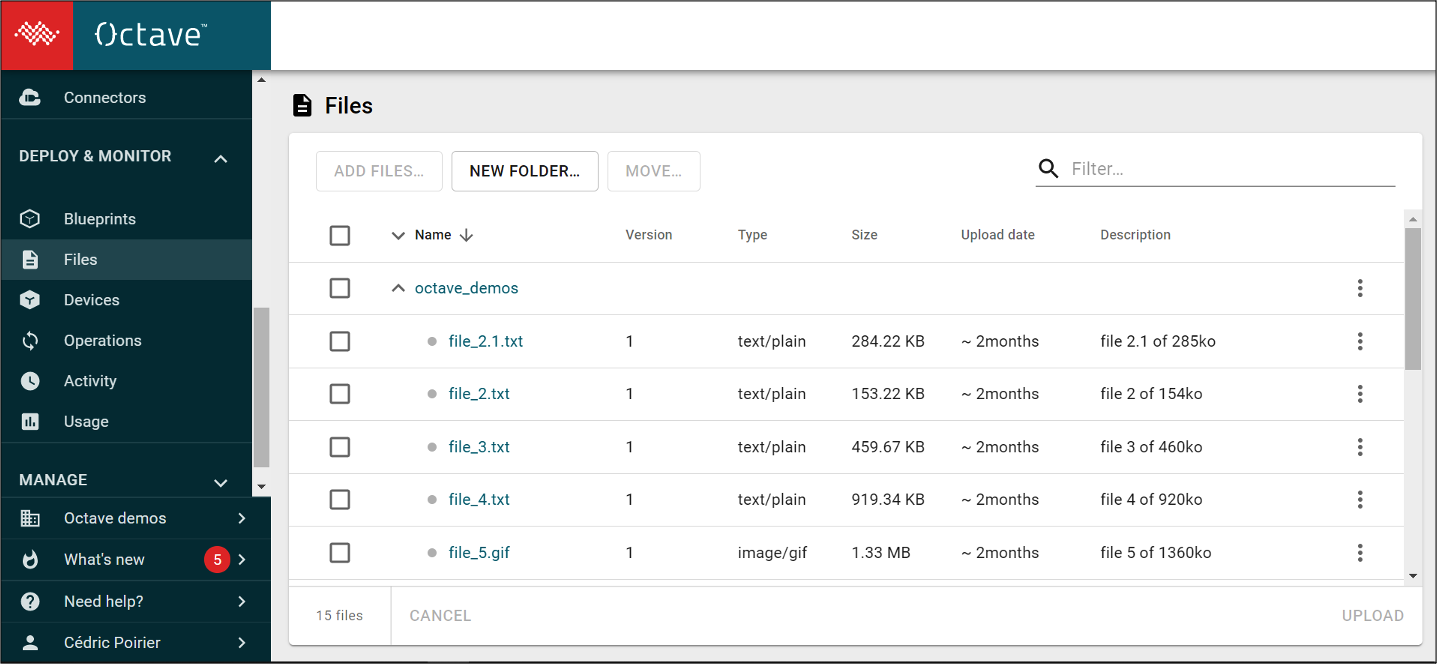
The following are the supported functions for file management on Octave Cloud:
- Folder: you can structure your file repository with a folder hierarchy under a default folder named with your company name. Folders require at least one file to be created and can be renamed or deleted except the parent folder.
- Files:
- Add: if you add (‘upload’) a file with same name as an existing file in that folder, you will be asked to provide a different name for that new file.
- Move: you can move files to a new or existing folder.
- Delete: you can delete a file at any time but we recommend you don’t delete files already sent to devices, otherwise this will result in an inconstancy in your operations history.
- Search: you can search for folders and files in your repository by entering a few characters of the name to search for.
Sending Files to Devices
Sending files to devices must be done in three steps:
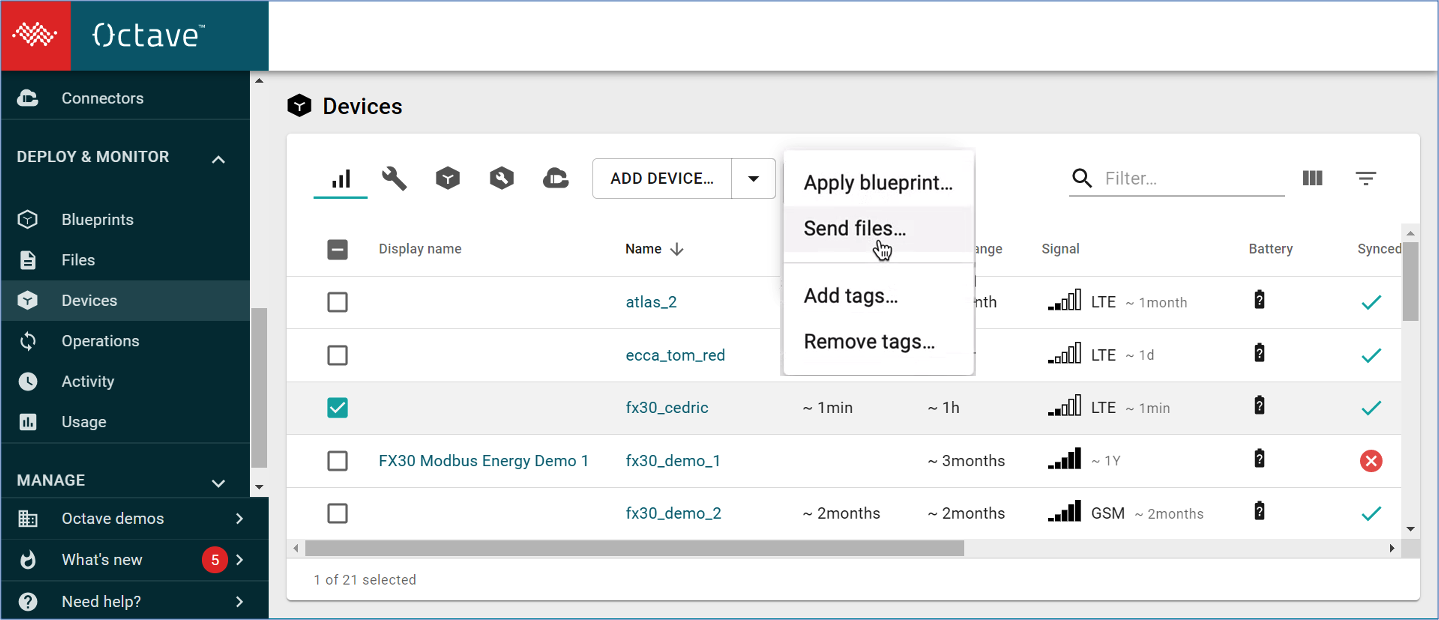
- Select the target devices in the device list and use the Send files function:
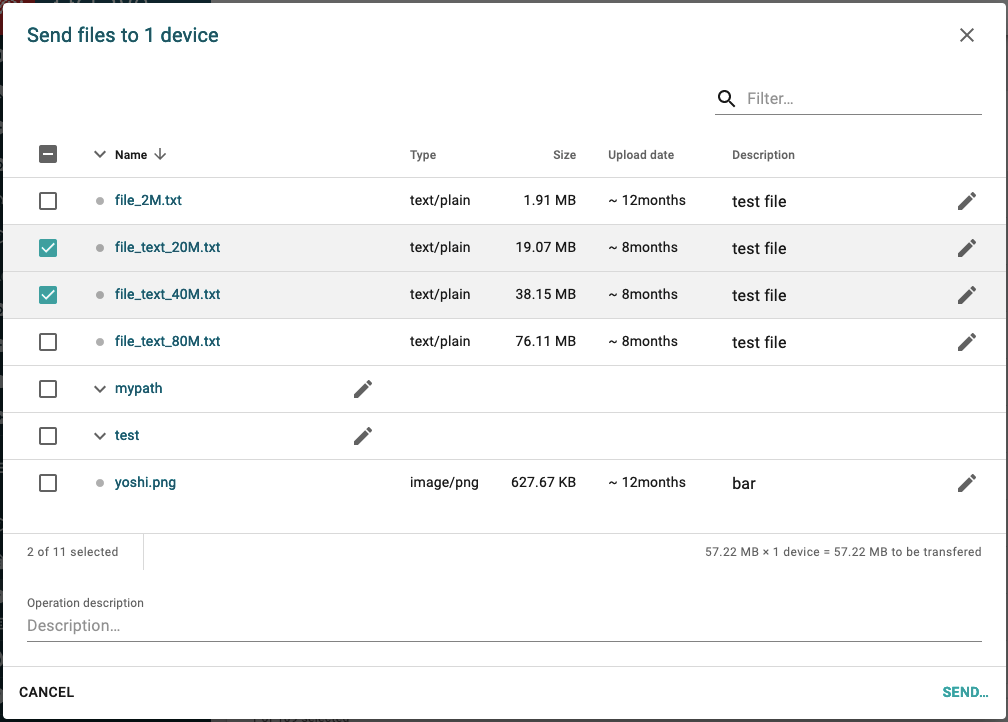
- Select the files to be sent, (optionally add a description to your operation) and click Send:
Tip:
Octave will remember your selected files. If you need to review or adjust the devices which are to receive the file(s), you can close the popup using the "x" button at the top-right corner. When you return back to the popup (as per Step 1), your files will remain selected.
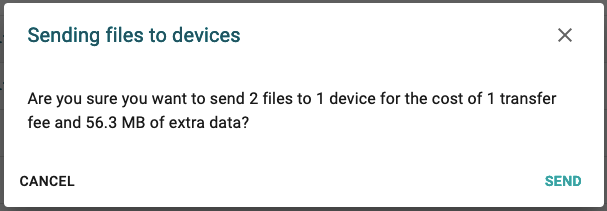
- Click Send on the confirmation popup to confirm the send request operation:
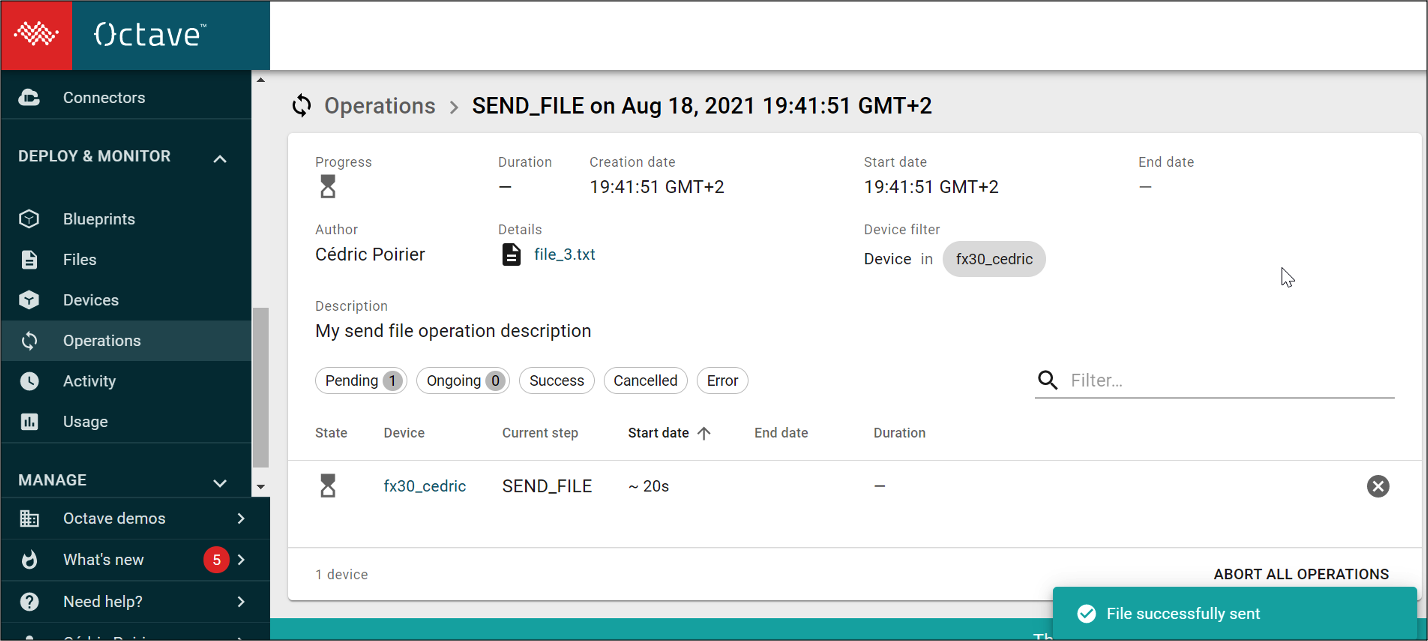
- View the acknowledgment notification for your operation request on the Deploy & Monitor > Operations screen:
Follow-up on the Send-File Operation
A file sending operation targets one or multiple devices and is composed of a StepList representing the operation for a device.
A StepList is composed of Steps, where each Step represents an action to process with the file sending operation for the device.
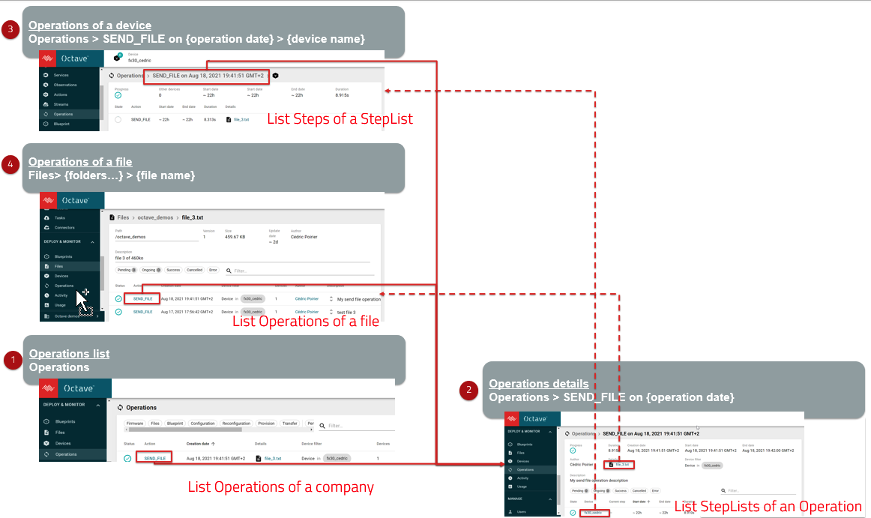
As illustrated in the diagram below:
- All file sending operations are listed in the Operations section under the Deploy & Monitor category (1) with the action type SEND_FILE. They are also listed on the file details page for the operation (4).
- StepLists of an operation, meaning the list of targeted devices of the operation, are listed in the operation’s detail page (2).
- Steps for a given device are listed in device’s operation page (3).
The following screenshot shows the main elements of the Deploy & Monitor > Operations section (1):
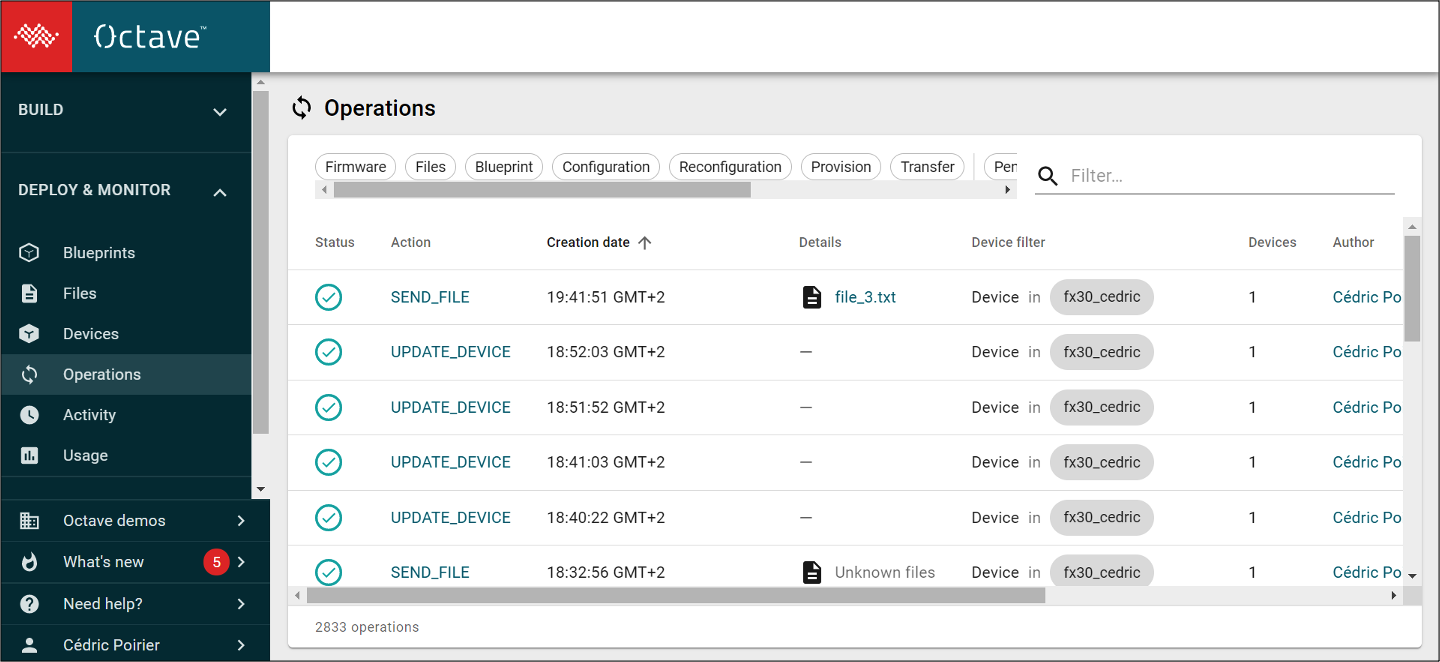
The following are the supported functions for the operations list on Octave Cloud:
- Read: operations are listed chronologically by default. For each operation you can view its type, date of operation, its status, details, target devices, and author. For each operation listed you can access its details and the file’s details when the operation is a SEND_FILE action.
- Sorting: you can sort by action type or author.
- Filtering: you can search for a given operation using available filter shortcuts by type (Firmware, Files, Blueprint…) or by state (pending, ongoing, success, Error…); you can also use the advanced filter.
The following screenshot shows the main elements of the operation details page (2):
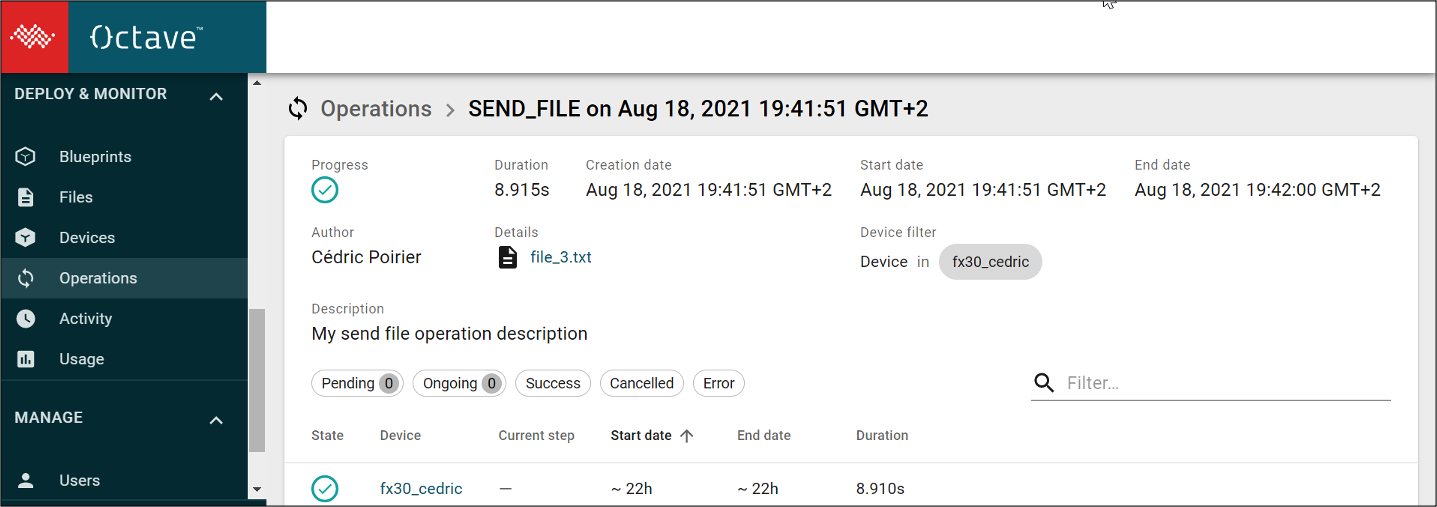
The following are the supported functions for the operation’s StepList on Octave Cloud:
- Read: list StepList (i.e., targeted device of the file sending operation) of the operation listed device name alphabetical order by default. For each StepList (=device) you get its state, start and end date, as well as duration. For each StepList listed you can access its details.
- Sorting: you can sort by device name, start date, or end date.
- Filtering: you can search for a given StepList using available filter shortcuts by state (pending, ongoing, success, Cancelled, Error); you can also use the advanced filter.
The following screenshot shows the main elements of the device’s operation detail page (3):
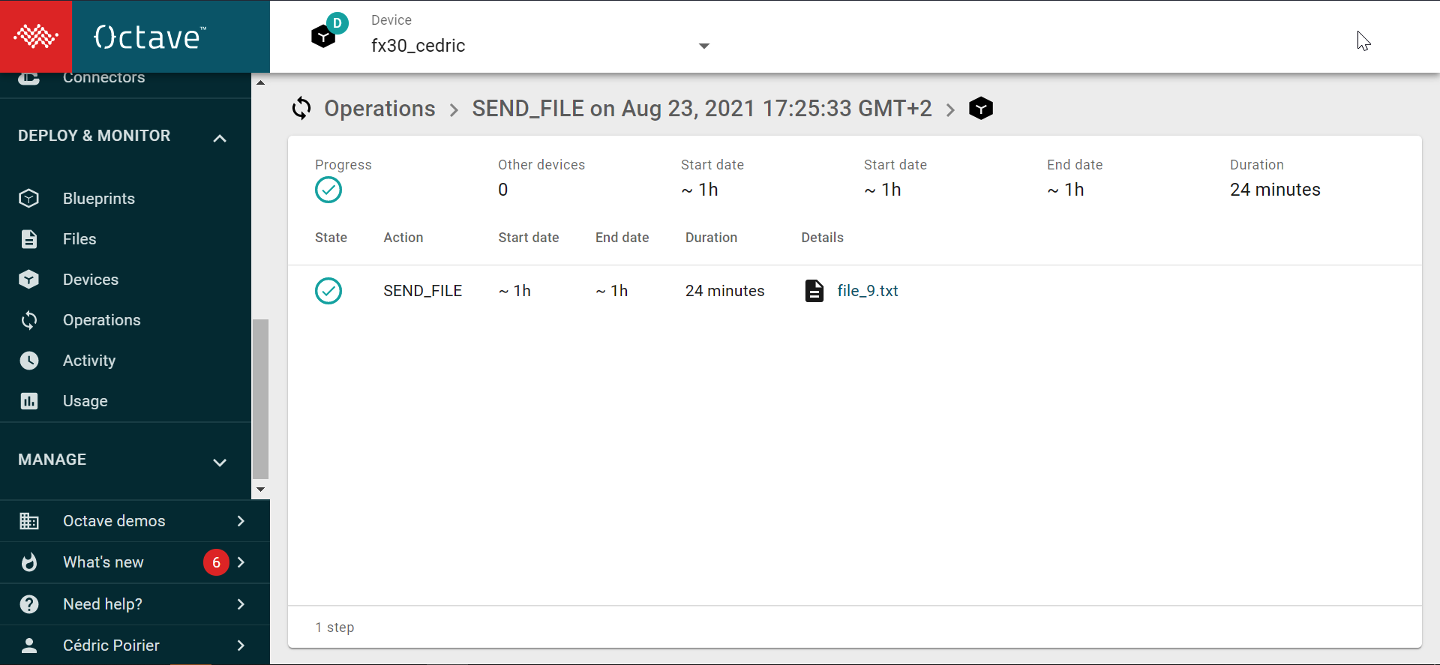
The following are the supported functions for the device’s operation detail page on Octave Cloud:
- Read: list Steps, meaning action of the file sending operation for the given device sorted by chronological order. For each Step you can view its state, start and end date, as well as duration.
- Progress: provides the progress of each step. The icon will update with the percentage as the step progresses.
Note: If your device is in Developer Mode you can check the progress and remaining bytes directly in the /files/download/value Resource:
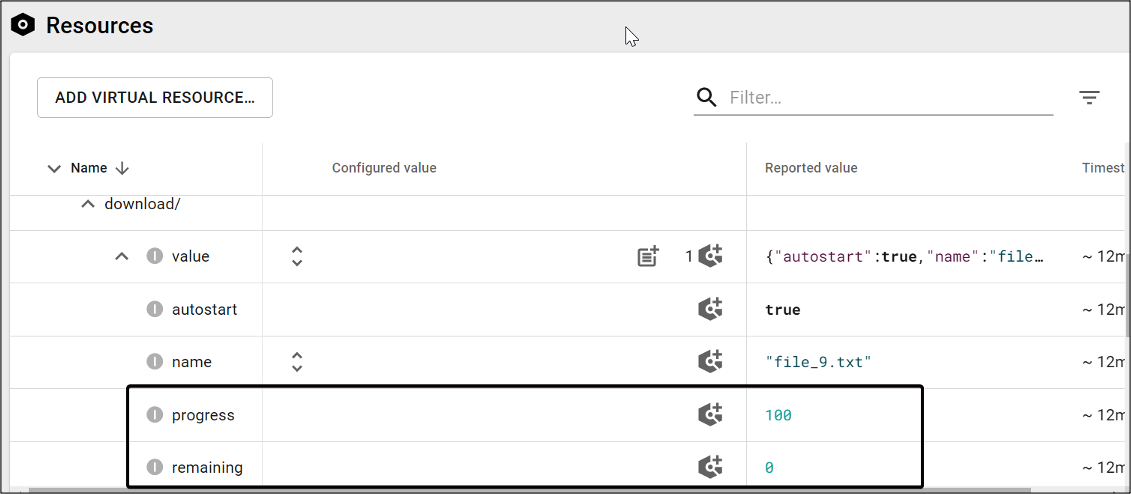
If you’ve created a cloud stream Observation you can visually monitor the progress and remaining data transfer via the //:download Stream:
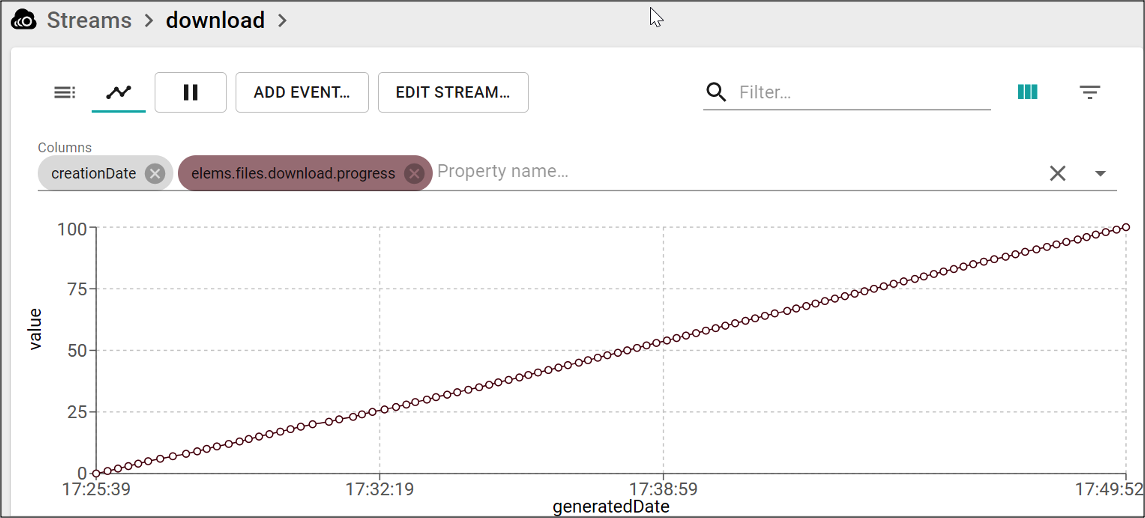
Deleting Files From a Device
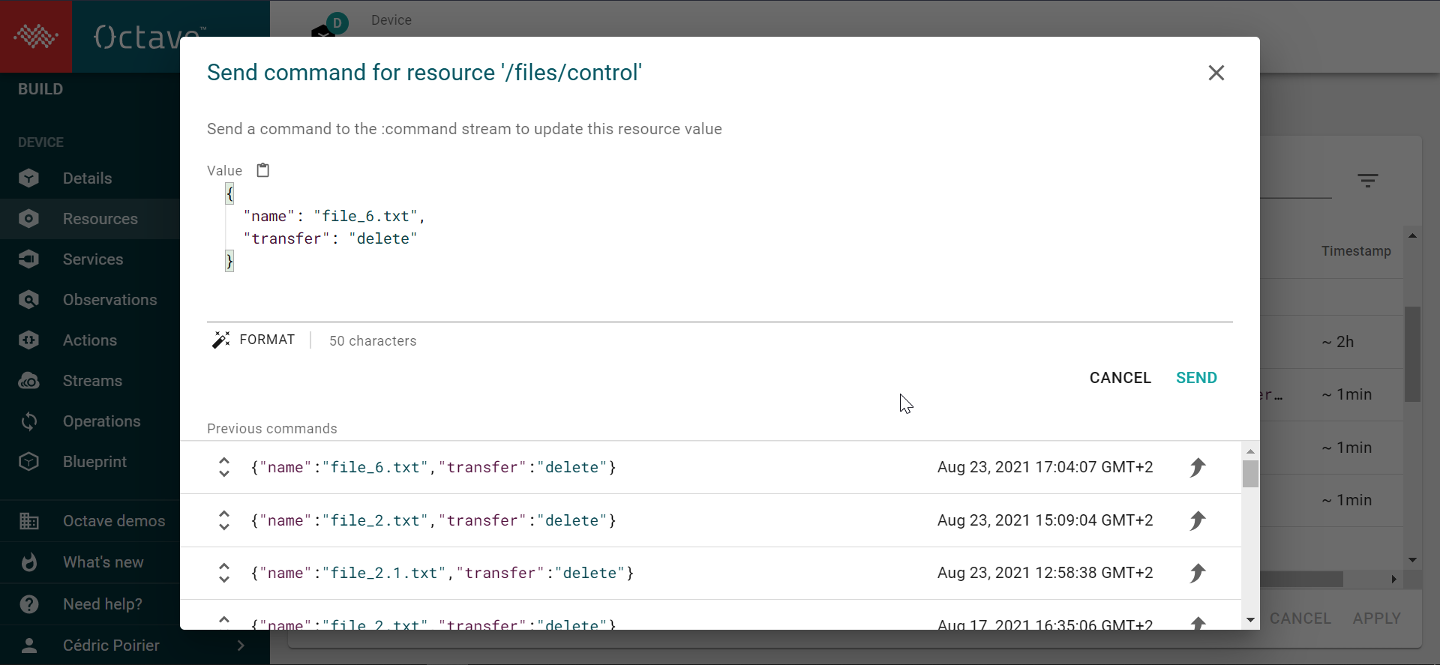
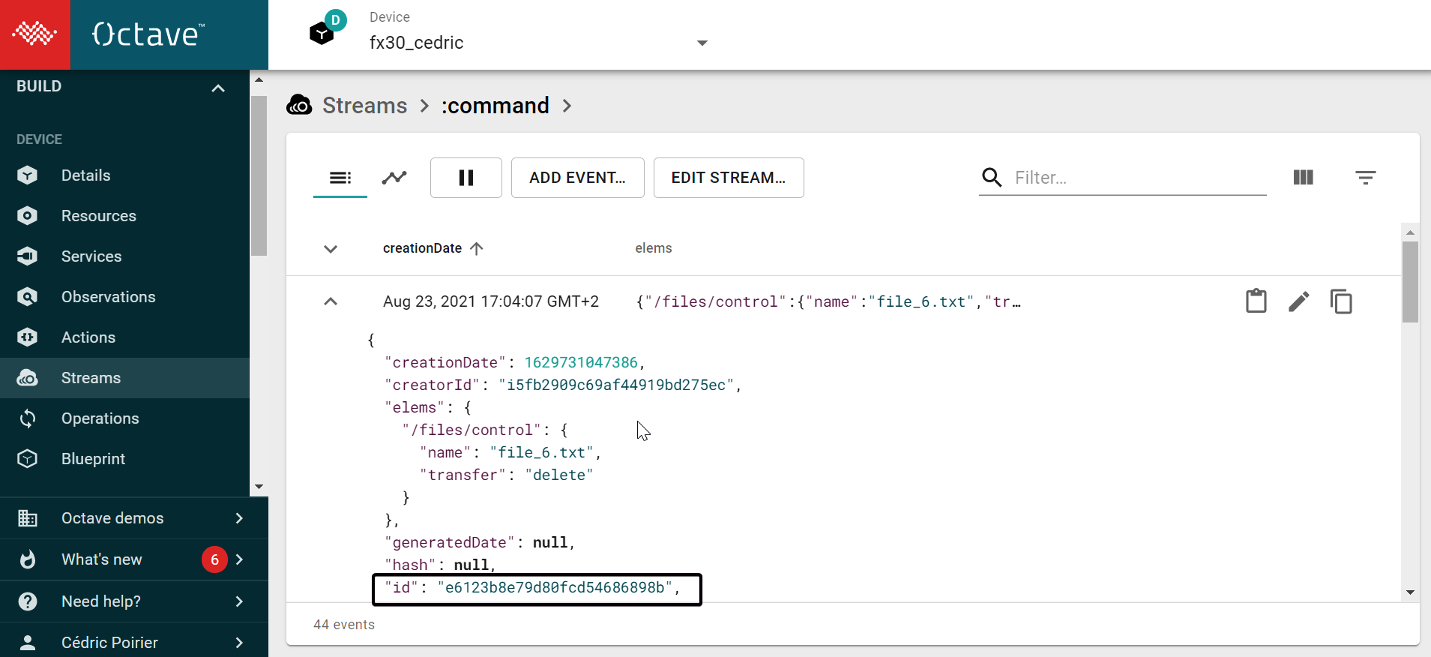
Deleting one or multiple files from a device can be done through a control command in the GUI:
- Send a delete command for a specific /file/control Resource:
- Check your command is sent by Octave Cloud and get the event ID in //:command Stream:
- Check for the command acknowledgment: COMMAND_COMPLETE in //:inbox Stream for the given Event ID:
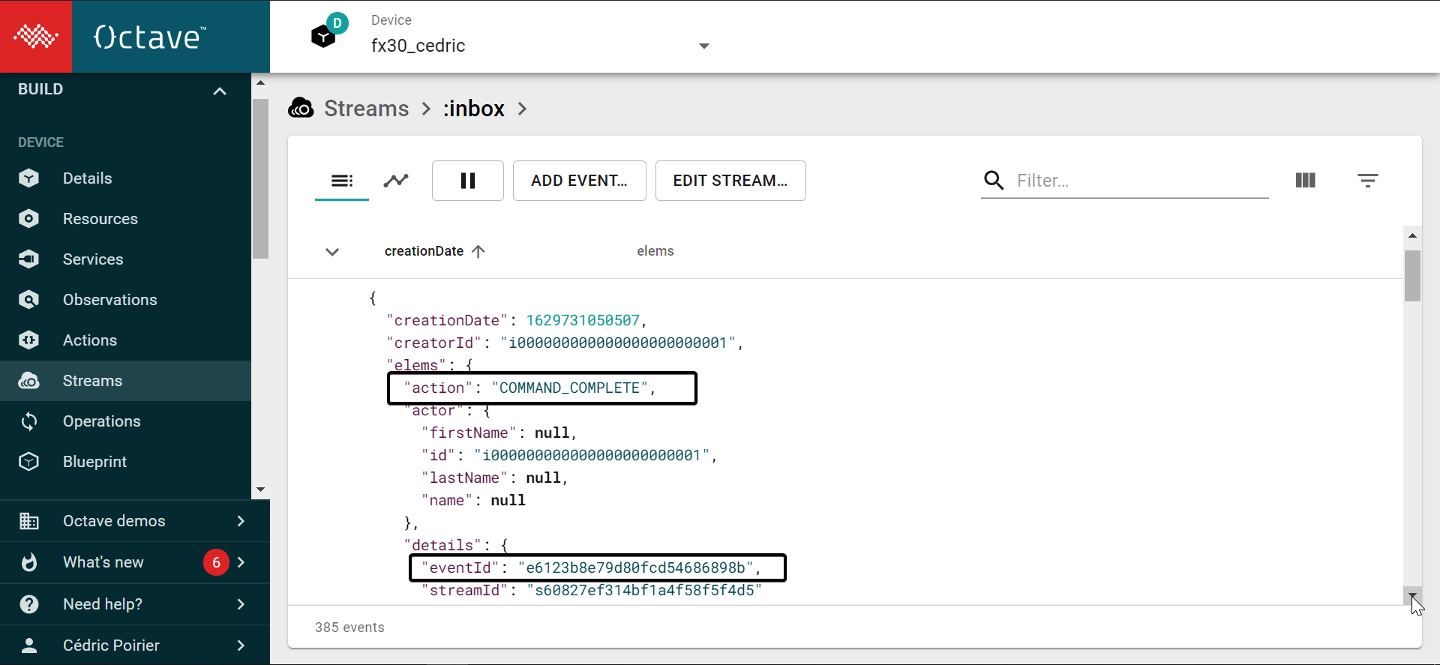
If you’re in Developer Mode you can determine whether the file has been deleted by simply checking whether it has disappeared from the /files/list/value Resource in the Resources tab.
The following are the supported functions for operations details on Octave Cloud:
- List sent file operation per device
Tutorial: ORP File Transfer Using an Example Program
Overview
This section provides a tutorial to help you set up and experiment with File Transfer using ORP.
ORP is a simple ASCII-based protocol built on top of HDLC-framed data sent via UART, which allows communications between an asset and an Octave edge device.
In the tutorial, your development machine will act as the asset and will be connected to an FX30S using a USB-to-serial cable.
Your development PC will run a C program through which you can enter high-level commands to create and work with Resources. The program translates your commands into ORP's underlying packets and sends them to the Octave edge device over the serial connection.
The tutorial's program will provide you with an understanding of how you might write your own program to run on an asset and use the file transfer feature over ORP.
Note
When experimenting with ORP, it can be useful to enable Developer Mode to see real-time updates of all creation, deletion, and value update events related to ORP on the Resources screen.
Requirements
For this tutorial you will need:
- Development machine running Linux (e.g., Ubuntu 20.04)
- USB-to-UART bridge such as a CP2102 or a USB-to-serial cable
- FX30S (for a USB-to-serial connection)
- A copy of the ORP tutorial package from GitHub, available here:
https://github.com/SierraWireless/octave-orp - To build the sample C program you will also need basic development tools: gcc, make
Setting up the USB Connection
Follow the steps below to connect your Octave-enabled device to your development PC:
- Connect the USB end of your USB-to-UART or USB-to-serial connection to your development PC. Connect the other end to your Octave-enabled device as follows: USB-to-serial: plug the RS-232 end of the cable into the respective port on your FX30S.
- (For USB-to-UART connections) Ensure that your development machine has the correct drivers installed for your USB-to-UART bridge (e.g., CP210x USB to UART Bridge VCP Drivers).
- Power on your Octave-enabled device and ensure that you can view the FX30S via the Octave dashboard and that the device is actively reporting.
- Identify the name of your USB-to-UART or USB-to-serial connection on your development machine using the appropriate platform-specific steps below. This name will be used later in this tutorial when running the example program.
Linux:
Open a terminal window, and run the following command to obtain a list of devices:
ls -l /dev/serial/by-id/
Locate the device in the output. The following shows examples of how the device might appear:
crw-rw-rw-  1 root  wheel           21,   4 29 Sep 08:15 tty.SLAB_USBtoUART
...
crw-rw-rw-  1 root  wheel           21,   6 29 Sep 08:16 tty.usbserial
...
lrwxrwxrwx 1 root root 14 Sep 23 13:18 usb-Silicon_Labs_CP2104_USB_to_UART_Bridge_Controller_0138DD7D-if00-port0 -> ../../ttyUSB1
...
Configuring UART in Octave
Follow the steps below to complete the configuration of your UART connection on the Octave side:
- Select your FX30S in the Octave dashboard, and then navigate to Build > Device > Services and locate the Octave Resource Protocol section.
- Click on UART1.
Note:
Ensure the device's UART is not already allocated in a Service, otherwise the UART cannot be configured.
- Set Baud Rate to 9600, Parity to None, Data bits to 8, and Stop bits to 1. For an FX30S, Routing will be automatically set to Rear port. The Standard must be set to RS-232.
The following screenshot shows what these UART configurations look like in Octave:
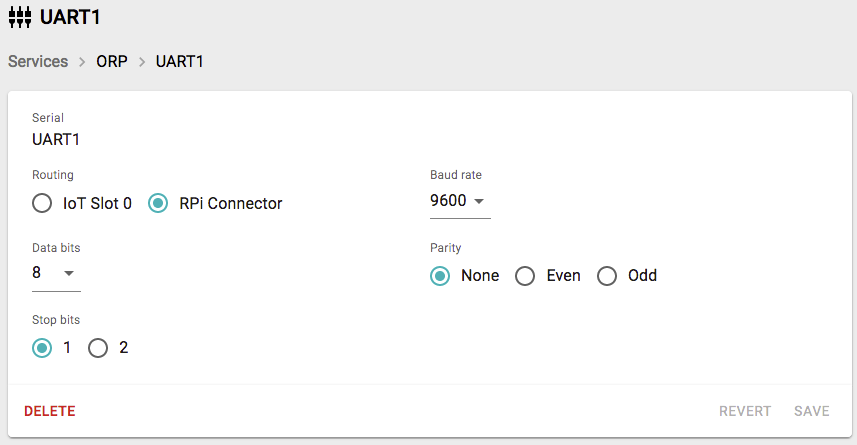
Example UART configuration for ORP via UART on a mangOH device.
- Click Save to save the UART service.
Installing and Running the Sample C Program
Follow the steps below to set up and run the C program example:
- Open a terminal window and navigate to the directory where you cloned or downloaded the ORP tutorial package from GitHub to your development machine (e.g., /octave-orp-master/clients/c).
- Consult the package's README.md file for instructions on building and running the sample client.
- Run the example program, passing in the name of your USB-to-UART or USB-to-serial connection that you identified earlier on your development PC to the -d argument.
For example, the following shows how to run the program with a USB-to-serial connection on /dev/ttyUSB0 of a development machine:
./bin/orp -d /dev/ttyUSB0 -b 115200
Syntax:
The example program allows you to create, update, query, receive notifications for, and delete Octave Resources over ORP by entering commands; its usage is summarized here:
ORP Serial Client - "h" for help, "q" to exit
using device: /dev/ttyUSB0, Baud: 115200
Protocol codec initialized

orp > h
Syntax:
        help
        quit
        create input|output|sensor  trig|bool|num|str|json <path> [<units>]
        delete resource|handler|sensor <path>
        add handler <path>
        push trig|bool|num|str|json <path> <timestamp> [<data>] (note: if <timestamp> = 0, current timestamp is used)
        get <path>
        example json <path> [<data>]
        reply handler|sensor|control|data <status>
        sync syn|synack|ack [-v] [-s] [-r] [-m]
        file control info|ready|start|suspend|resume [<private data>]
        file data [<data>]
File Transfer Example
Startup and update MTU
On startup, the ORP service will send synchronization packets to the asset every 5 seconds, until a response is received:
orp >
Received: 'Y00T1619579167.000000', (31 bytes)
        Type     : Synchronization, sync
        Data type: -1
        Sequence : 0
        Timestamp: 1619579167.000000
The asset should respond to the sync packet with an ACK:
orp > sync ack
Sending: '~z00~', (8 bytes)
        Type     : Synchronization, ack
        Data type: 0
        Sequence : 0
Note: If a different MTU is needed, the asset can respond to the SYNC packet with a SYNACK, which can include the MTU:
orp > sync synack -m 512
Sending: '~y00M512,S0,R0L~', (18 bytes)
        Type     : Synchronization, sync-ack
        Data type: 0
        Sequence : 0
Alternatively, if the SYNC packet has already been acknowledged, the asset can initiate a sync with ORP by sending a SYN packet and including the MTU:
orp > sync syn -m 512
Sending: '~Y00M512,S0,R0m~', (18 bytes)
        Type     : Synchronization, sync
        Data type: 0
        Sequence : 0
Add a Handler to the /files/list/value Resource
Invoke the add handler command on the /files/list/value Resource to watch for changes to its value. After this has been added, any updates to the value (e.g., when a new files is fully downloaded on the Edge) will invoke the handler and the example program will display the information received.
orp > add handler /app/files/list/value
Sending: '~H10P/app/files/list/value +~', (34 bytes)
        Type     : Request, handler add
        Data type: 0
        Sequence : 1
        Path     : /app/files/list/value

orp >
Received: 'h@00', (4 bytes)
        Type     : Response, handler add
        Status   : 0 (OK)
        Sequence : 0
Notify Readiness for File Transfer
The asset indicates to ORP that it is ready for transfers:
orp> file control ready
Sending: '~L150~', (8 bytes)
        Type     : Notification, File transfer control
        Event    : 1
        Sequence : 5

orp >
Received: 'l@00', (4 bytes)
        Type     : Response, File transfer control
        Status   : 0 (OK)
        Sequence : 0
Receive new File Notification
Upon completion of the file reception by Octave Edge device the /app/files/list/value resource is changed, and ORP notify the remote asset:
orp >
Received: '[email protected]', (193 bytes)
        Type     : Response, get
        Status   : 0 (OK)
        Sequence : 0
        Timestamp: 1619478046.444278
        Data     : {"path":"/data/le_fs/fileStream/files","files":[{"name":"file_01.txt","hash":"7691C1B89D19BFE9A659EAA237CF64E929A5D57DF8419BF49525034891488B43","size":2000,"origi\
n":0}]}
Request File Transfer
Upon completion of the file reception by Octave Edge device the /app/files/list/value resource is changed, and ORP notify the remote asset:
orp >
Received: '[email protected]', (193 bytes)
        Type     : Response, get
        Status   : 0 (OK)
        Sequence : 0
        Timestamp: 1619478046.444278
        Data     : {"path":"/data/le_fs/fileStream/files","files":[{"name":"file_01.txt","hash":"7691C1B89D19BFE9A659EAA237CF64E929A5D57DF8419BF49525034891488B43","size":2000,"origi\
n":0}]}
The Asset tells ORP to start the transfer of a specific file: file_01.txt:
orp > file control start file_01.txt
Sending: '~L300Dfile_01.txtY~', (20 bytes)
        Type     : Notification, File transfer control
        Event    : 3
        Sequence : 0
        Data     : file_01.txt

orp >
Received: 'l@00', (4 bytes)
        Type     : Response, File transfer control
        Status   : 0 (OK)
        Sequence : 0
Receive Data Packets
Upon receiving the START event, ORP will begin sending data to the asset:
orp >
Received: 'T00DLorem ipsum dolor sit amet, ...', (505 bytes)
        Type     : Request, File transfer data
        Data type: -1
        Sequence : 0
        Data     : Lorem ipsum dolor sit amet, …
The asset must acknowledge each packet before ORP will send another. A successful receipt is indicated by a status code of zero. All other values will be interpreted as a negative acknowledgement. This will result in ORP resending the last packet.
orp > reply data 0
Sending: '~t@10"~', (8 bytes)
        Type     : Response, File transfer data
        Status   : 0 (OK)
        Sequence : 1
This continues until the last data packet is received.
File Validation
The asset must count incoming bytes from the payload of the data packets in order to know when the file has been fully transferred. ORP does not send any notification indicating that the transfer is complete.
The asset should also check the SHA 256 hash against the file contents to validate its content.
ORP Control Sending Sequence
Octave enables you to configure the Remote Asset to control when to start sending the file from Octave Cloud to the Octave Edge.
Disable autostart
By default, the /files/autostart Resource is set to true so that the file is sent automatically upon request.
Follow the steps below to disable autostart:
- Select your FX30S in the Octave dashboard, and then navigate to Device > Resources and locate the file service path.
- Click on files/.
- Set autostart to false:

ORP Control Sending Sequence Integration
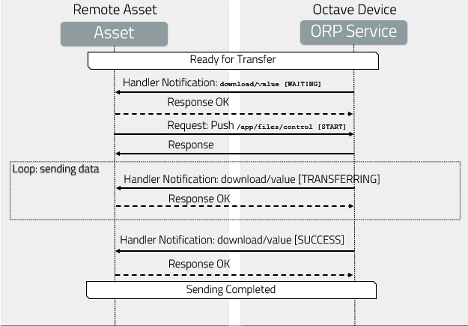
The following is the sequence of calls to be made between your asset and the ORP Service to handle the sending of a file from the Octave Cloud to Octave Edge by your asset. This applies when you disable the autostart function from the Octave file service and your Remote Asset has added a handler on the /app/files/download/value Resource (see the start-up sequence – see the previous section):
- The Remote Asset is notified by the handler on the /app/files/download/value Resource that a new file is in a waiting state on Octave Cloud, meaning it’s ready for sending. The Remote Asset can only check the filename and size to determine if it should accept the sending.
- The Remote Asset requests Octave Cloud to start sending the file to Octave Edge by pushing the new transfer status start to the files/control Resource.
- The Remote Asset is notified by the handler on the /app/files/download/value Resource that the file is in a new state (transferring), meaning file sending is on-going from Octave Cloud to Octave Edge including a progress percentage and remaining size to be downloaded in bytes.
- The Remote Asset is notified by the handler on the /app/files/download/value Resource that the file sending operation is complete with a new state: success.
Updated about 3 years ago
