Pushing Data from Octave to IoT Central
This topic describes how to integrate Octave with Microsoft Azure IoT Central to report sensor data to your IoT Central application.
Deprecation Notice
This whole section still works but connectors should be used instead
1. Setting up IoT Central and Device Bridge
- Create your IoT Central application in the Azure Portal:
- Navigate to: https://apps.azureiotcentral.com/myapps
- Create a new application of your choice.
B. Deploy and configure the "device bridge" from the Azure portal: Install "Device bridge", and follow its deployment steps from 1 to 6 . We have integrated the required steps below in this documentation.
If you want to access the original online source for this Device Bridge installation tutorial, it is maintained here by the Azure team Device Bridge Readme. Otherwise, just keep following the steps below.
Azure Device Bridge deploy and configuration tutorial
Right click to open this in a new tab: 
Instructions
Follow the steps below to deploy an Azure Function into your subscription and set up the device bridge:
- Click the
Deploy to Azurebutton shown above. This opens up a custom ARM template in the Azure Portal to deploy the Device Bridge Azure Function.
Populate the parameters in the ARM template:
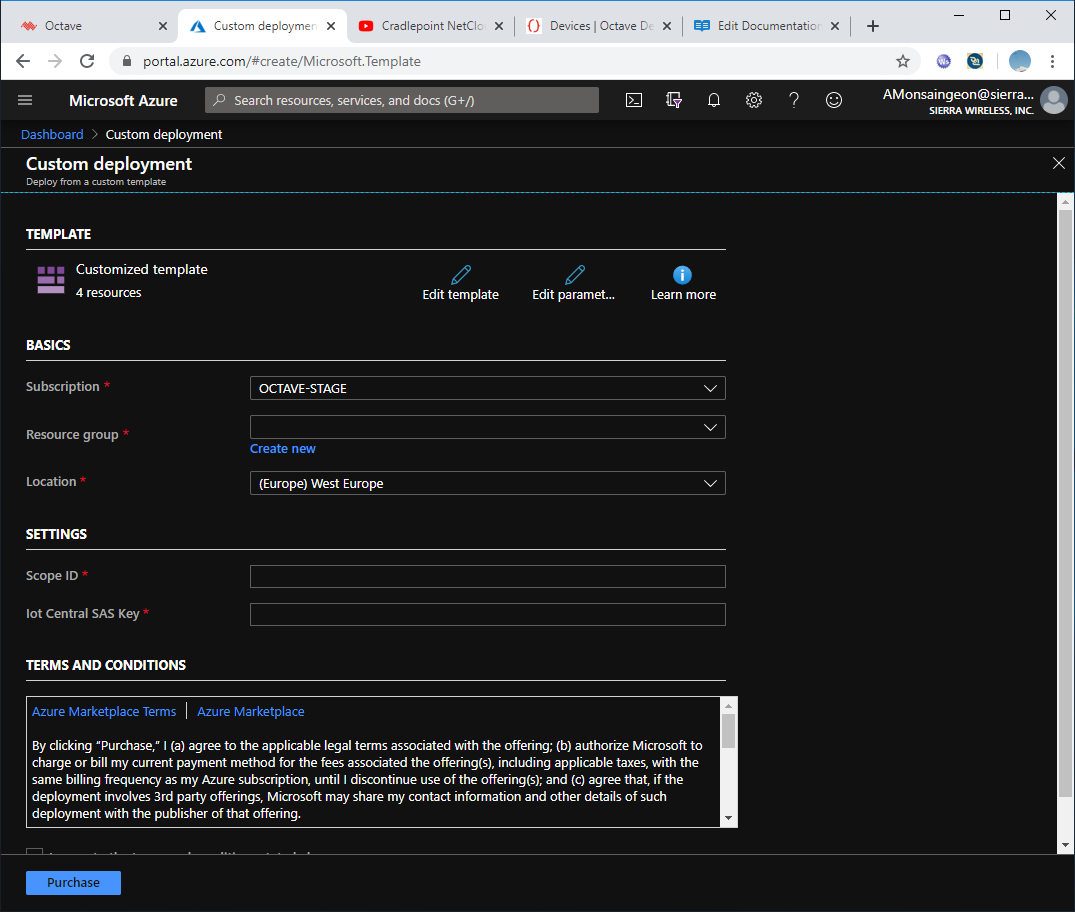
Populate the BASICS as required.
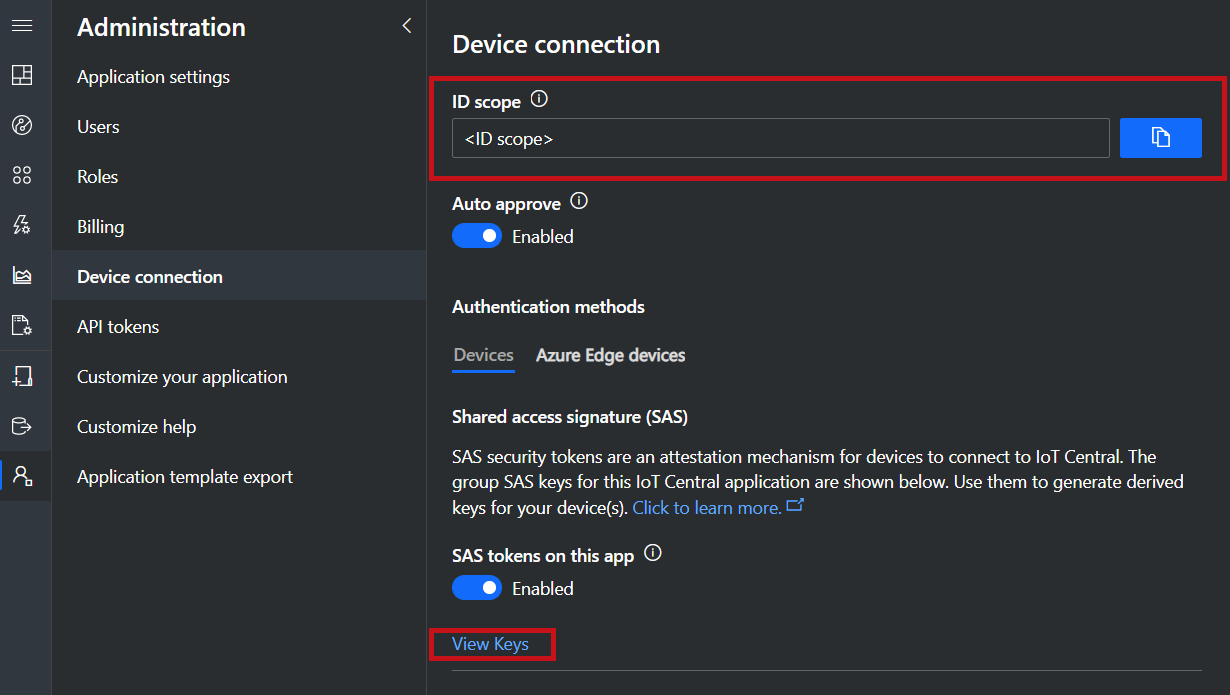
Populate the required SETTINGS: the step below indicates how to obtain the Scope ID and IoT Central SAS key from the IoT Central application.
Navigate to your IoT Central web application page
The IoT Central application mentioned in step 2 below, is the IoT central web application, which differs from the management of your IoT Central service in the Azure portal.
- Navigate to your IoT Central application, and then to the Administration > Device Connection area.
- Copy the ID Scope and paste it into the Scope ID field the ARM template requires you to fill.
- On the same page, under the Devices tab, click View Keys. Copy either the Primary key or the Secondary key and paste it into the
IoT Central SAS Keyfield that the ARM template requires you to populate:
Go back to your Azure portal dashboard
- Click on the Purchase button at the bottom of the page you opened when launching the ARM template deployment.
The Azure portal notifications (top-right corner) will tell you when the resources related to the package deployment have been successfully completed.
This may take a few minutes.
- Configure the device bridge function:
Navigate to All resources within the Azure Portal, and search for a resource named Function App; it has been deployed as part of Step 1.
Install the required NPM packages in the function that was deployed in your Azure portal: navigate to the Function App that was deployed to your subscription in the Functions > IoTCIntegration > Console tab (click on Console at the bottom of the page).
Run the command: npm install in the console (this command takes about 20 minutes to complete). No specific message is displayed upon completion and the spinning wheel disappears when done.
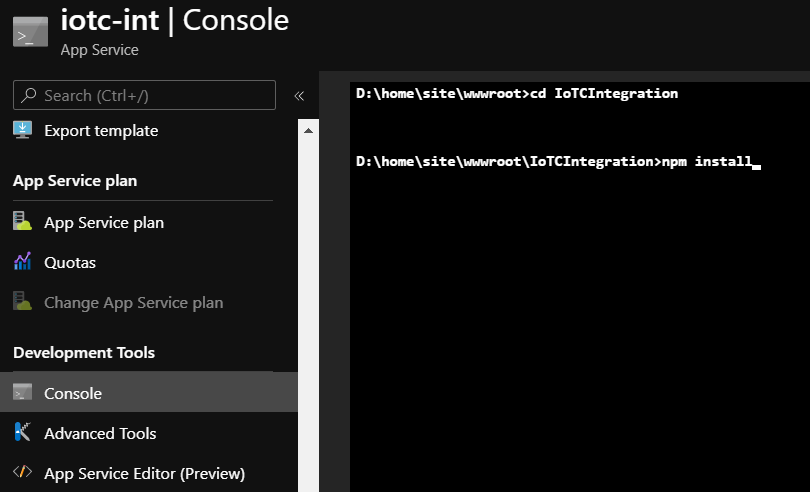
- After the package installation finishes, the Function App needs to be restarted by clicking the
Restartbutton inOverviewpage.

- The function is now ready to use. External systems can feed device data through this device bridge and into your IoT Central app by making HTTP POST requests to the function URL. The URL can be obtained in the newly created function App in Functions > IoTCIntegration > Get Function Url:
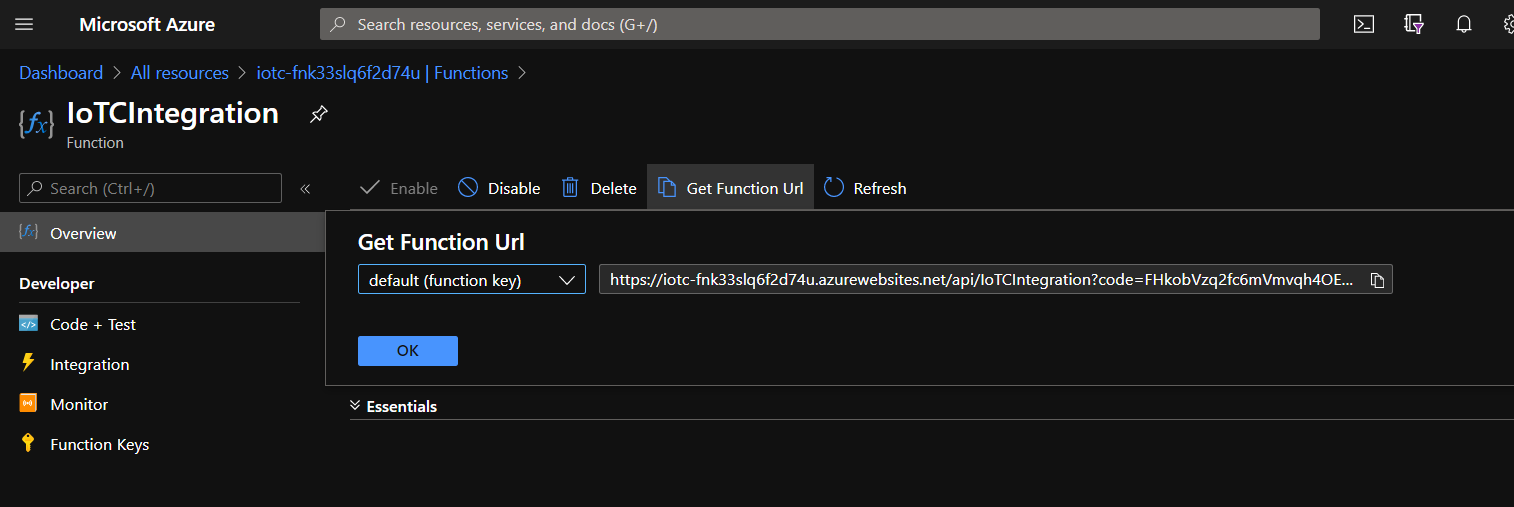
The function URL you retrieve will look like https://iotc-abcdefghijlk.azurewebsites.net/api/IoTCIntegration?code=xxxxxxxxxxxxxxxx==
This is the URL that will be used to POST data to IoT Central in your Octave Cloud Action further below.
2. Using a Cloud Action in Octave to POST Data to IoT Central
Your cloud action performs the following:
- takes Events coming from a given Stream or a group of device Streams using Tag-based Cloud Actions. Select the Tags and Streams that your devices use to report your Telemetry
- retrieves the
deviceIdand measurements/data to be sent to IoT Central. - formats the payload in the data structure expected by IoT Central.
- performs an
HTTP.postto IoT central.
As you can see, there is only one URL to post data to IoT Central , and the only device-specific field is the deviceId in the payload.
To initially check that data goes through when you post data with your Cloud Action:
- check the logs of the Device Bridge in the Azure console.
- run a report showing what is returned by the
Octave.http.postto a stream ("/mycompany/iotcentral_post_results/:reports" as shown in the example code below:
function(event) {

// retrieve device ID

var deviceId = event.path.split("/")[3];
// deviceId = deviceId.replace(/_/g, "-"); // for previous versions of device bridge, "_" need to be replaced in device names

// fill-in your payload

// payload must follow the format below for IoT Central

var ICpayload = {
"device": {
"deviceId": deviceId},
"measurements": {
  "sensorA": event.elems.sensorA.value,
  "sensorB": event.elems.sensorB.value}
};

var icpostBody = JSON.stringify(ICpayload);
var icpostHeaders = {'Content-Type': 'application/json'};


var icresult = Octave.Http.post('https://iotc-fnmgepx3vq5ir7e.azurewebsites.net/api/IoTCIntegration?code=wwanxxxxxxxxx', icpostHeaders, icpostBody)


return {  "/mycompany/iotcentral_post_results": [{"elems": icresult}]};

}
Customize Your Telemetry Data
event.elems.sensorA.value in the above code is an example, you have to replace this code to match the data which is reported by your device in the Stream which is processed by the Cloud Action.
Create Streams Before you Return Anything to Them in a Cloud Action
Before running the above Cloud Action, you have to create the stream /mycompany/iotcentral_post_results via the Octave UI or API.
3. Allowing Devices in the IoT Central Application
For device data to be received on the IoT Central application side:
- a device template, describing the telemetry JSON structure that is pushed from the devices must first be created (at least once for your category of device).
- any device which starts sending data will first appear as not associated to a template. IoT Central will only start collecting its data once you have associated it to a device template, or will report data as "unmodeled data" until you have done so.
As IoT Central interface evolves over time, we recommend that you look at the Azure IoT Central documentation here https://docs.microsoft.com/en-us/azure/iot-central/core/howto-set-up-template) if you need more explanations than provided below.
a. Create a device template:
Navigate to IOT Central > App Settings > Device templates and follow the process (IoT Central UI evolves over time so the steps below might have changed, but things are usually pretty straightforward)
-
Select "New", select IoT Device and then customize
-
Do not click Gateway device
-
Create a template and enter a device template name.
-
Then either create a Custom device or use import a .json template. Usually you go for Custom to set-up your own device (list of sensors and properties). A sample .json template is provided below
-
You must create at least one Interface
-
Add Interface
-
Custom
-
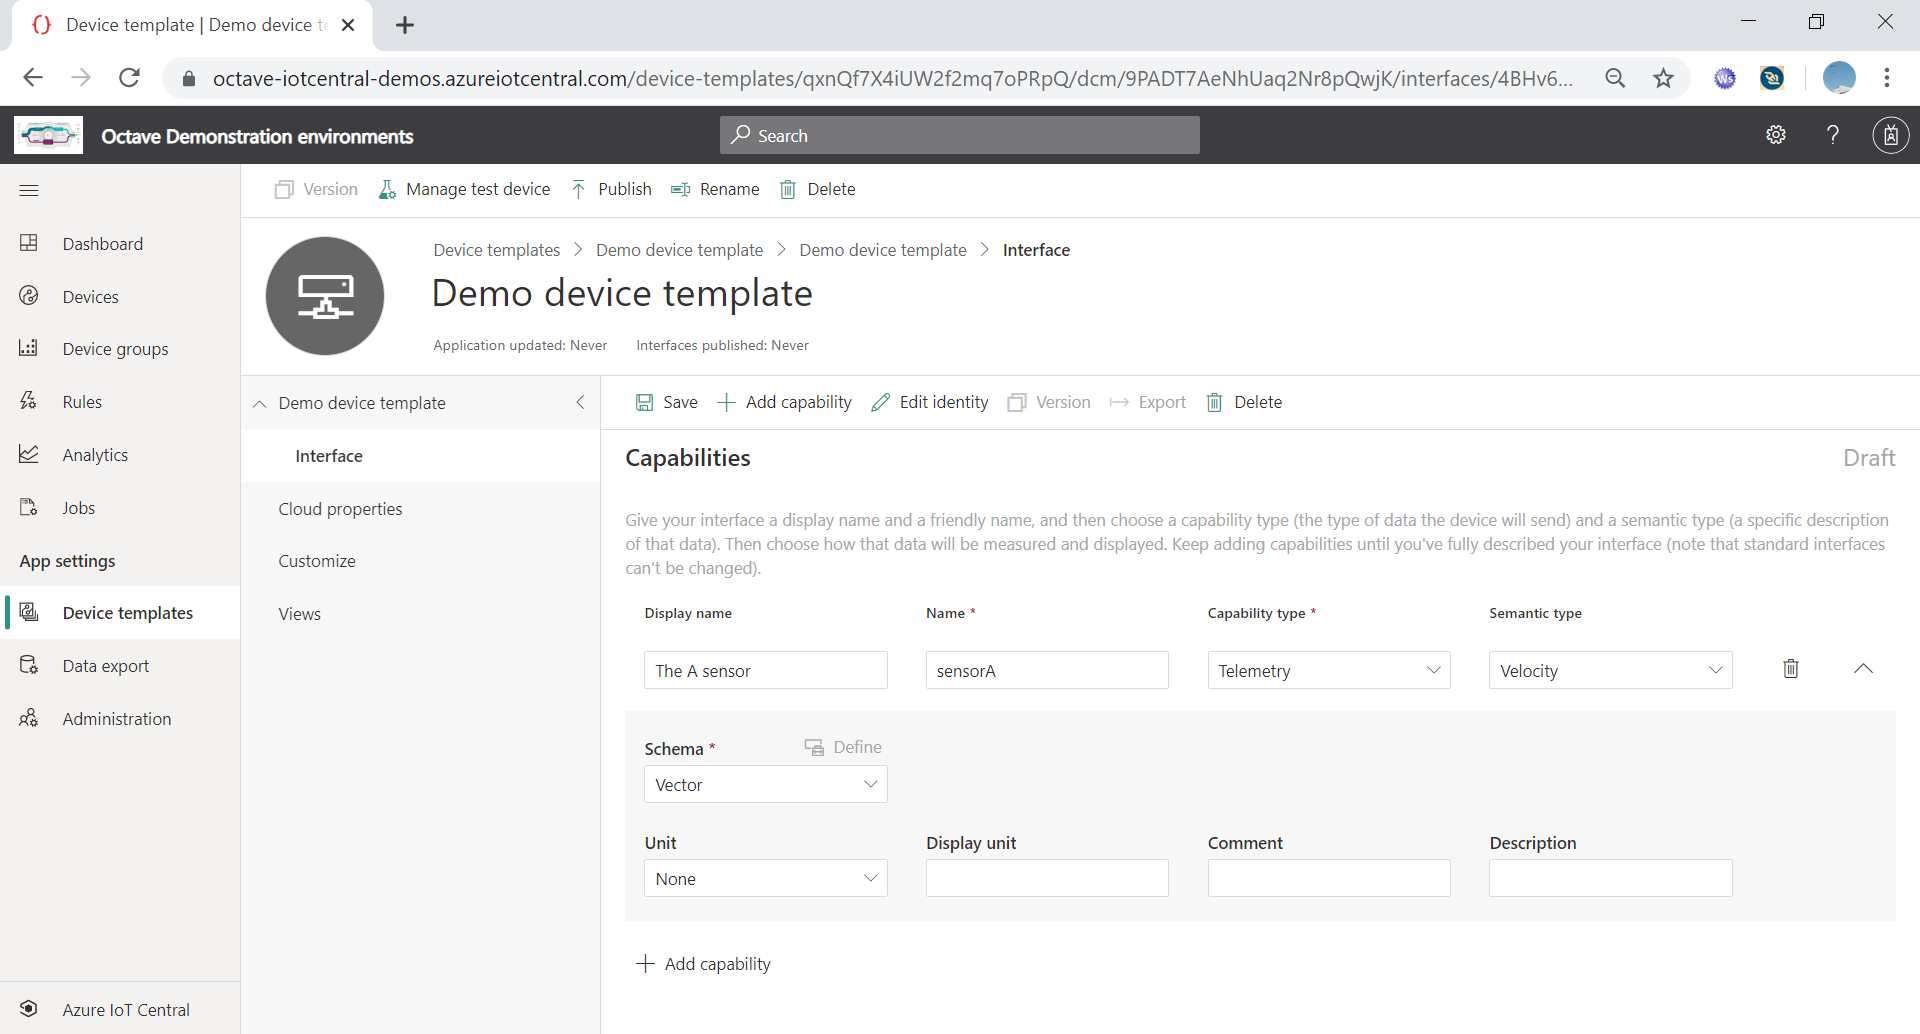
Add capability: this is where you map the data reported by your device to Telemetry data names:
-
Display Name: choose a user friendly name, for instance "Sensor A data"
-
Name: this must exactly match the name of the field as present in the device "measurement" payload reported from device, and the case must match as well. Here your Sensor A in the Cloud action code seen before is: "sensorA" as the payload coming from the device is formatted as: { "measurements": {"sensorA": event.elems.sensorA.value}.
-
Add as many telemetry values as you need and then save the Interface.
-
Publish your device template via the top bar; whenever you make a change later on, you need to publish it again for changes to happen.
Note: if you want to import a simple device template for the mangOH Red, one is provided at the end of this tutorial.
b. Associate a Device to an Existing Template:
As seen on the screen capture below, a device named "test-device" has been seen, but has no assigned device Template:
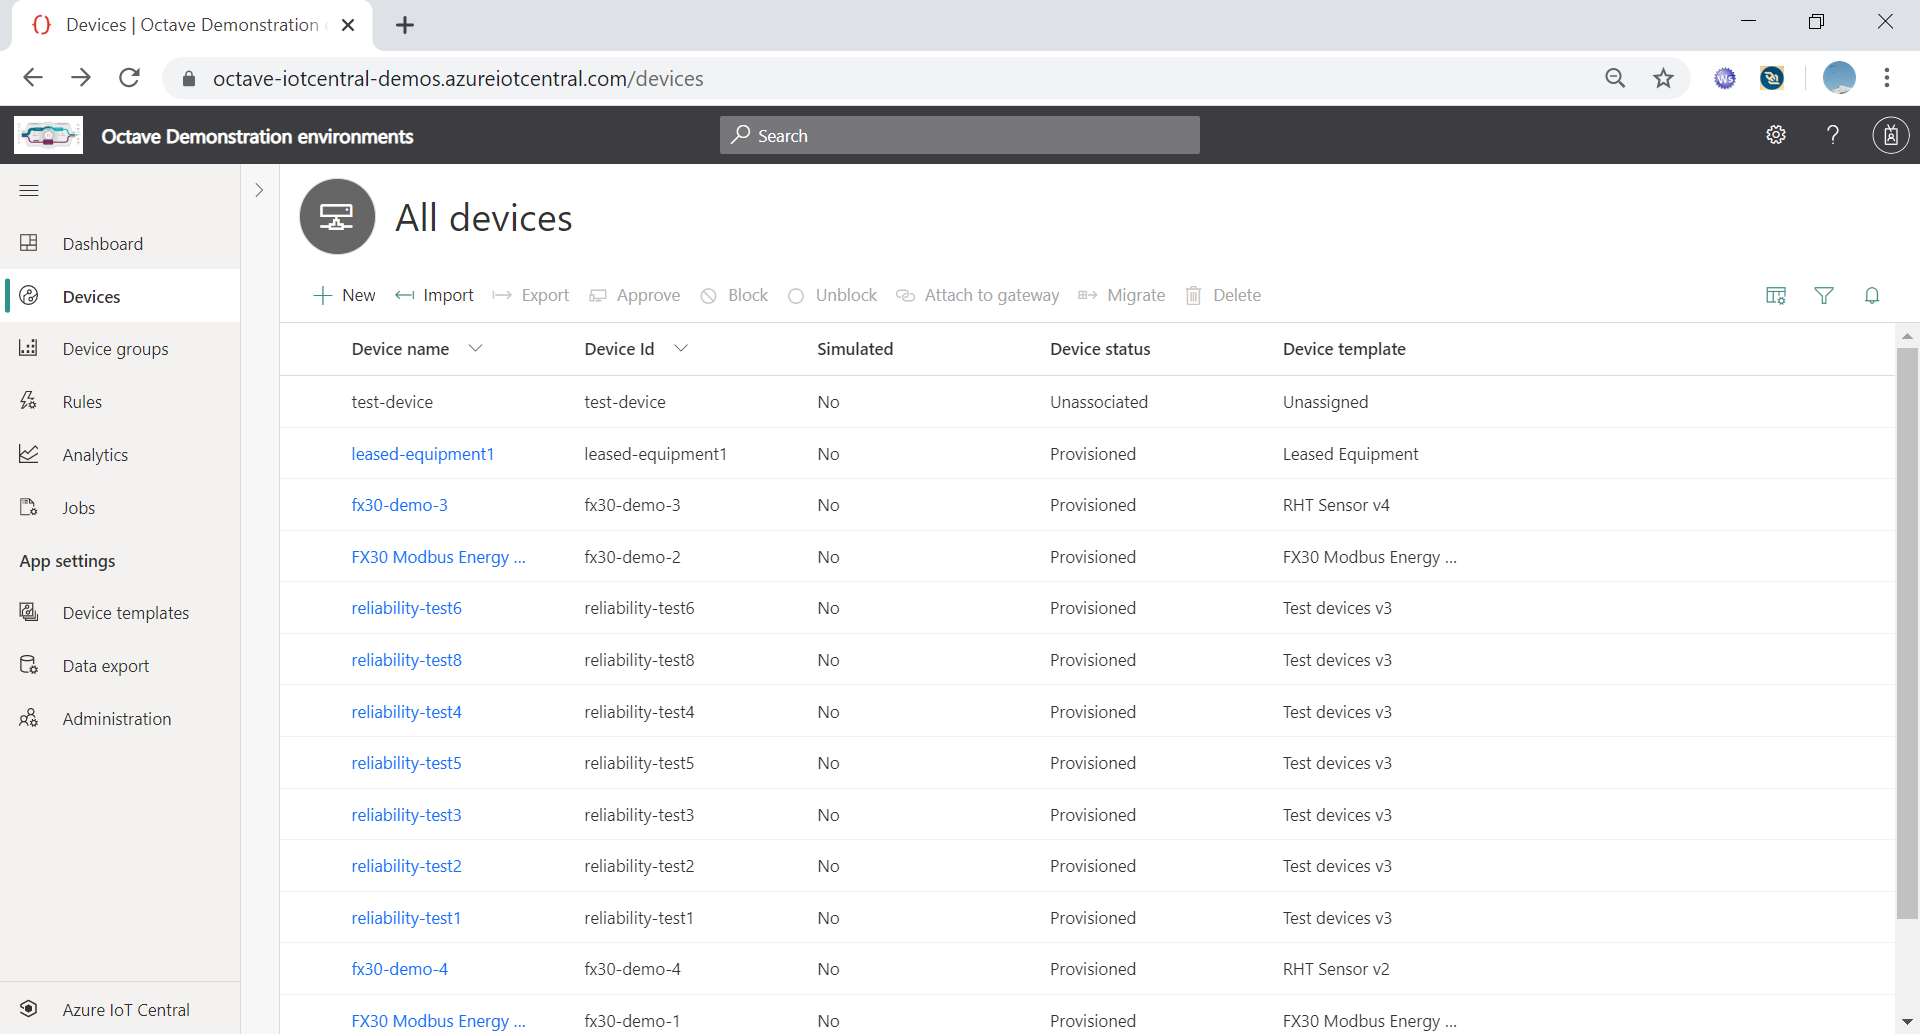
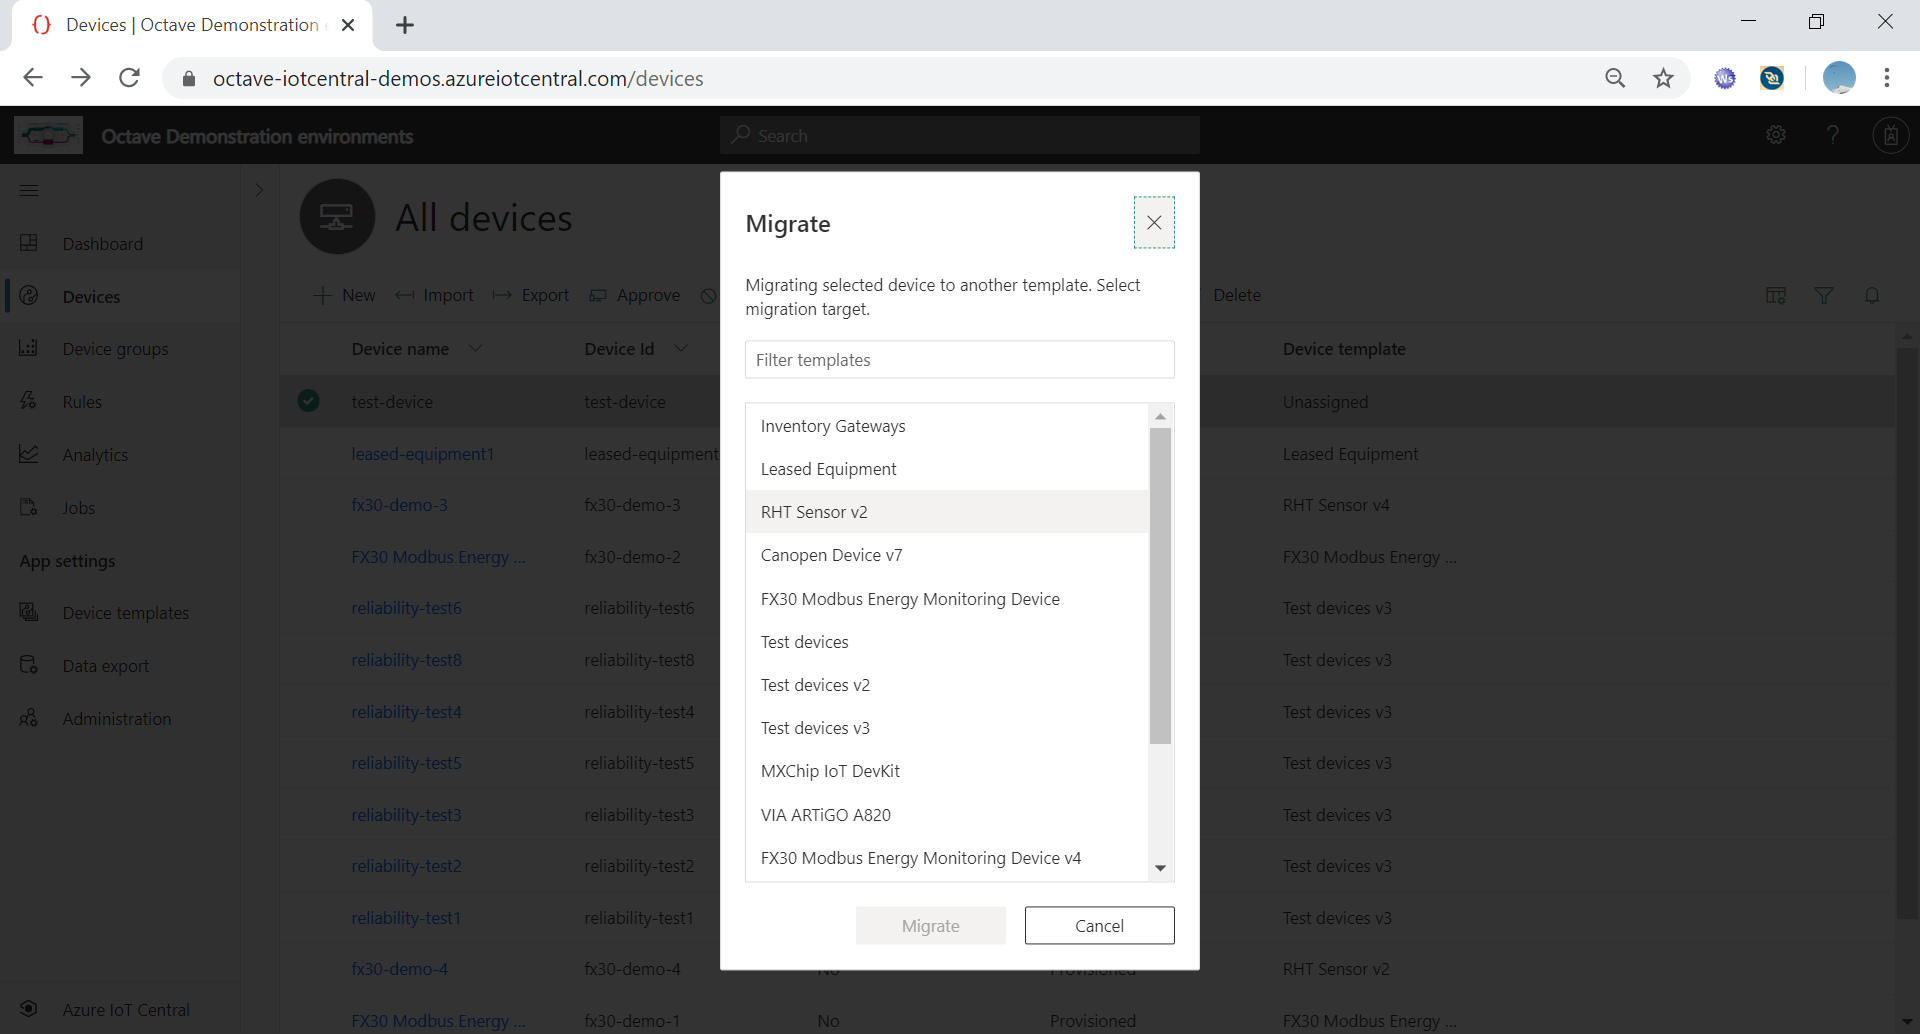
Select that device and click Migrate to associate it to an existing device template:
c. View Device Telemetry
There are three main ways to access to device Telemetry:
-
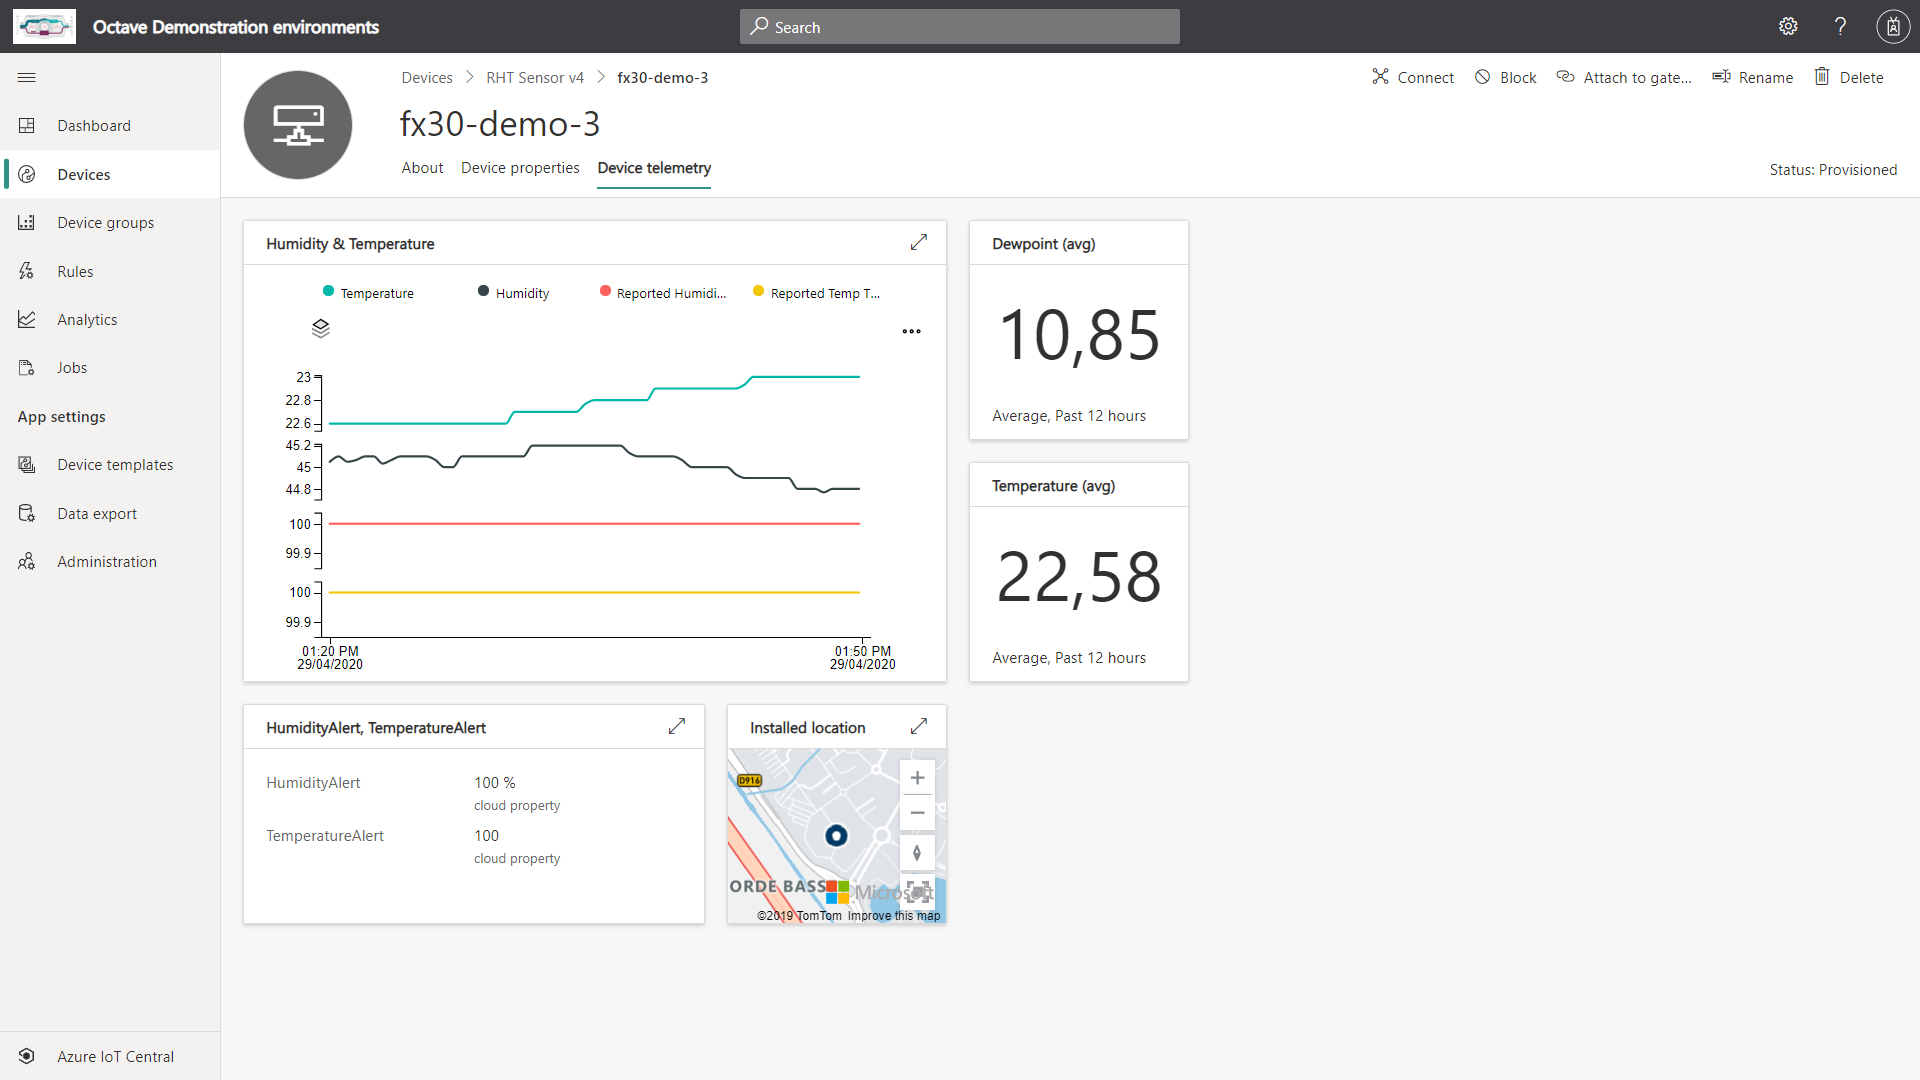
Create a standard device View as part of the device template. When you browse into your device in IOTC, you will then have access to the View of your device (it's a per-device dashboard). In order to create/update the device View, navigate to the device Template, edit it, and publish it.
-
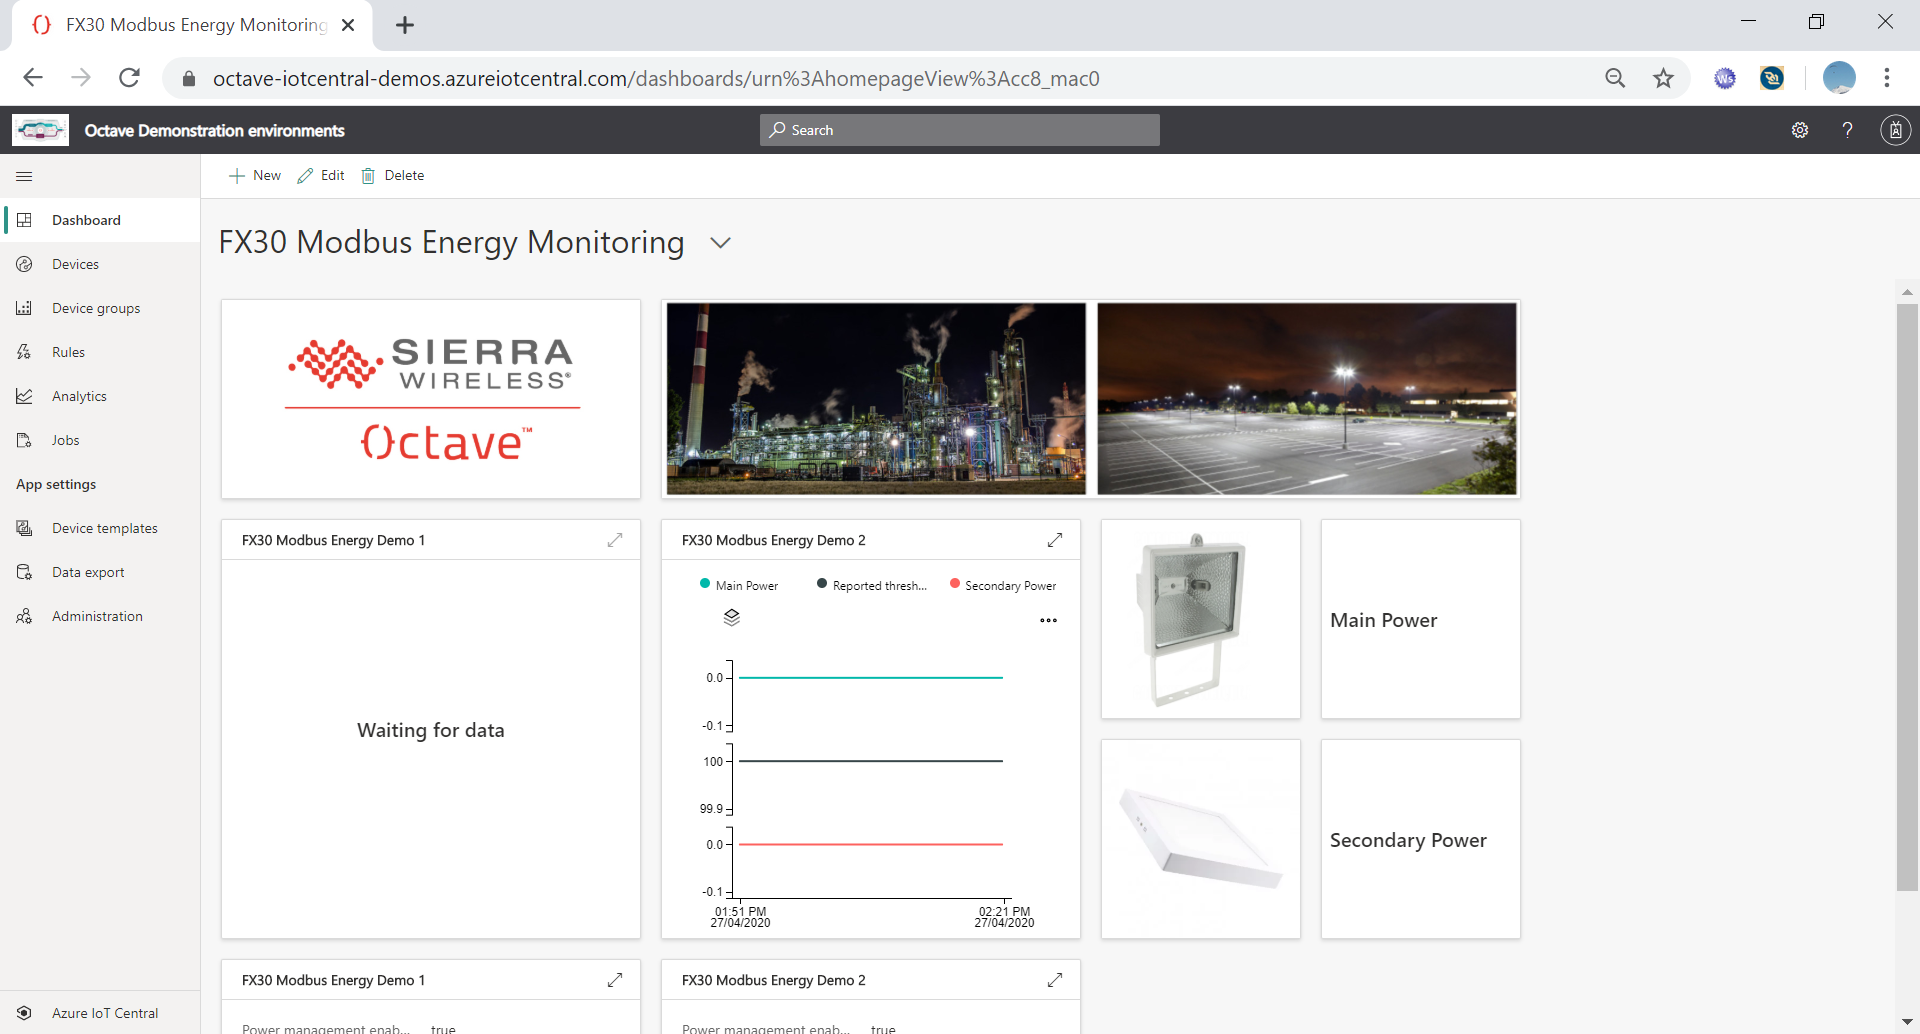
Create a Dashboard: navigate to Dashboards and create or edit one. When you create a dashboard, it can be made public (only the IOTC App) or private (only you have access).
-
Show Analytics: this provides non pre-formatted access to all stored telemetry data. Select a device group, the Telemetry values, rules (count, average, ...) and split (none, per device Id, ....) to create graphs.
Device View:
Dashboard:
Analytics:
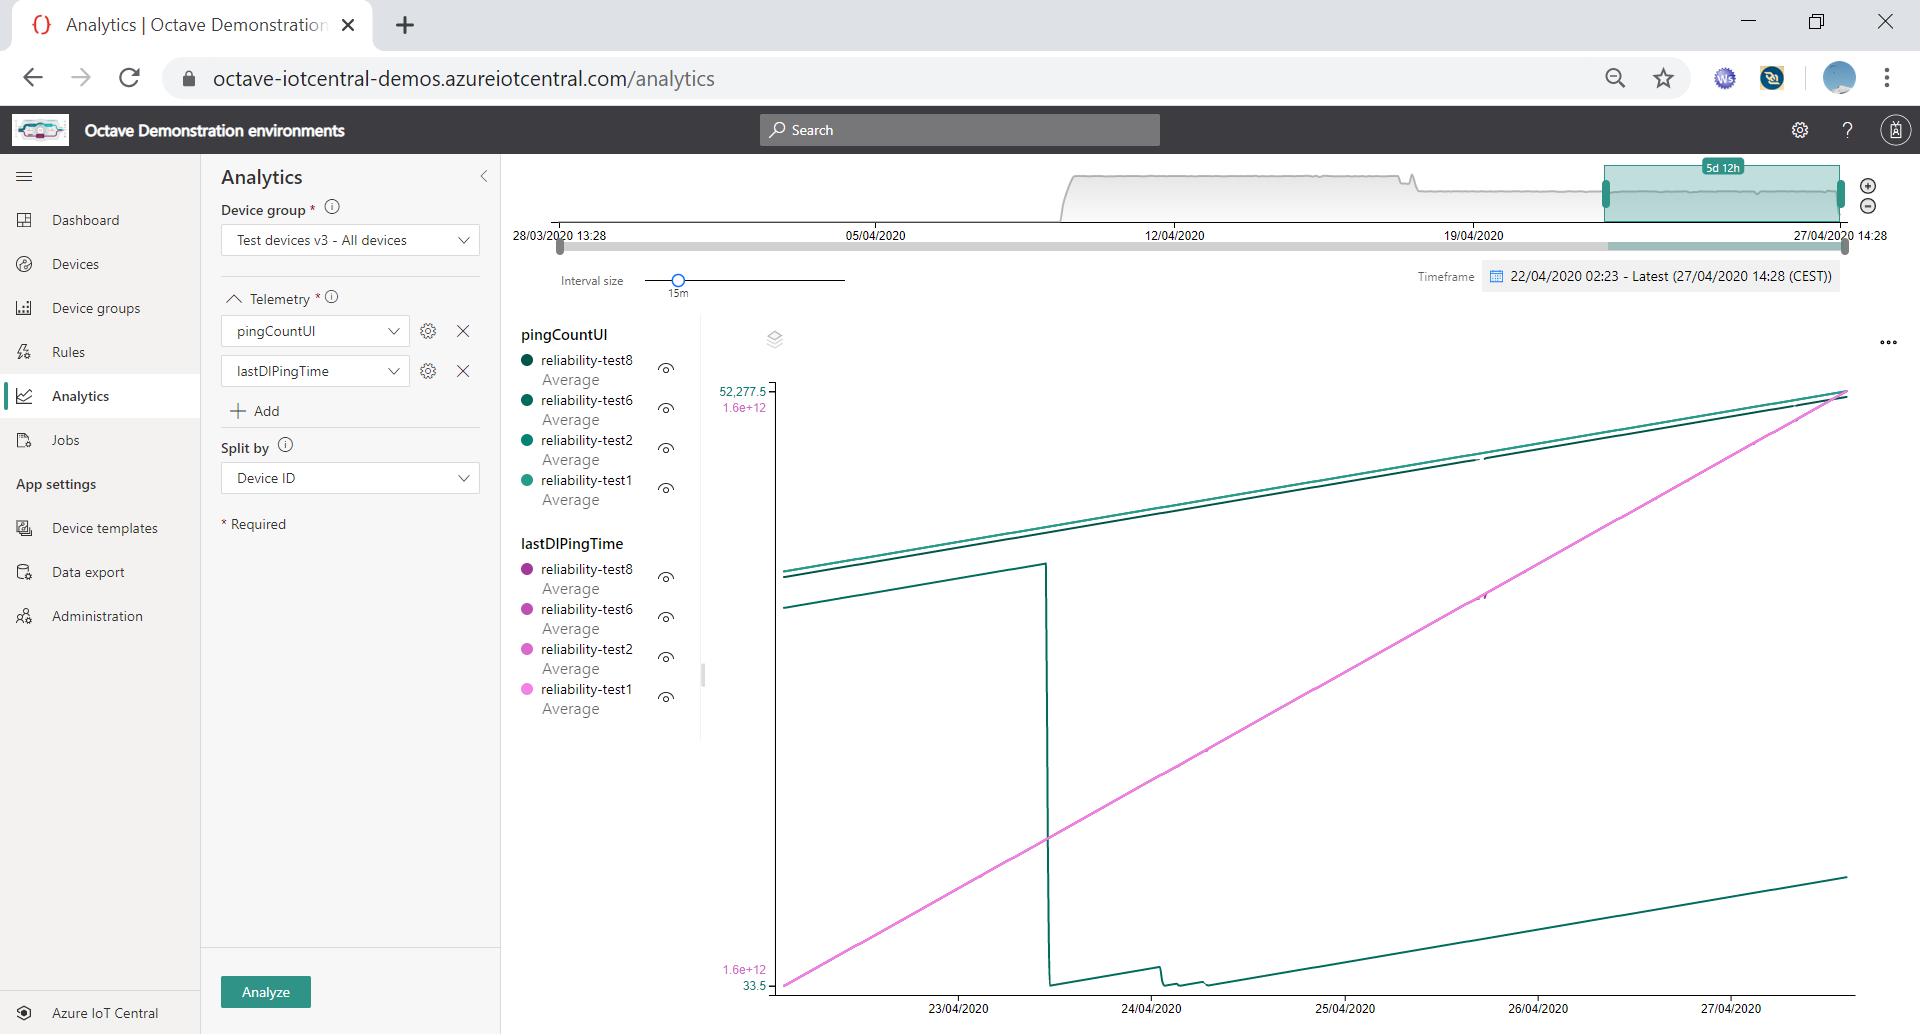
Device Template Example
You can use this file to import a device template which has three sensors (temperature, light, pressure). You can use it for a mangOH Red or Yellow for instance, provided that the reported sensor names under "measurements" are: "light", "pressure", and "temperature".
{
  "@id": "urn:octaveNamIotc:MangoHRed_42d:1",
  "@type": "CapabilityModel",
  "implements": [
    {
      "@id": "urn:octaveNamIotc:MangoHRed_42d:p1ws_jan9:1",
      "@type": "InterfaceInstance",
      "displayName": {
        "en": "Interface"
      },
      "name": "MangoHRed_35t",
      "schema": {
        "@id": "urn:octaveNamIotc:MangoHRed_35t:1",
        "@type": "Interface",
        "displayName": {
          "en": "Interface"
        },
        "contents": [
          {
            "@id": "urn:octaveNamIotc:MangoHRed_35t:light:1",
            "@type": "Telemetry",
            "displayName": {
              "en": "Light"
            },
            "name": "light",
            "schema": "double"
          },
          {
            "@id": "urn:octaveNamIotc:MangoHRed_35t:temperature:1",
            "@type": "Telemetry",
            "displayName": {
              "en": "Temperature"
            },
            "name": "temperature",
            "schema": "double"
          },
          {
            "@id": "urn:octaveNamIotc:MangoHRed_35t:pressure:1",
            "@type": "Telemetry",
            "displayName": {
              "en": "Pressure"
            },
            "name": "pressure",
            "schema": "double"
          }
        ]
      }
    }
  ],
  "displayName": {
    "en": "MangoH Red"
  },
  "@context": [
    "http://azureiot.com/v1/contexts/IoTModel.json"
  ]
}
Updated over 3 years ago
