Octave Resource Protocol Guides
This topic provides the following tutorials on using Octave Resource Protocol (ORP), a simple ASCII-based protocol that is built on top of HDLC-framed data sent via UART, to facilitate the communication between an edge device and an Octave-enabled device:
- Tutorial 1: ORP Communications via UART
- Tutorial 2: ORP Communications via a USB-to-UART Bridge or USB-to-Serial Cable
- ORP: Protocol definition
- Implementing ORP on your asset's processor
Tutorial 1: ORP Communications via UART
This tutorial uses a Raspberry Pi as an edge device connected to an Octave-enabled device such as an FX30S or mangOH Red, via the UART pins. The Raspberry Pi runs the Octave ORP Evaluation Tool that communicates to the Datahub on the Octave-enabled device using ORP, which in turn, communicates to Octave's cloud service.
The example performs the following:
- Creates a serial object on
/dev/ttyS0. - Uses ORP to create Sensor resources to read the system/platform information, CPU percentage, and memory usage.
- Creates an Output to write a string to the LCD screen.
- Creates an Input resource and periodically sends a value to it.
The sample was built using octave_rp.py from the Octave ORP Evaluation Tool package's Octave ORP Evaluation Tool, which contains helper functions that wrap the ORP commands necessary to perform functionality such as creating inputs, outputs, etc., and can be used as a starting point for writing your own ORP application.
The steps in the following subsections demonstrate how to get this demo set up.
Setting up the Hardware
- Connect the UART pins between the Raspberry Pi and the Octave-enabled device. Be sure to "cross" the wires so that the TX UART pin on the edge device is connected to the RX UART pin on the Octave-enabled device and vice versa. For example, run a wire between Pin 8 on the Raspberry Pi and Pin 10 on the mangOH Red, and Pin 10 on the Raspberry Pi and Pin 8 on the mangOH Red.
- Power on the devices.
- Ensure that you can view the Octave-enabled device via the Octave dashboard.
Setting up the UART on the mangOH Red Through Octave
- Select your mangOH Red device in the Octave dashboard, and then navigate to Device > Services and locate the Octave Resource Protocol section.
- Click on UART1. Note that on a mangOH Red there will only be one UART listed. For an FX30S select UART1 for the rear port.
Note: Ensure the device's UART is not already allocated in a Service, otherwise the UART cannot be configured. - Set Routing to RPi Connector, Baud Rate to 9600, Parity to None, Data bits to 8, and Stop bits to 1.
- Click Save to save the UART service.
Preparing and Running the Sample Application
- Copy and paste all of the source code for the Octave ORP Evaluation Tool package into new .py files on your Raspberry Pi.
- Open a shell on your Raspberry Pi and run the sample client:
python sample.py
Note
You many need to enable permissions on the Raspberry Pi using
chmodto access/dev/ttyS0. For example:
sudo chmod 777 /dev/ttyS0
Verifying the new Resources in Octave
- Navigate to Device > Resources in the Octave dashboard and verify that a new /orp/asset entry has been created.
- Expand /orp/asset and verify that the following resources were created:
/orp/asset/system/platform/orp/asset/system/cpu/orp/asset/system/mem/orp/asset/external_status/lcd1/orp/asset/push_type_input
Notes
- Resources created in /orp/asset using ORP are not persisted by the device across power cycles.
- Remote clients have read/write access only to orp/asset. Other paths under orp are read-only.
Tutorial 2: ORP Communications via a USB-to-UART Bridge or USB-to-Serial Cable
This tutorial uses a mangOH Red connected to your development PC over a USB-to-UART bridge. or an FX30S connected to your development PC over a USB-to-serial cable.
The example performs the following:
- Creates a UART connection using Octave's southbound resource protocol
- Creates three resources under the /orp/asset node on the mangOH Red: system/platform, system/cpu, and system/mem.
What you will need:
- Development machine running Windows, Linux, or Mac OSX.
- A USB-to-UART bridge such as a CP2102, and its drivers installed on your development machine; or a USB-to-serial cable
- Python 2.7 installed on your machine
- mangOH Red (for a USB-to-UART bridge connection) or an FX30S (for a USB-to-serial connection)
- Virtualenv
Identifying the Name of the USB Converter Hardware
Before you can start the development steps, you must first identify the name assigned to your USB-to-UART bridge or USB-to-serial cable by your development machine's operating system. Use the one of the following subsections based on the hardware you will be using.
Identifying the USB-to-UART Bridge Device Name
Follow the steps below if you will be connecting a mangOH Red using a USB-to-UART bridge:
- Connect the USB-to-UART bridge to your development machine.
- Ensure that your development machine has the correct drivers installed for your USB-to-UART bridge (e.g., CP210x USB to UART Bridge VCP Drivers).
- Identify the name of your USB-to-UART bridge device using the appropriate platform-specific steps below. This name will be used in a subsequent step later in this tutorial.
Linux and Mac OSX:
Open a terminal window, run the following command to obtain a list of devices, and then locate the name for your USB-to-UART bridge device:
ls /dev | grep tty
This produces a list similar to the following. In this example, we can see that tty.SLAB_USBtoUART is the name assigned to the USB-to-UART bridge device:
tty
tty.Bluetooth-Incoming-Port
tty.SLAB_USBtoUART
ttyp0
ttyp1
...
Windows:
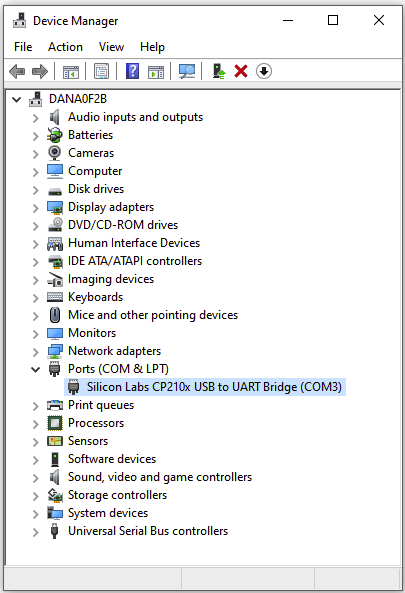
Open the device manager, expand Ports, locate your USB-to-UART device, and identify the COM port assigned to it. For example, the following screenshot shows that COM3 has been assigned to the Silicon Labs CP210x USB to UART Bridge device:

Identifying the USB-to-serial Device Name
Follow the steps below if you will be connecting an FX30S using a USB-to-serial cable:
- Connect the USB-to-serial cable to your development machine.
- Identify the name of your USB-to-serial cable using the appropriate platform-specific steps below. This name will be used in a subsequent step later in this tutorial.
Linux and Mac OSX:
Open a terminal window, run the following command to obtain a list of devices, and then locate the name for your USB-to-UART bridge device:
ls /dev | grep tty
This produces a list similar to the following. In this example, we can see that tty.usbserial is the name assigned to the USB-to-serial cable:
tty
tty.Bluetooth-Incoming-Port
tty.usbserial
ttyp0
ttyp1
...
Windows:
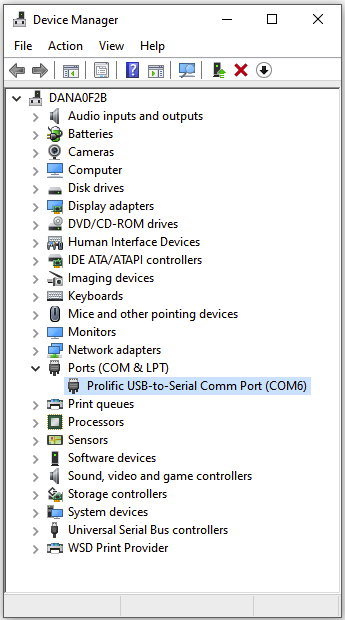
Open the device manager, expand Ports, locate your USB-to-serial cable, and identify the COM port assigned to it. For example, the following screenshot shows that COM6 has been assigned to the Prolific USB-to-Serial Comm Port device:

Setting up the Hardware
Setting up the USB-to-UART Bridge
Note
Ensure your USB-to-UART bridge has been connected to your development machine.
- Connect a wire between the UART TX pin on the CP2102 and Pin 10 (RX pin) on the mangOH Red, and a wire between the UART RX on the CP2102 and Pin 8 (TX pin) on the mangOH Red. Also connect a ground wire between both devices (e.g., connect a wire between the CP2102's ground pin and Pin 25 on the mangOH Red). The pinouts for the mangOH Red can be viewed here.
- Power on the mangOH Red.
- Ensure that you can view the mangOH Red via the Octave dashboard.
Setting up the USB-to-Serial Cable
Note
Ensure your USB-to-serial cable has been connected to your development machine.
- Power on the mangOH Red.
- Ensure that you can view the FX30S via the Octave dashboard.
Preparing and Running the Sample Application
- Copy and paste all of the source code for the Demo Application for Southbound Resource Protocol package into new .py files on your development machine.
- Open a terminal window on your development machine, navigate to your package's root directory, and run the following commands to prepare your virtual Python environment:
Linux and Mac OSX:
virtualenv env
source ./env/bin/activate
pip install -r requirements.txt
Windows:
virtualenv env
python ./env/bin/activate_this.py
pip install -r requirements.txt
- Open run.py from the package's source code.
- Change the device name
/dev/ttyS0specified on this line:DEV = os.getenv('DEV', '/dev/ttyS0'), to that which you identified above in Identifying the Name of the USB Converter Hardware.
For example, on Linux and Mac OSX the device might be named /dev/tty.SLAB_USBtoUART for a USB-to-UART bridge, or /dev/tty.usbserial for a USB-to-serial cable. On Windows, the device might be named COM3, COM6, etc.
- Execute
python ./run.pyto run the package's sample application. Output similar to the following output should appear:
2019-11-27 09:29:31,276 SbSerial: creating sensor at system/platform
2019-11-27 09:29:31,277 SbSerial: sending frame, awaiting s
2019-11-27 09:29:31,354 SbSerial: recv frame: {'status': 'OK', 'responseType': 's'}
2019-11-27 09:29:31,793 SbSerial: checking message {'status': 'OK', 'responseType': 's'}
2019-11-27 09:29:32,010 SbSerial: preparing to send: push string system/platform/value Darwin-17.7.0-x86_64-i386-64bit
argc: 3
2019-11-27 09:29:32,011 SbSerial: creating sensor at system/cpu
2019-11-27 09:29:32,011 SbSerial: sending frame, awaiting s
2019-11-27 09:29:32,151 SbSerial: recv frame: {'status': 'OK', 'responseType': 'p'}
2019-11-27 09:29:32,159 SbSerial: recv frame: {'status': 'OK', 'responseType': 's'}
2019-11-27 09:29:32,515 SbSerial: checking message {'status': 'OK', 'responseType': 'p'}
2019-11-27 09:29:32,515 SbSerial: checking message {'status': 'OK', 'responseType': 's'}
2019-11-27 09:29:32,716 SbSerial: preparing to send: push num system/cpu/value 0.0
argc: 3
2019-11-27 09:29:32,717 SbSerial: creating sensor at system/mem
2019-11-27 09:29:32,717 SbSerial: sending frame, awaiting s
2019-11-27 09:29:32,819 SbSerial: recv frame: {'status': 'OK', 'responseType': 'p'}
2019-11-27 09:29:32,827 SbSerial: recv frame: {'status': 'OK', 'responseType': 's'}
2019-11-27 09:29:33,218 SbSerial: checking message {'status': 'OK', 'responseType': 'p'}
2019-11-27 09:29:33,218 SbSerial: checking message {'status': 'OK', 'responseType': 's'}
2019-11-27 09:29:33,419 SbSerial: preparing to send: push json system/mem/value {"available": 7069175808, "active": 6448443392, "total": 17179869184}
argc: 8
2019-11-27 09:29:33,539 SbSerial: recv frame: {'status': 'OK', 'responseType': 'p'}
Note
On Windows, the following additional output may also be present. This occurs because Windows-based machines don't support the same memory stats as Linux-based machines, so the mem resource cannot be created.
Traceback (most recent call last):
  File "./run.py", line 37, in <module>
    [sensor.create_sensor() for sensor in sensors]
  File "\sbResource\clients\python\sb_resource_demo\sb_serial\sb_serial.py", line 81, in create_sensor
    self.sbs.create_sensor(self.dataType, self.path, self.unit, self.handler)
  File "\sbResource\clients\python\sb_resource_demo\sb_serial\sb_serial.py", line 54, in create_sensor
    self.push_value(path)
  File "\sbResource\clients\python\sb_resource_demo\sb_serial\sb_serial.py", line 36, in push_value
    value = self.sensor_handlers[path][1]()
  File "./run.py", line 27, in json_vmem_handler
    return dumps({ 'total': mem.total, 'available': mem.available, 'active': mem.active })
AttributeError: 'svmem' object has no attribute 'active'
Verifying the new Resources in Octave
- Navigate to Device > Resources in the Octave dashboard and verify that a new /orp/asset entry has been created.
- Expand /orp/asset and verify that the following resources were created:
/orp/asset/system/platform/orp/asset/system/cpu/orp/asset/system/mem
Notes
- Resources created in /orp/asset using ORP are not persisted by the device across power cycles.
- Remote clients have read/write access only to orp/asset. Other paths under orp are read-only.
Updated about 5 years ago
