Getting Started with the mangOH Yellow
What You'll learn
In this tutorial, we'll use Octave to observe the value of a light sensor on a mangOH Yellow, generate repeated events for light sensor values, forward the data to an external cloud service (Webhook) and write an event handler that executes at the edge to extract the sensor values and change color of the LED.
Prerequisities
Before you start, you will need:
- A mangOH Yellow with a soldered WP7702 2G/LTE-M Ready-to-Connect cellular module including an embedded Sierra Wireless SIM card. If you don't have one yet, you can order one from RichardsonRFPD or Digi-Key.
- Sign up for an account to get access to the Octave web UI, API, and documentation.
The mangOH Yellow provides built-in accelerometer, gyroscope, magnetometer, pressure, humidity, acoustic mic, air Index quality, temperature, and light sensors as well as a slot for an IoT Expansion card. Once your prototype is complete, you can then adapt and reuse the industrial-grade design as well as Sierra Wireless AirPrime modules in final production. Visit mangoh.io for more details on the platform.
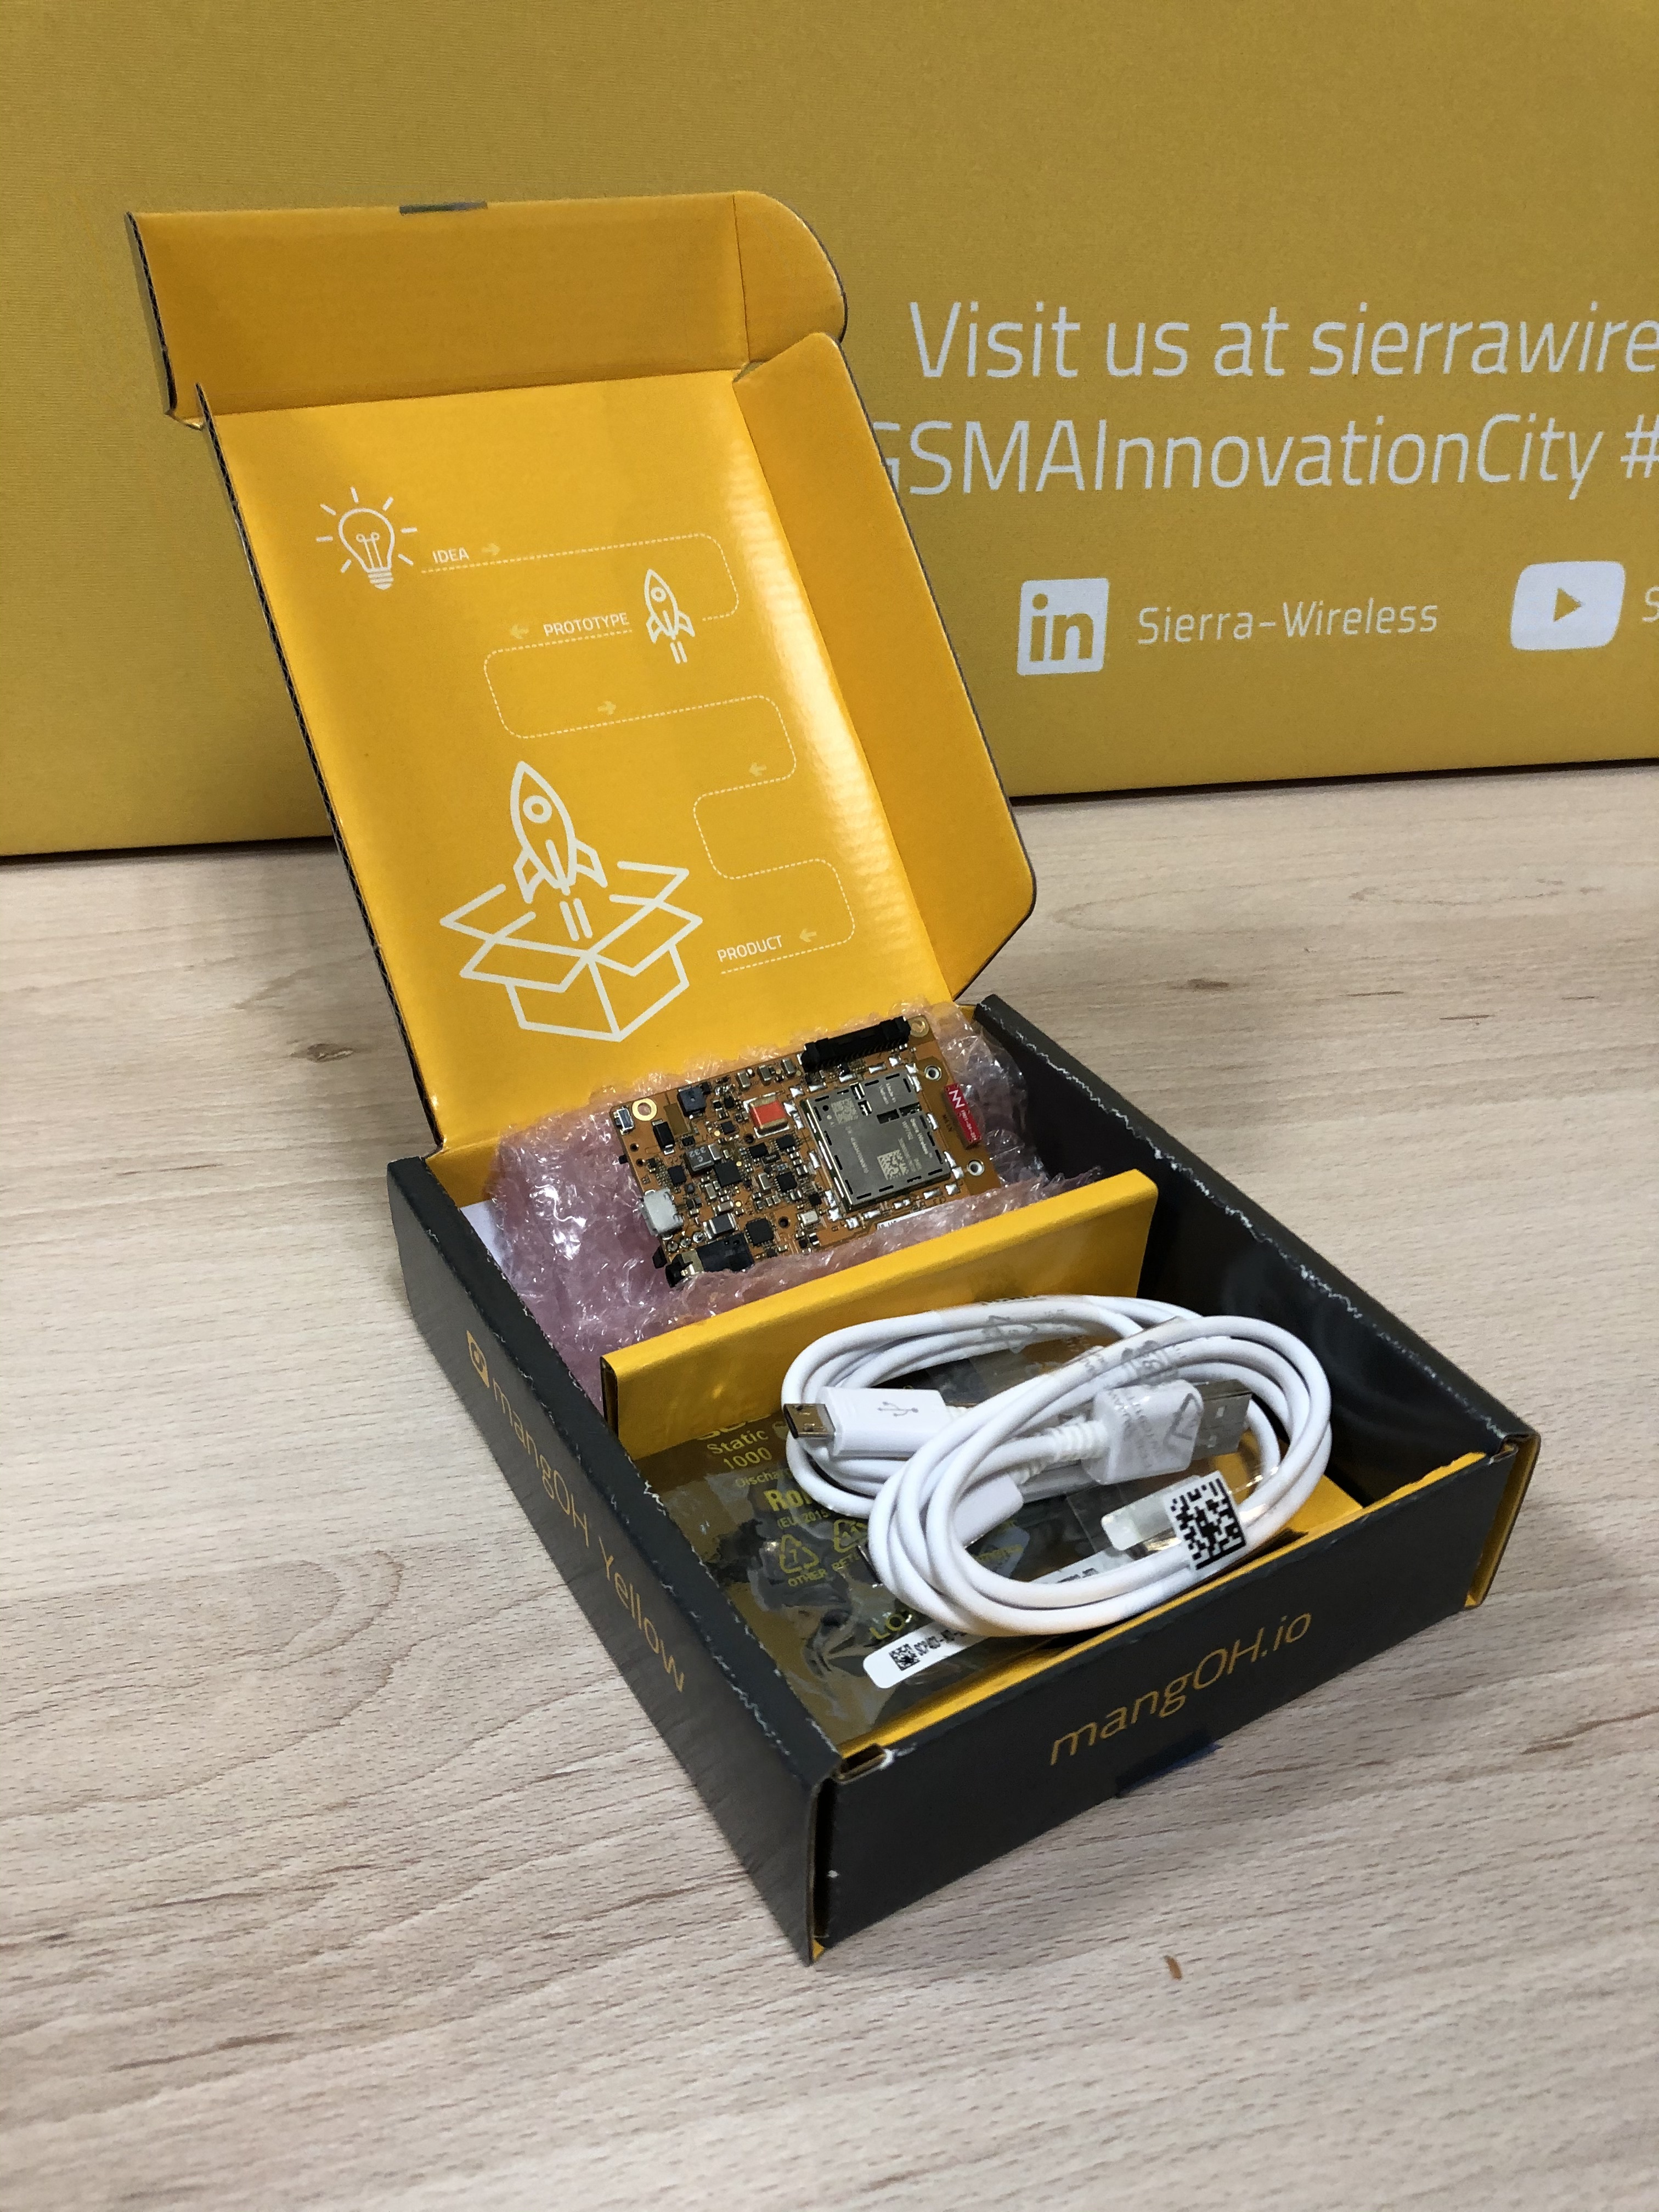
The mangOH kit includes an USB cable used to power on your mangOH and connect to a laptop or an external power supply. You have to make sure your laptop USB can deliver 500 mA, or plug a LiPo battery to provide additional capacity.
1. Setup and load the latest Octave firmware
Follow the steps below to setup your mangOH Yellow and verify it is communicating with Octave:
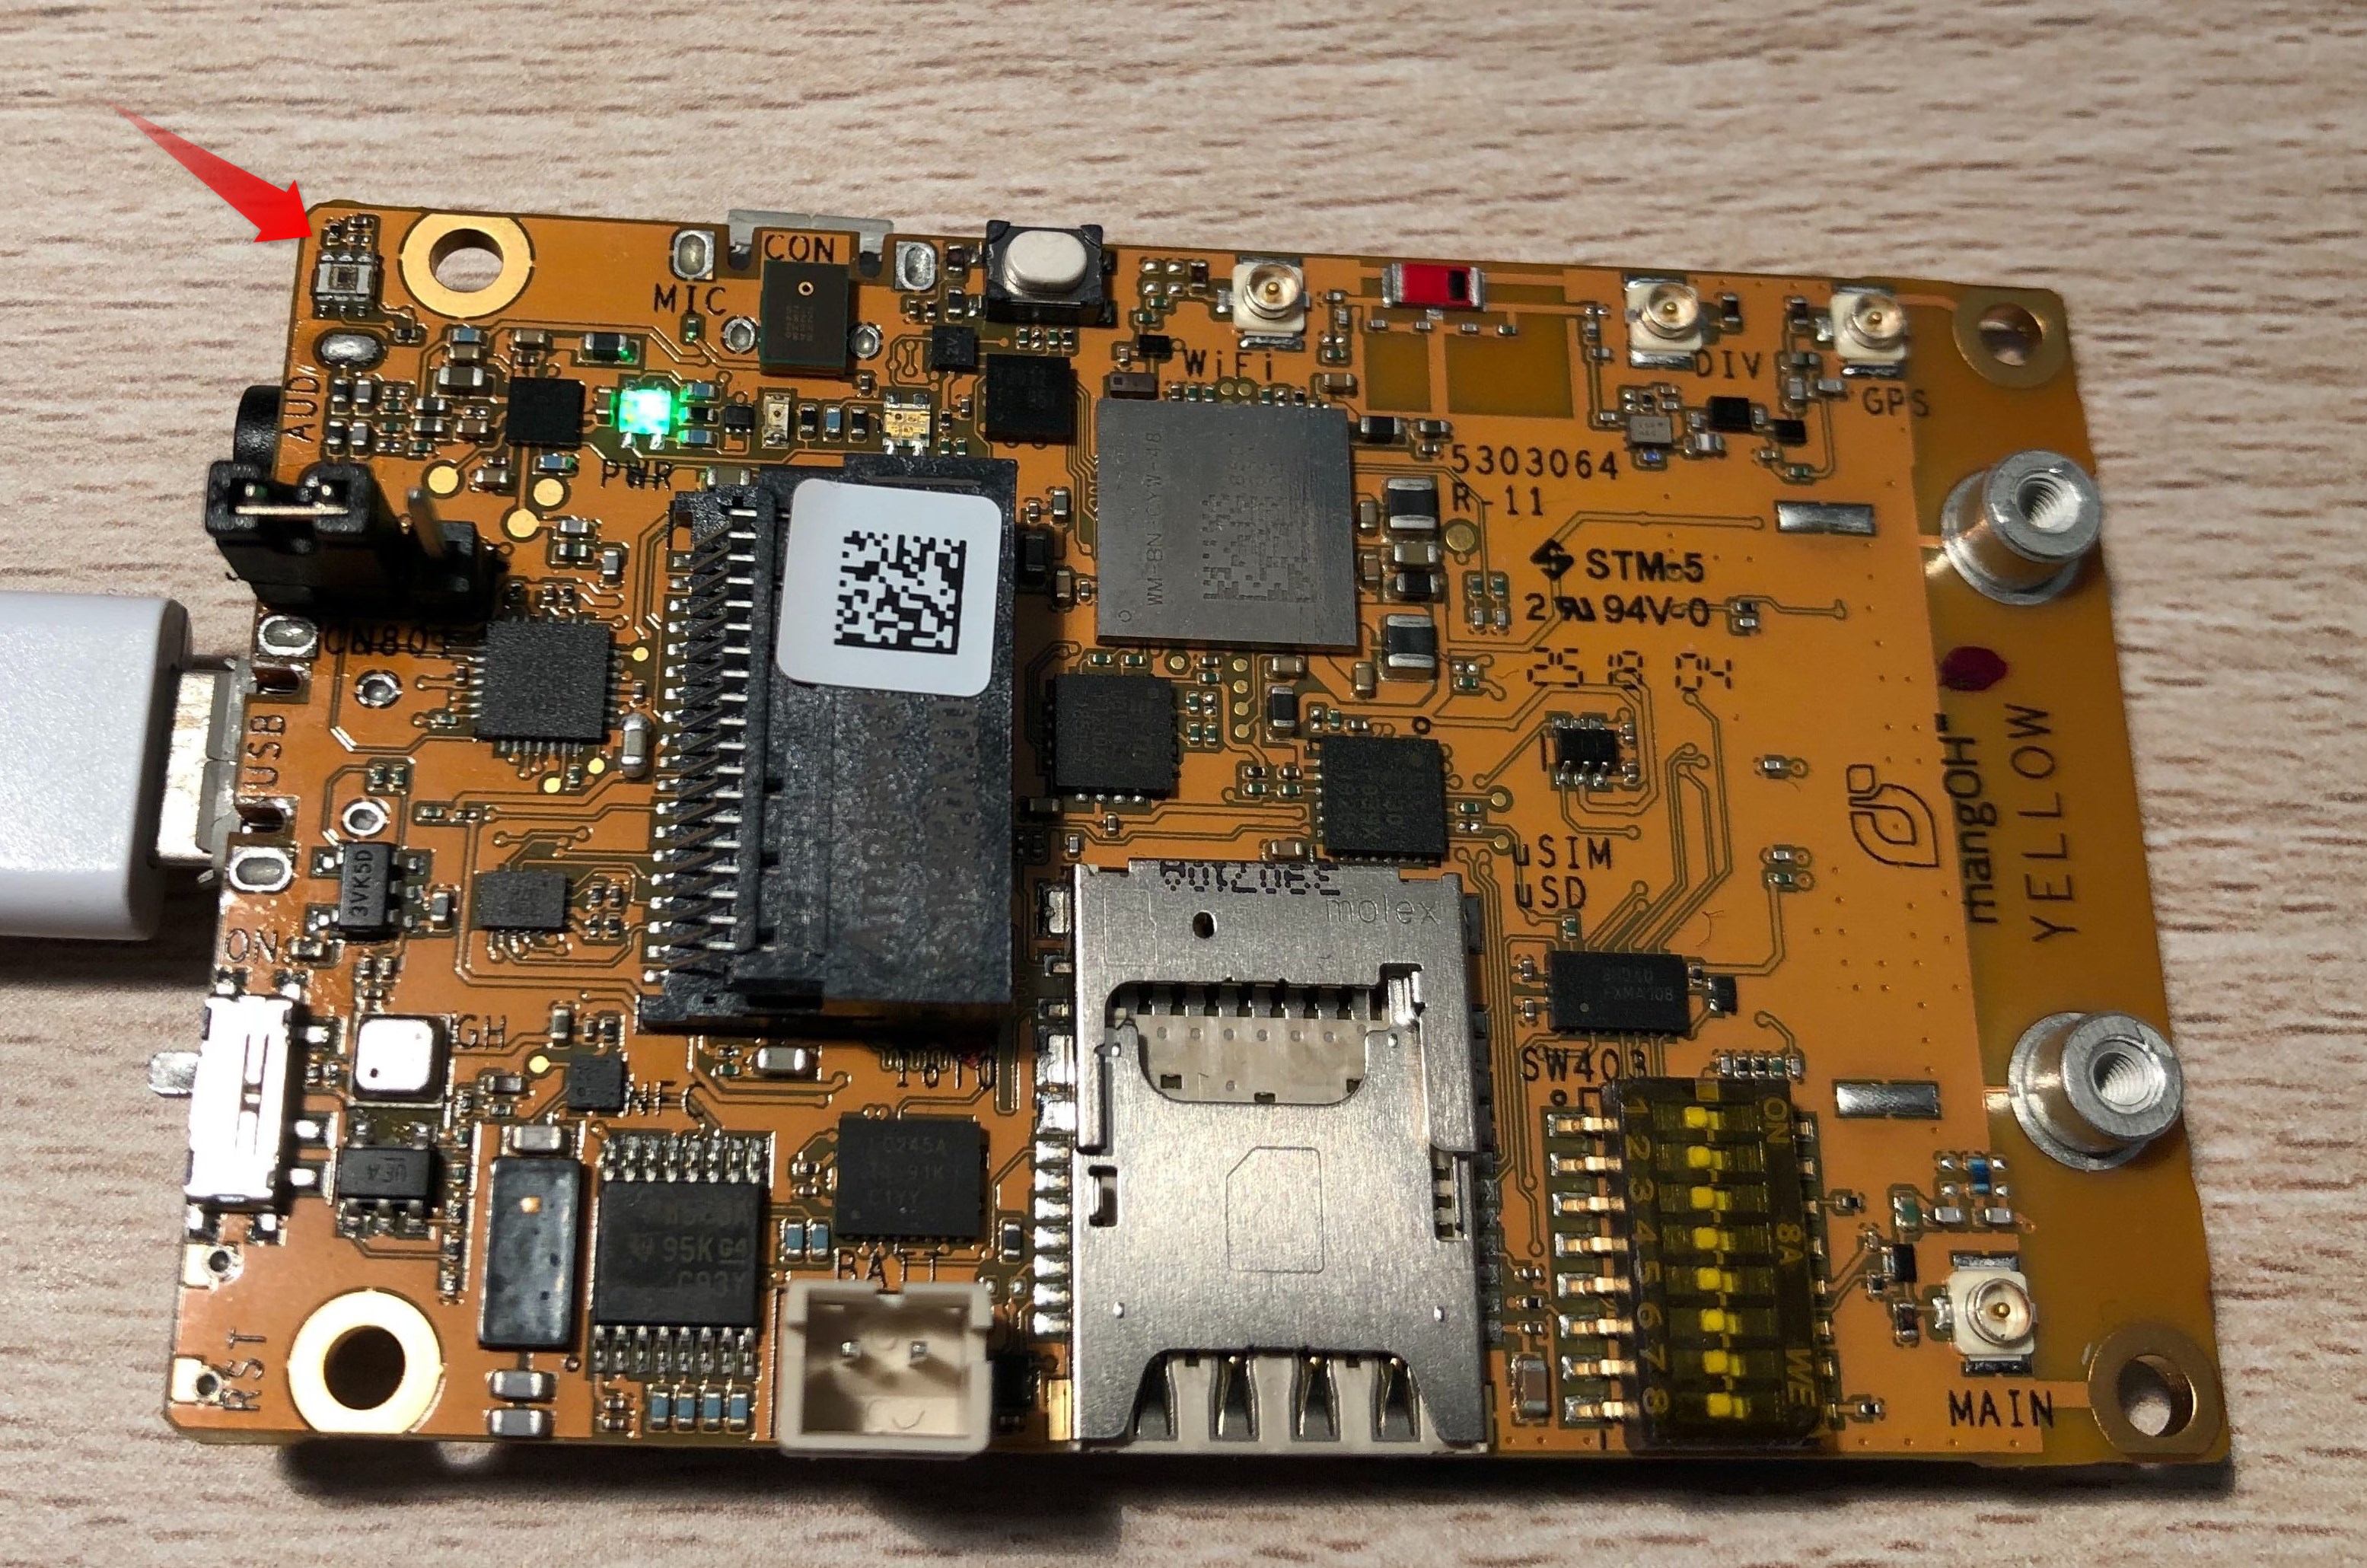
- Attach the power cable to the mini USB port marked USB:
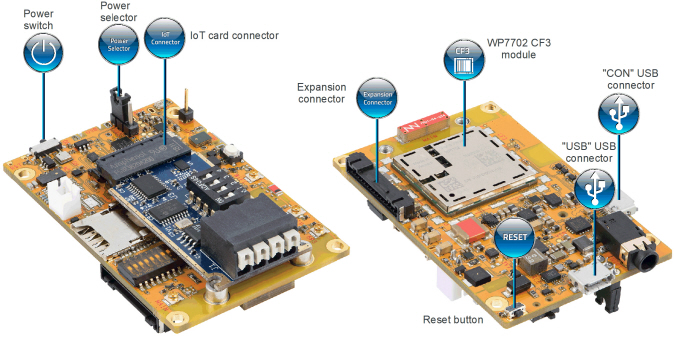
- Set the power switch to On, you shall see the Power LED turning green immediately and yellow when the radio module is powered on.
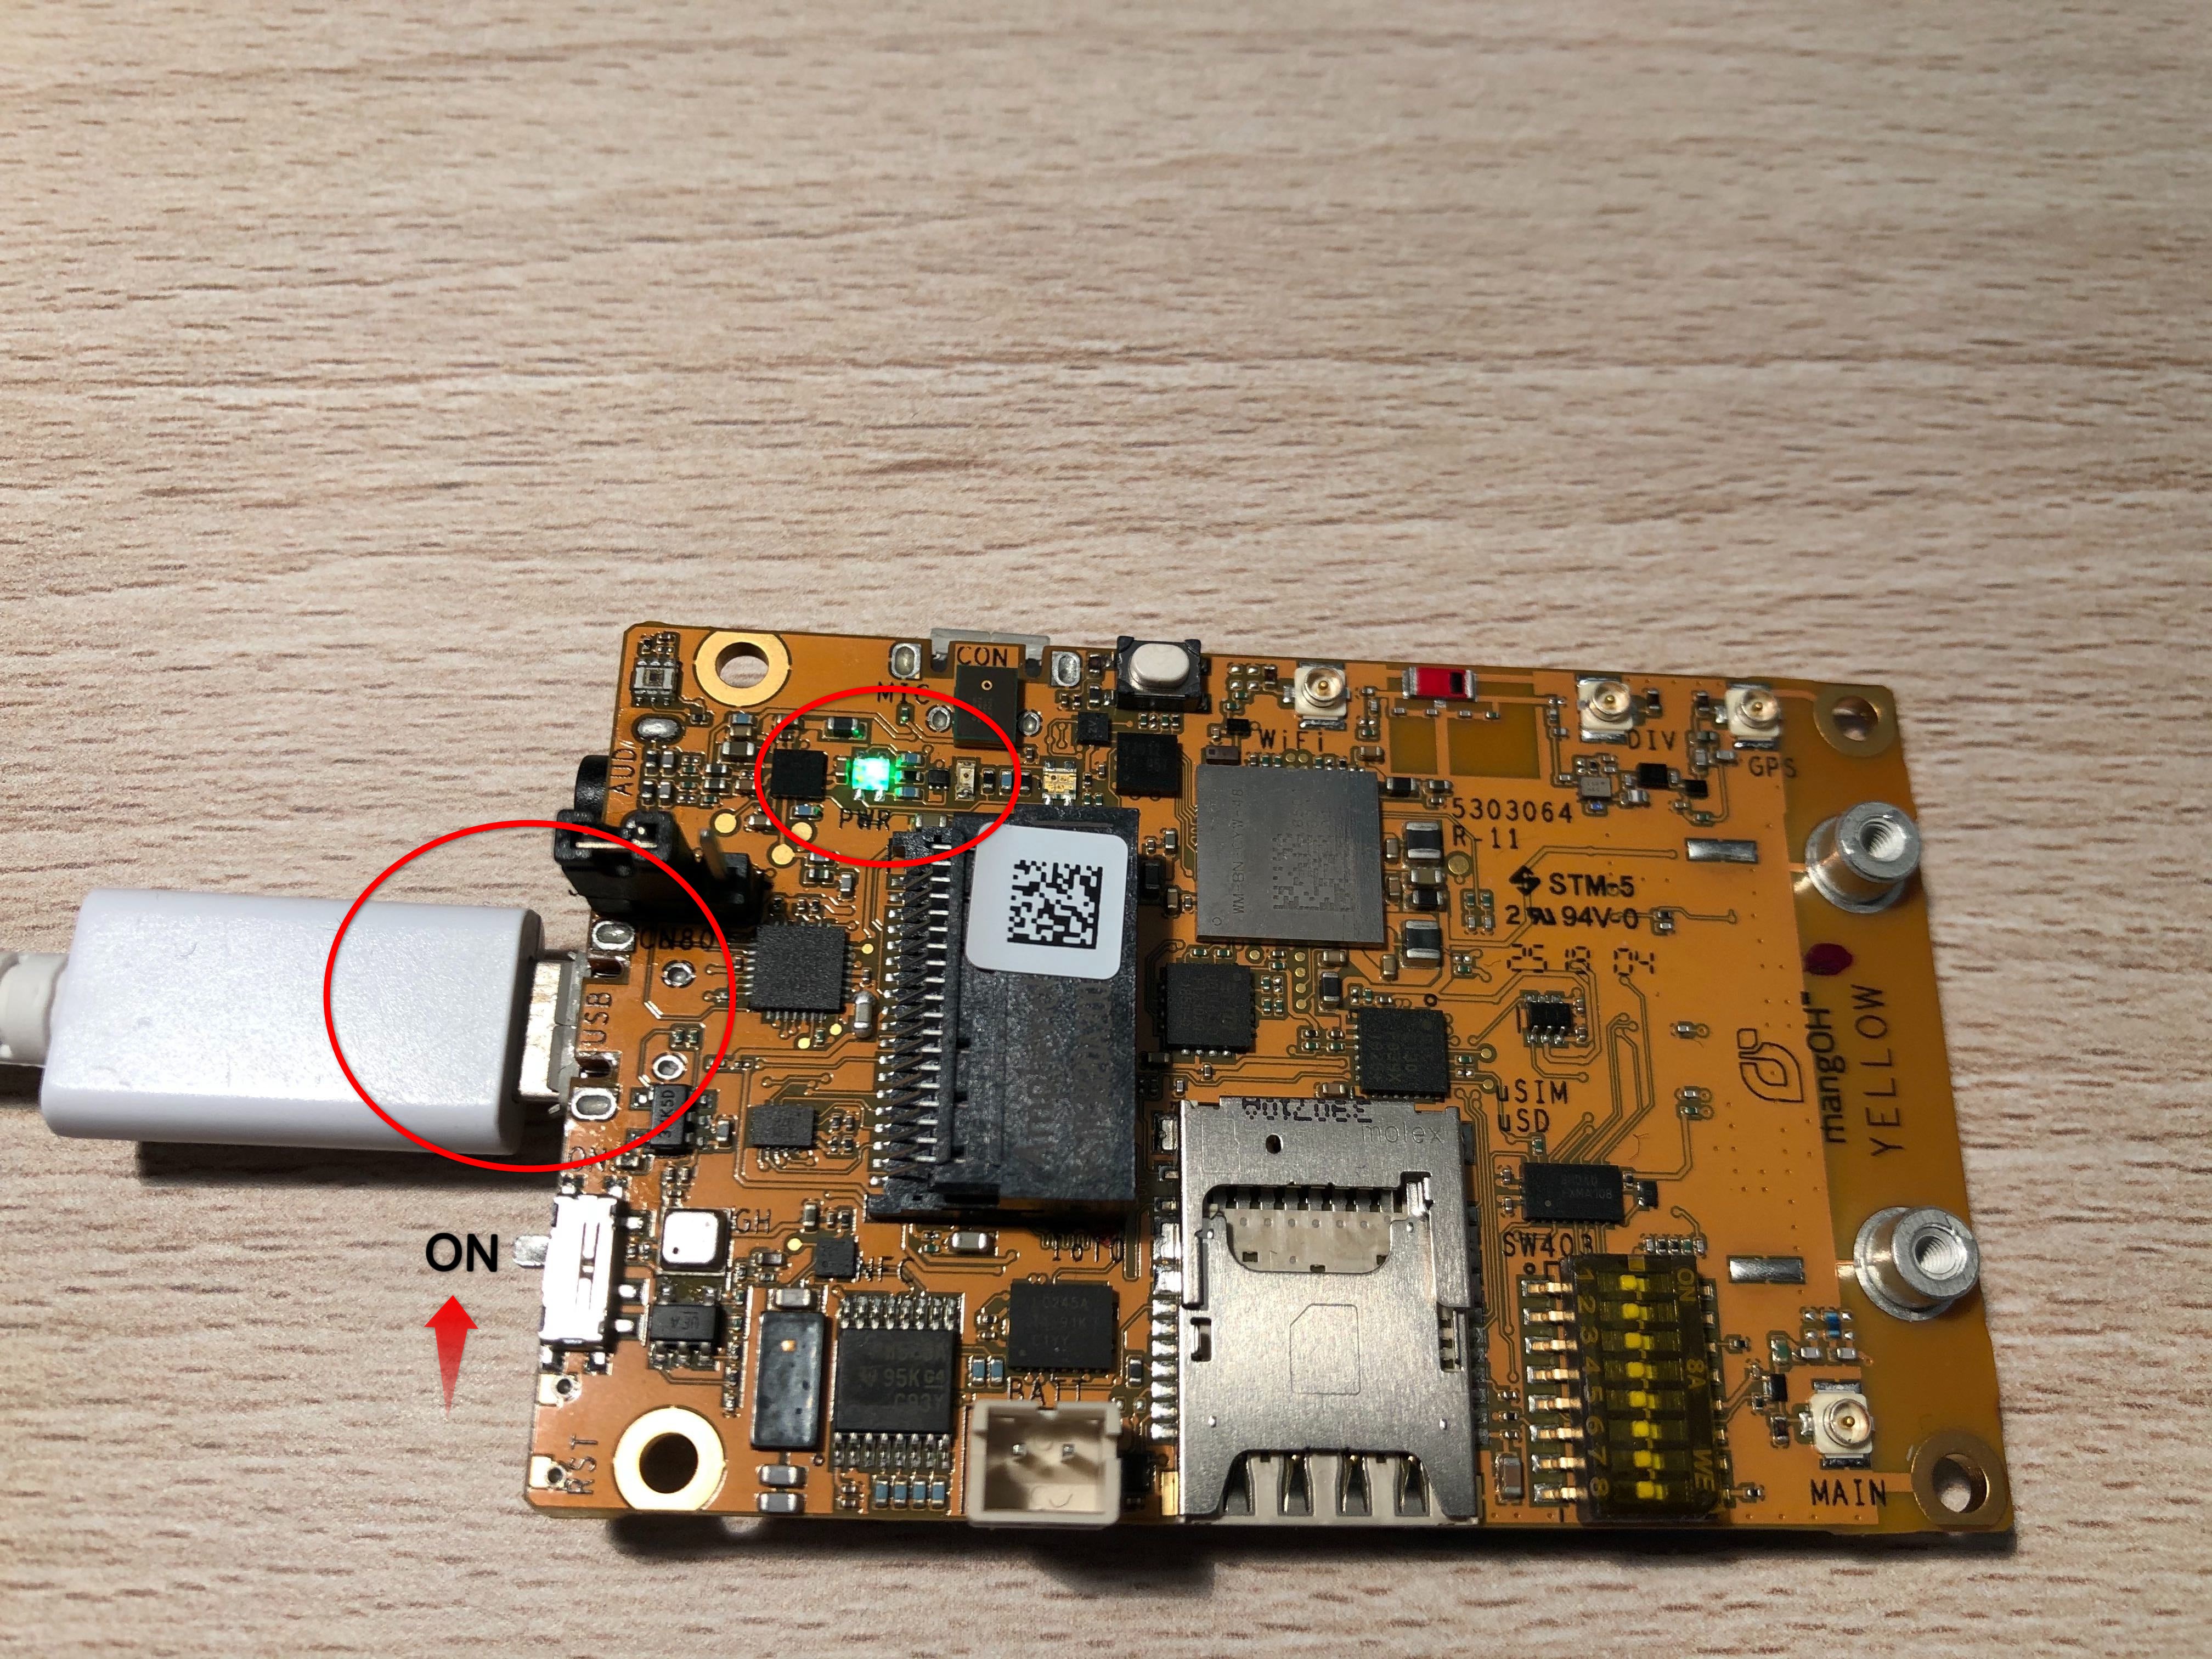
- It takes approximately 30 seconds for the mangOH to boot. A ’welcome’ application (helloYellow) starts running to demonstrate some of the device inputs / outputs: the board’s generic LEDs start flashing in sequence to indicate the app is running.
Press the white user button: the buzzer sounds and the board’s LEDs flash faster (’Vegas mode’).
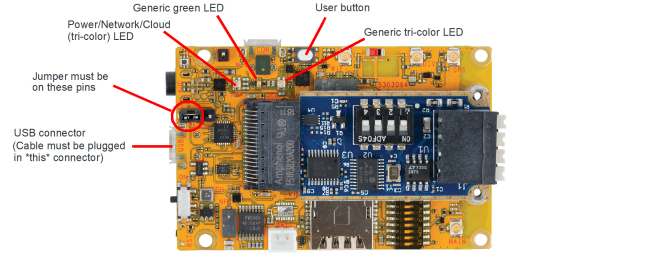
Next step is to connect to the yellow via the USB port and upgrade the firmware.
-
(Windows only) If you are a Windows user, you must install the driver on your computer. Download the WP7702 driver for Windows. It is an .exe file, run it and follow the prompts. It shall run smoothly!
-
From step 3, the mangOH yellow shall be connected to the USB port of your laptop. Open a terminal or a Windows command tool. Test the connection issuing command:
> ping 192.168.2.2
You shall receive answers from the mangOH yellow:
press Ctrl-C to interrupt
> ping 192.168.2.2
PING 192.168.2.2 (192.168.2.2) 56(84) bytes of data.
64 bytes from 192.168.2.2: icmp_seq=1 ttl=64 time=2.22 ms
64 bytes from 192.168.2.2: icmp_seq=2 ttl=64 time=2.16 ms
64 bytes from 192.168.2.2: icmp_seq=3 ttl=64 time=1.19 ms
64 bytes from 192.168.2.2: icmp_seq=4 ttl=64 time=2.24 ms
^C
--- 192.168.2.2 ping statistics ---
4 packets transmitted, 4 received, 0% packet loss, time 3002ms
rtt min/avg/max/mdev = 1.191/1.956/2.249/0.444 ms
Now you shall be able to ssh into the mangOH yellow:
> ssh [email protected]

It is strongly recommended to setup credentials for remote login.
  Please select one of the following options:
    1) Setup ssh keys and disable passwords-based authentication via ssh (the most secure)
    2) Setup password (better than nothing)
    3) Do nothing
The first time, the module will ask to setup the credentials, choose 3 (Do nothing) and Y (to be reminded next time) or n if you don't need to secure access to the mangOH.
Type exit to close the ssh session".
-
Download the latest mangOH Yellow firmware with Octave: Platform independent .spk file.
-
Locate the downloaded file, and run the following commands from your terminal or command line tool on your laptop:
> scp yellow_wp77xx_0.6.0-octave.spk [email protected]:/tmp
Once done, log into the mangOH:
> ssh [email protected]

root@swi-mdm9x28-wp:~# fwupdate download /tmp/yellow_wp77xx_0.6.0-octave.spk
-
The mangOH reboots and installation is performed.
You can ssh into the mangOH again to verify it is still alive and connected. -
Let's retrieve the identifiers we will need to activate the mangOH on Octave with the command cm info :
> ssh [email protected]

root@swi-mdm9x28-wp:~# cm info
Device:                        WP7702
IMEI:                          352653090207150
IMEISV:                        4
FSN:                           4L936370601610
Firmware Version:              SWI9X06Y_02.32.02.00 c2e98c jenkins 2019/08/30 07:28:21
Bootloader Version:            SWI9X06Y_02.32.02.00 c2e98c jenkins 2019/08/30 07:28:21
MCU Version:                   002.013
PRI Part Number (PN):          9909138
PRI Revision:                  001.001
Carrier PRI Name:              SIERRA
Carrier PRI Revision:          001.027_000
SKU:                           1104405
Last Reset Cause:              Reset, User Requested
Resets Count:                  Expected: 45     Unexpected: 0
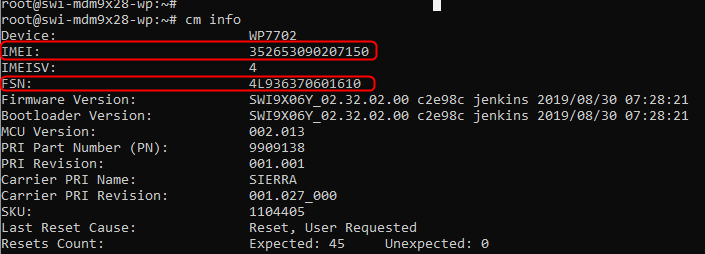
FSN stands for Serial Number.
Troubleshooting
If you have trouble connecting you can refer to the mangOH Yellow getting started guide providing more details.
2. Activate the mangOH in Octave
Follow the steps below to activate your mangOH Yellow and verify that it is communicating with Octave:
- Open the Octave user interface in a browser on your development PC.
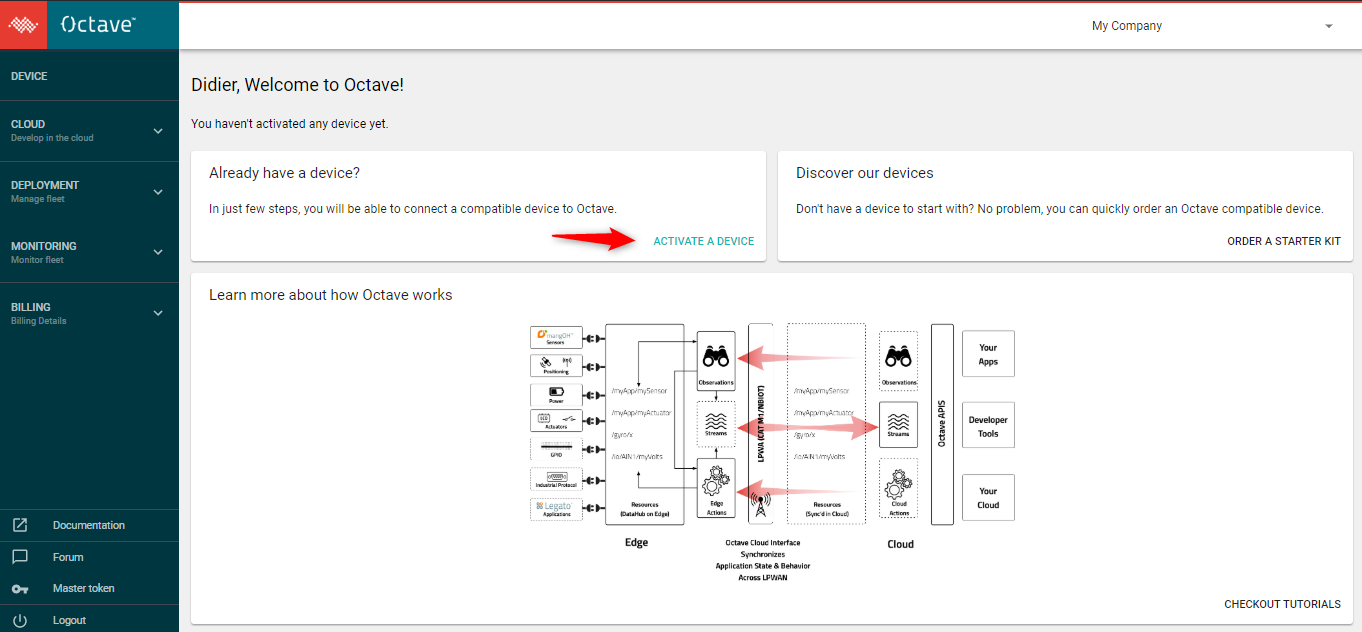
- Activate your mangOH entering the Serial Number and IMEI retrieved in previous step, and enter a name you will use later to identify it on Octave.
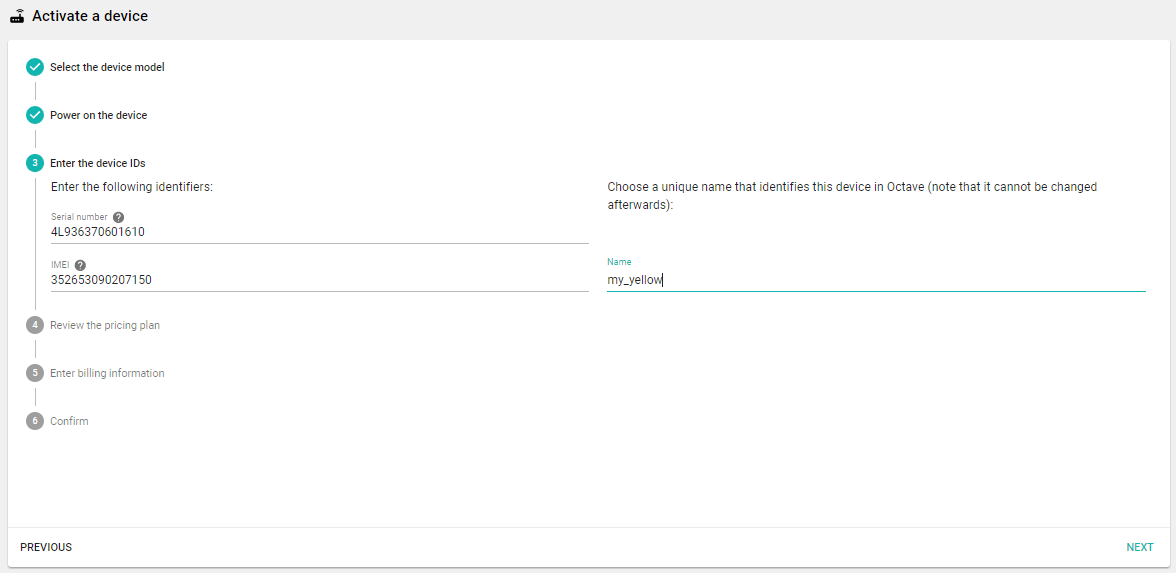
- As soon as the mangOH is activated it will communicate with Octave, you can check the Last seen field in the Device Details section, indicates that the device reported within a few seconds (e.g. Less than 20 seconds ago).

Verifying Connectivity to the Cloud
By default, the mangOH is configured in Developer Mode, that means that it is always connected to the platform and any change in the cloud will be applied on the device within few seconds.
Before we go further, check the last seen date on the device details page of the web UI as well as developer mode status.
If you have trouble connecting your device, you can plug the extra cellular antenna, and check that you are in an area with some cellular coverage. In case all these are good then do not hesitate to contact Octave support.
3. Commanding Resources
Your device's inputs and outputs (e.g. sensors, control pins, etc.) are represented in Octave as Resources.
You can view the available Resources by navigating to the Device > Resources screen. On that screen, locate the vegasMode and led resources. These resources correspond to the mangOH Yellow LEDs.
You can expand each Resource listed to view its sub resources, along with information including each sub resource cloud configured value and last value reported from the device.
Note: Given the hierarchical nature of Resources and their child or "sub" resources, this documentation commonly refers to these sub resources as just "resources".
Follow the steps below to control the settings for the LEDs:
Locate the vegasMode Resource, and click on the edit icon to the right of the continuous/period resource,
change it to 0,5 seconds and "Apply".
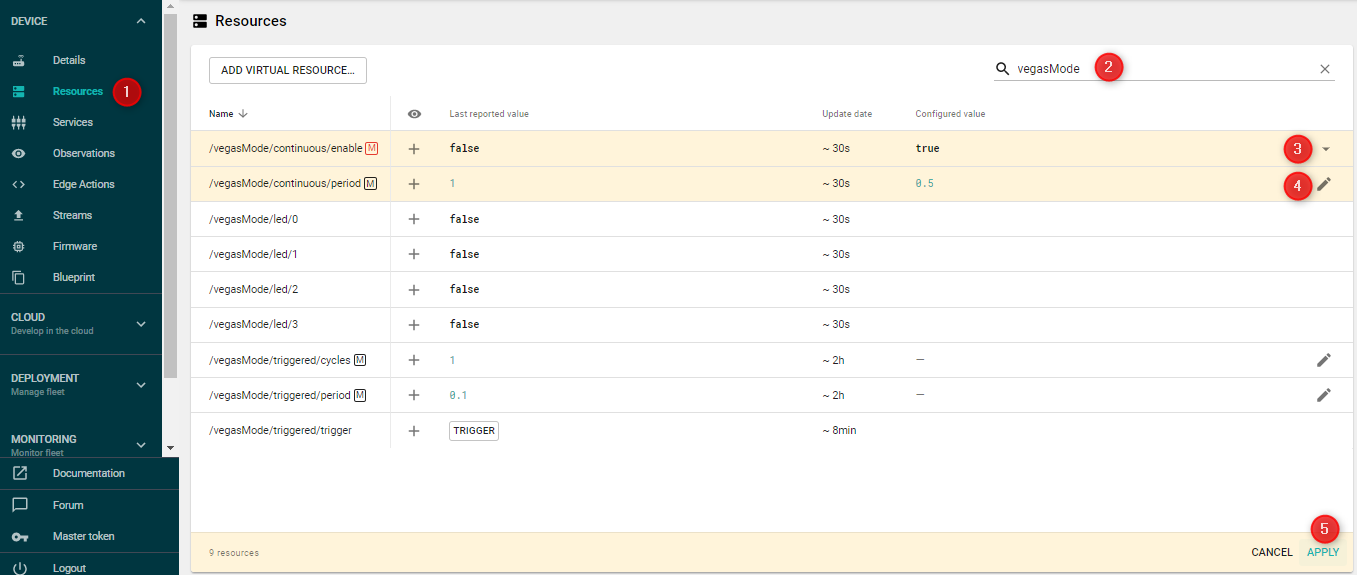
Confirm that the vegasMode chaser speed has changed.
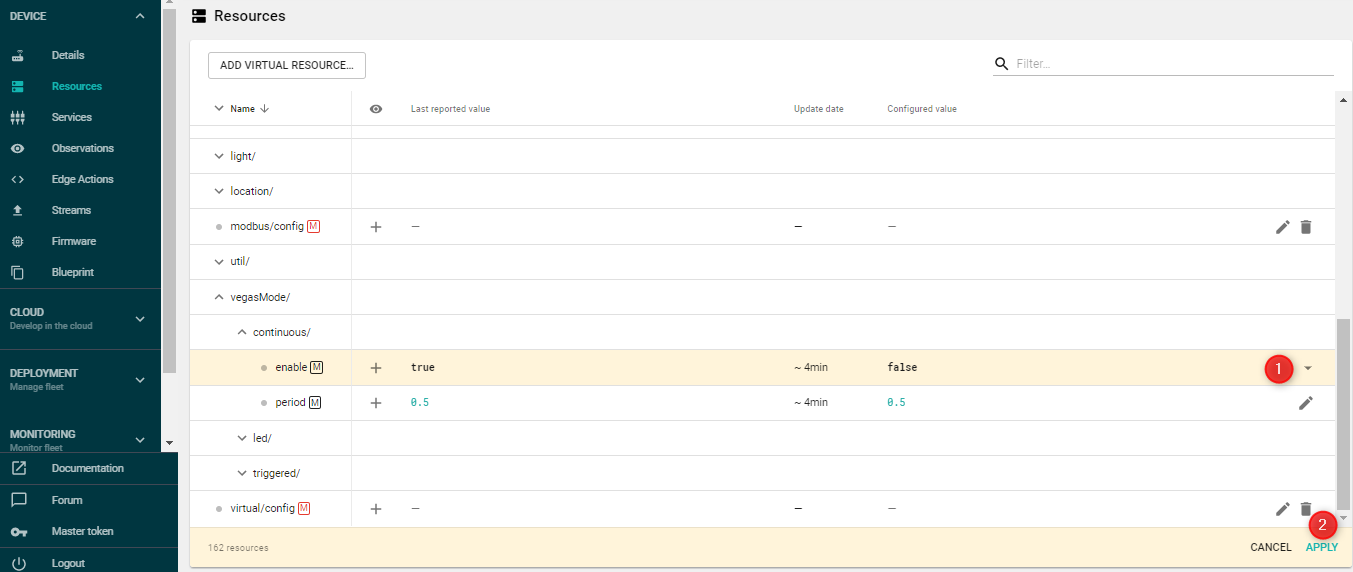
You can stop the vegasMode, turning the resource vegasMode/continuous/enable to false:
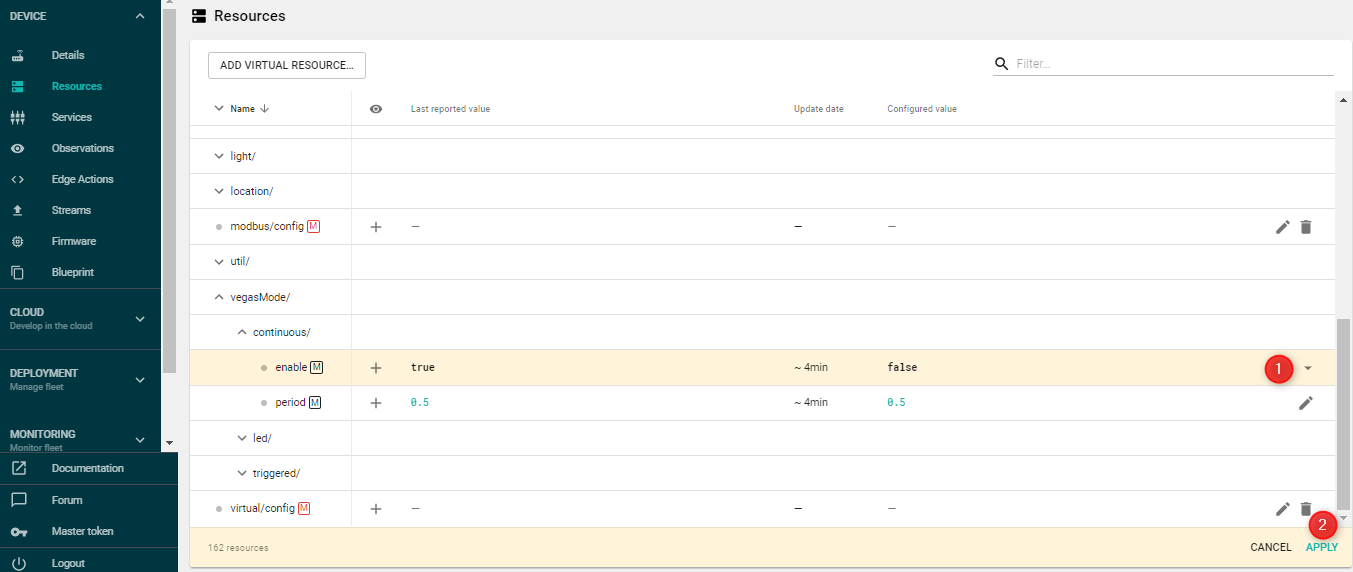
Confirm that after few seconds the LEDs are switched off.
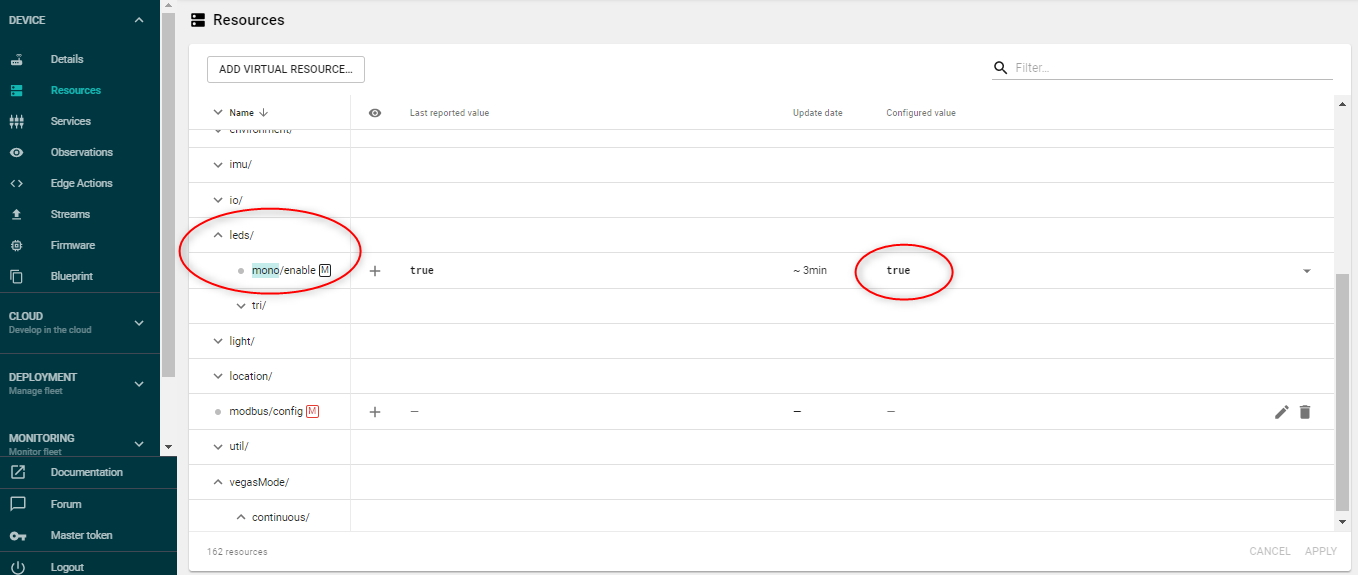
Now we can switch-on the monochrome generic LED. It is controled via the resource leds/mono/enable, we turn it to green setting the resource to true:
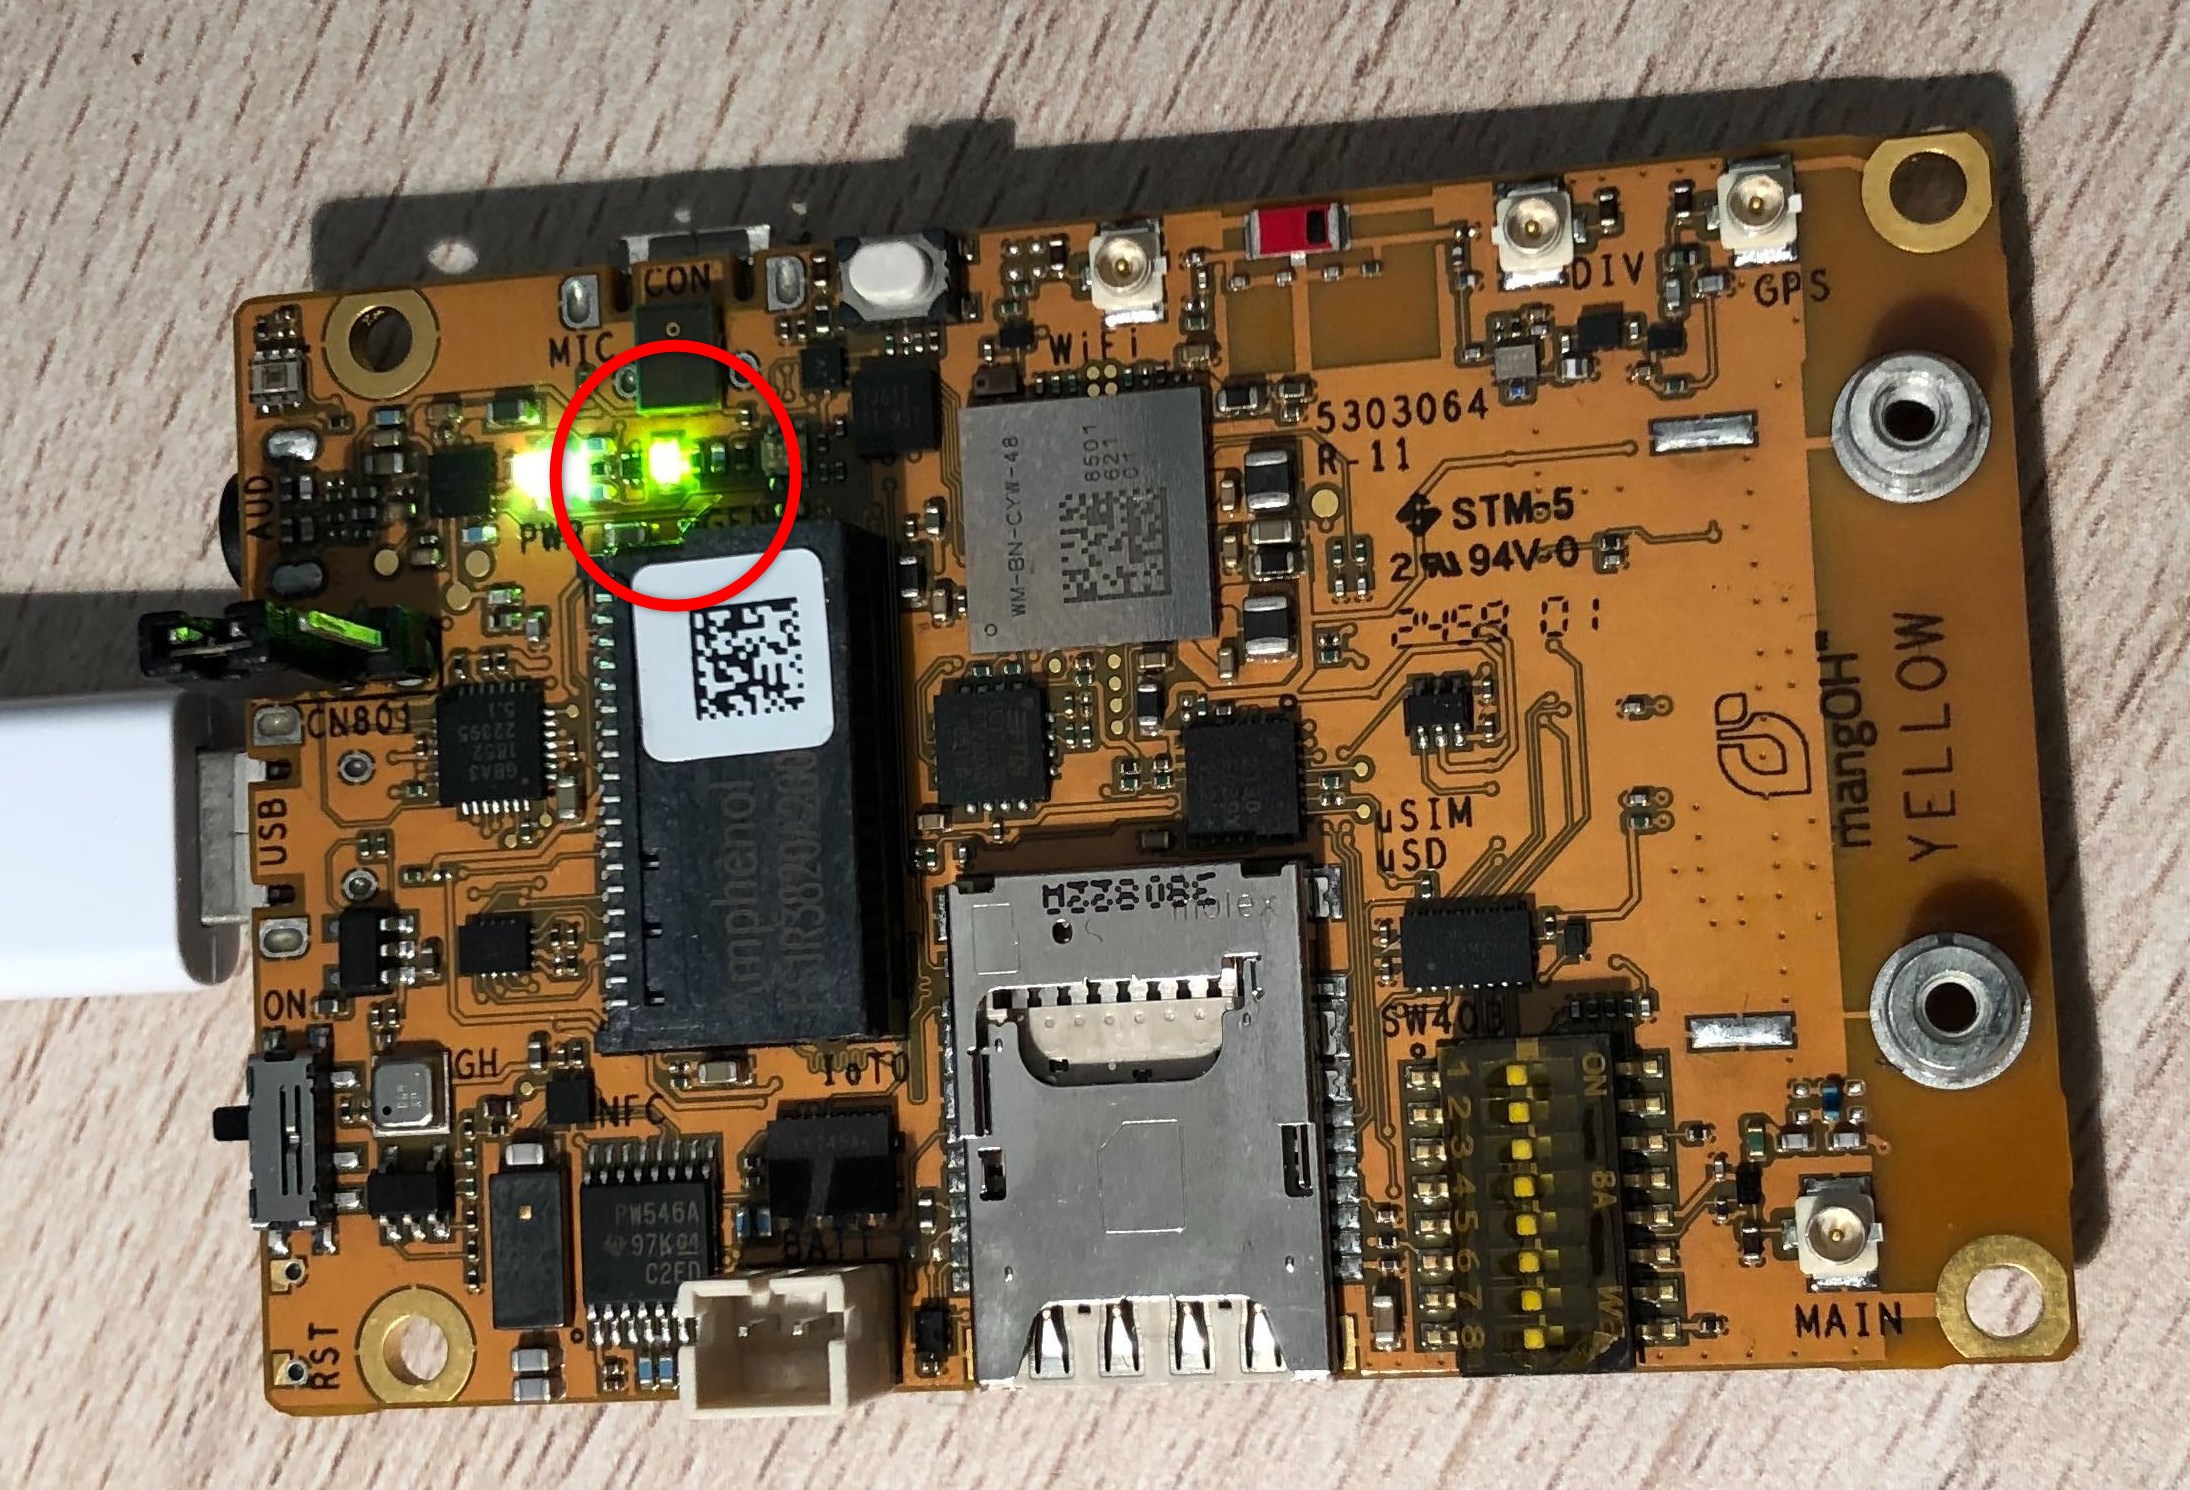
Congrats !
You manage to program your device from the Cloud.
4. Configuring sensor resources
Now we propose to observe the light sensor of the mangOH Yellow.
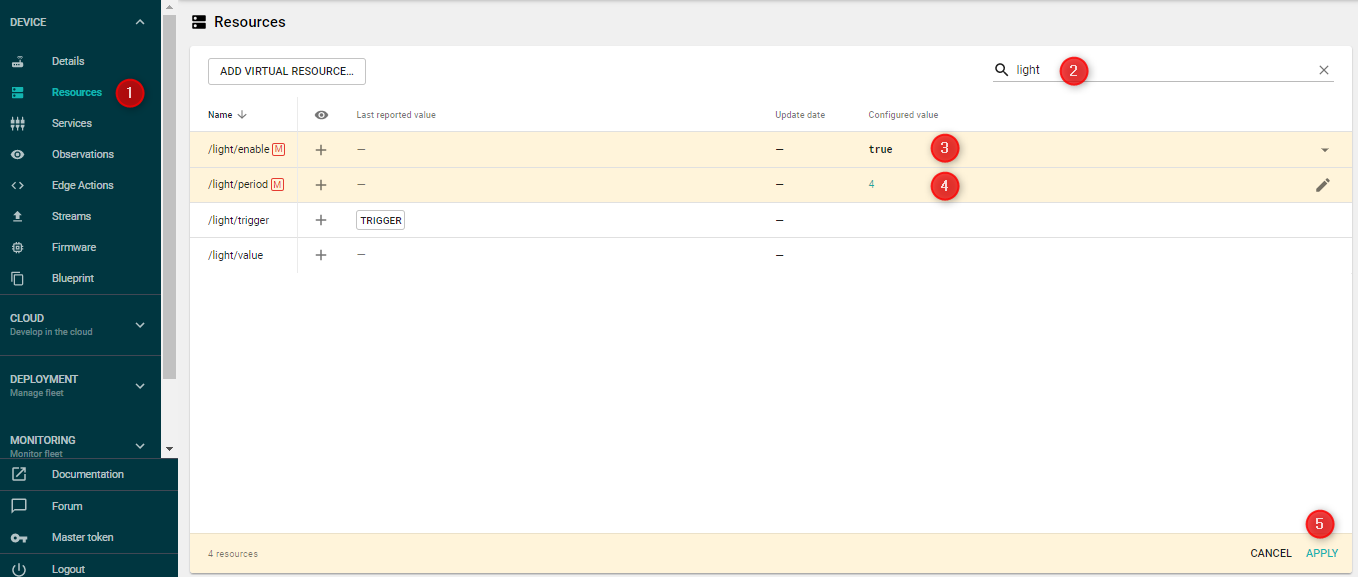
Follow the steps below to enable the sensor and configure the frequency at which the light sensor value will be polled by Octave:
- Go to Resources page.
- Locate the light Resource.
- Locate the Resource's enable property, set it to true. Note the "M" icon to the right of the property's name, which indicates that the property must be configured to use it.
- Locate the Resource's period property. Set the value for Period to 4 (for four seconds). This controls how often the light sensor's value will be polled by Octave, and in turn, how often events corresponding to the light sensor's reading will flow through Octave.
- Click Apply to save the change and send the new configuration to the device.
After few seconds you'll see that the "Last reported value" has been updated and "Update date" says when.

Developer Mode
You see this update on the Resources screen because the device is in Developer Mode. Remember, in Developer Mode the device periodically updates all of it's last-known values for every Resources, regardless if it is set to be Observed or not.
5. Prepare an Observation for a Resource
In order to do something with the values being polled every 4 seconds from the light sensor, we need to create an Observation. An Observation is a pipe through which Events flow from a Resource to various targets such as another Resource, to the cloud immediately (Cloud Stream), store on the device and forward with other events at a given period (Store and Forward), or a script running on the device (Edge Action):
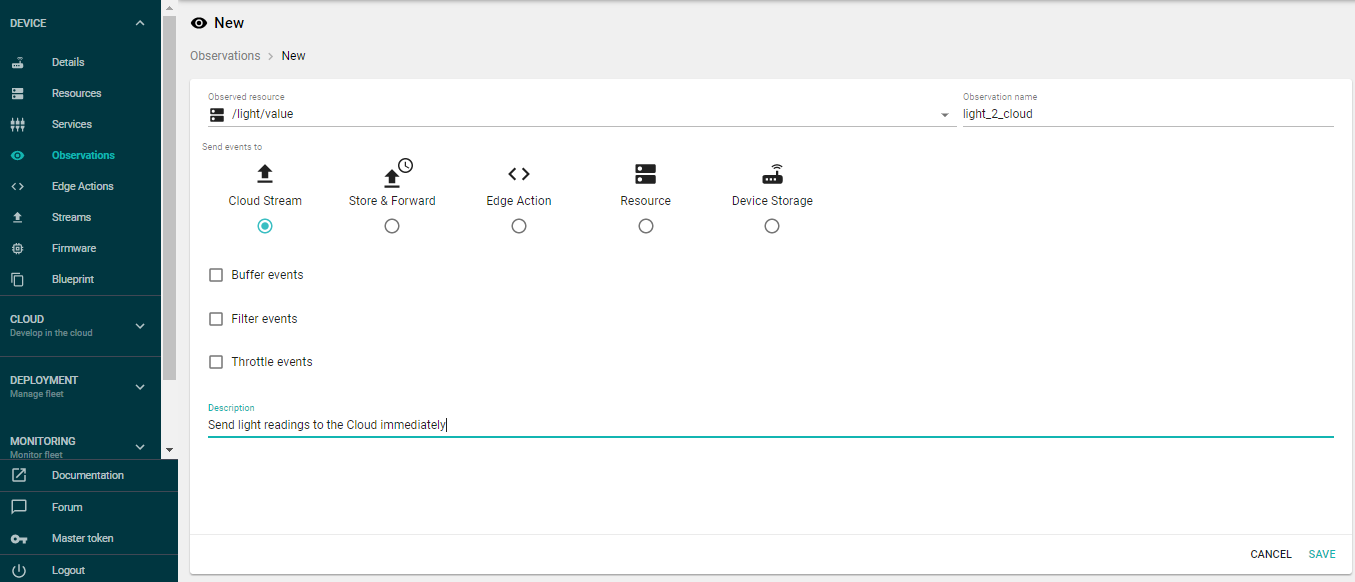
Follow the steps below to create an Observation on the light sensor Resource. This will be used to observe light sensor readings from the Resource and send them immediately to the Cloud. Each new reading will be sent to as an Event (JSON document) in a Stream nammed as the Observation:
- Navigate to Device > Observations.
- Click Add Observation.
- Click the Observed resource drop down and select light/value.
- Enter a descriptive Observation name to uniquely identify the Observation, example light_2_cloud.
- Set Send events to to Cloud Stream.
- Click Save.
You can view the new observation created in the list.
Now you can Navigate to Device > Streams and check there is a new stream created in the Cloud for that device:

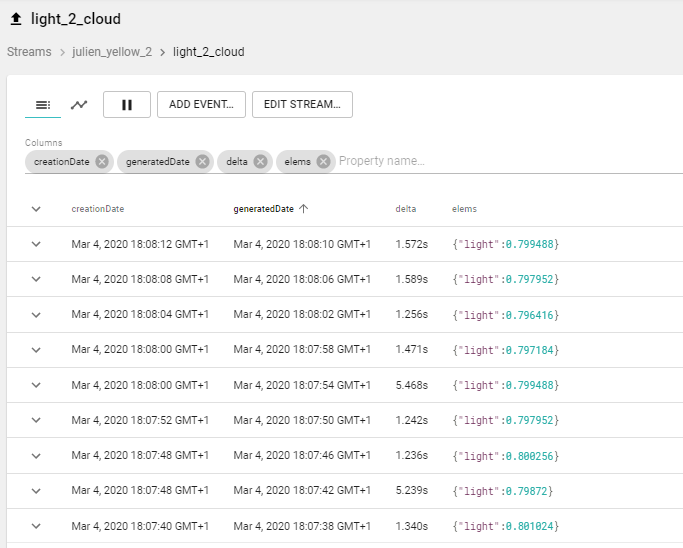
You can click on the Stream light_2_cloud to inspect the Events received from the mangOH.
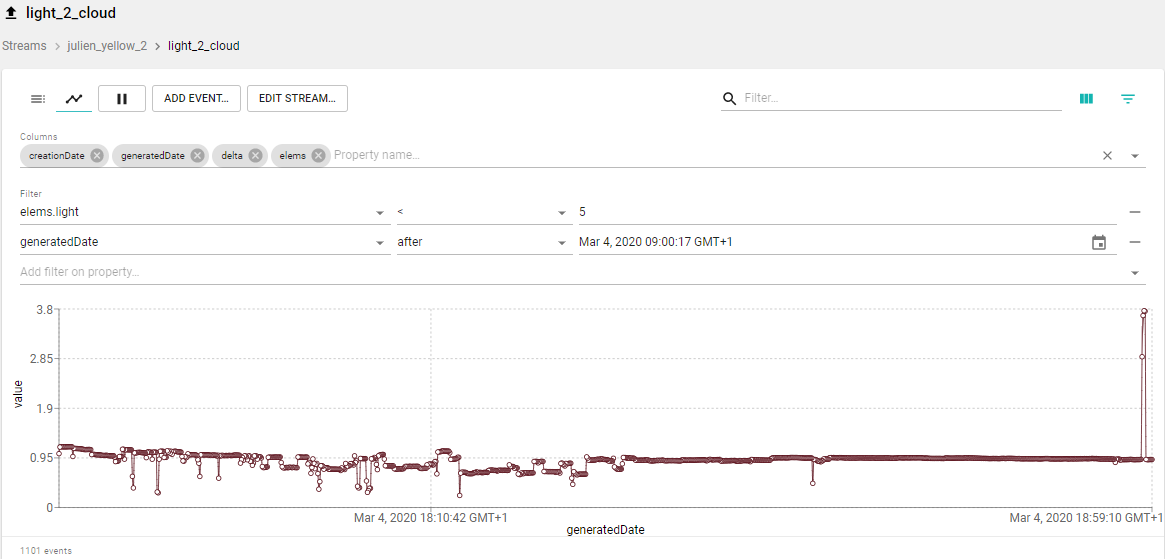
When new events arrive in the cloud from the device Octave store them in a Stream and add additional meta-data. Note that both the time at the edge (generatedDate) , as well as the time received in the cloud (creationDate) are stored. Having both of these times available for each event is important when we try more sophisticated data orchestration strategies.
Tools to inspect streams
You can inspect events in streams using filters on any element and graph numerical data.
An example is to visualize the light readings under 5 from 9 AM today:
6. Sending data periodically
While some data benefits from being sent to the cloud instantly, there is a cost for choosing to do so. Firstly, every time we start and stop the cellular data session, power is consumed.
Secondly, encapsulating each reading for transmission individually causes more data to be sent over the air. This is reflected in pricing.
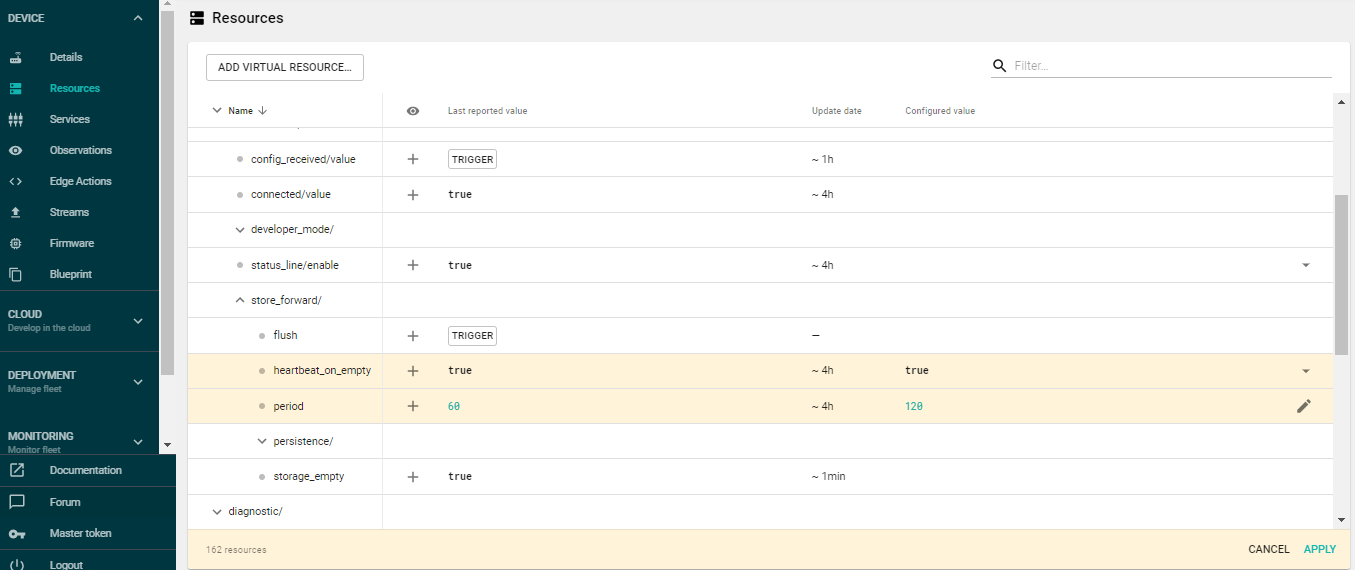
In order to optimize our power and bandwidth consumption, we can chose to have our readings stored and forwarded on a periodic basis. The Cloud Interface provides us with a buffer for Events we wish to store and allows us to dynamically configure how often that buffer is sent to the cloud.
It is important to note that you are configuring the maximum time between transmissions. For example, if the store and forward buffer is set for 120 seconds and an "immediate" event is generated 30 seconds after the last transmission, the contents of the buffer will be sent with the "immediate" event, and the 120 second timer reset.
The /cloudInterface/store_forward resource controls that maximum time between transmissions.
For more details, check our example here
7. Forward to a Cloud Service
As we have seen in the previous steps, device events are organized into entities called "streams" represented by a single path (example: /company_xxx/devices/device_yyy/light_2_cloud).
On Octave, Stream Events can be processed by Cloud Actions.
A Cloud Action is a script written in Javascript language and is triggered when new Events are written in a Stream.
The Cloud Action takes an Event as input and can produce zero or more events in any pre-defined stream while also accessing data from other Streams and executing REST requests.
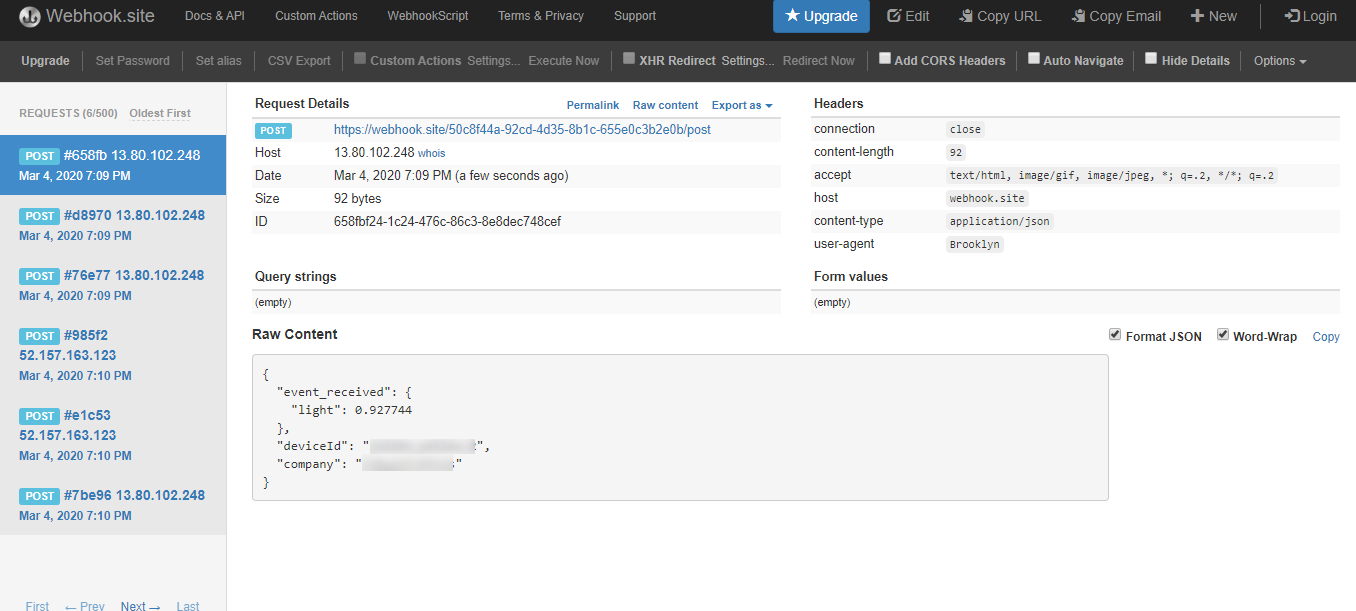
The following Cloud Action takes the events coming from the light sensor, adds the device name and timestamp, and forwards the event via a WebHook to a REST endpoint.
In the following example, we propose to use https://webhook.site to represent a cloud service receiving data from Octave:
- Navigate with your Web browser to https://webhook.site.
- Copy the url of the Webhook they have generated for you.

- In Octave, Navigate to Cloud > Cloud Action.
- Click Add Cloud Action.
- In the form, choose the input stream containing Events from light sensor (example: /company_xxx/devices/device_yyy/light_2_cloud)
- Select the POST HTTP option: You cannot type in Javascript yet! but click to continue.
- Paste the following code, and change the webhook site url with the one you got in step 2.
function(event) {
  var data = event.elems;
  var deviceId = event.path.split("/")[3];
  var company = event.path.split("/")[1];

  // options is not used here, but in most real Cloud services implementation, there are authentication headers ...
  var options = {
    'Content-Type': 'application/json',
  };

  var body = JSON.stringify({
    "event_received": data,
    "deviceId": deviceId,
    "company": company
  });

  // Post the data to the test cloud service (dump)
  var resultPost = Octave.Http.post("https://webhook.site/YOUR_ID/post", options, body);
  // console log to view server reply: you can see logs using Simulate
  console.log(resultPost);
}
- Save.
- Check that every 4 seconds, light readings are sent to the cloud service webhook
Integrate with the Cloud service you are using
Webhook.site is used in this guide to give an example, as you may see, you can adapt the Cloud action to format the data and forward it to the Cloud service which makes sense for your application.
8. Processing the data in an Edge Action
Going one step further, we can use an Edge Action to process data locally, avoiding the round trip to the Cloud and being more efficient.
In the following example we create an observation sending light sensor values to an edge action. The edge action will analyse the luminosity from the light sensor and show the result changing color of the LED directy on the mangOH Yellow.
First create the Observation and send it to the Action Runner.
Follow the steps below to create an Observation on the /light/value Resource. This will be used to observe light sensor readings from the Resource and send them to an Edge Action as events. An Edge Action is an event handler that runs on the device to perform some action on an event:
- In Octave, navigate to Device > Observations.
- Click Add Observation.
- Click the Observed resource drop down and select /light/value.
- Enter a descriptive Observation name to uniquely identify the Observation.
- Set Send events to to Edge Action. You will implement an Edge Action in the next section that will process the light sensor value take some actions locally.
- Click Save.
An Edge Action is a powerful mechanism for handling event data on the device (hence the name Edge Action), and routing it to other targets.
Follow the steps below to create an Edge Action that handles the light sensor event routed through the Observable, process luminosity information and show the result sending commands to the onboard LEDs of the mangOH Yellow:
- Navigate to Device > Edge Actions.
- Click Add Edge Action.
- Click on Source Observation and select the Observation created in the previous section.
- Enter a descriptive Edge Action name to uniquely identify the Edge Action.
- Click on the Documentation tab. Octave provides a number of example scripts that you can use as a starting point.
- Select Write a value to a resource and copy and paste the code into the Code section.
- Replace the script with the following:
function(event) {
  var lightReading = event.value;
  var lightDescription;
  var isBlue = false;
  var isGreen = false;
  var isRed = false;

  if (lightReading > 2) { lightDescription = "bright"; isRed = true;} else
  if (lightReading > 0.5) { lightDescription = "a bit dim"; isGreen = true; }
  else { lightDescription = "dark"; isBlue = true; }

  var s = "It's " + lightDescription + " in here.";
  return { "dh://leds/tri/blue/enable": [isBlue],
           "dh://leds/tri/green/enable": [isGreen],
          "dh://leds/tri/red/enable": [isRed]
  }
}
You can also increase the sampling frequency of the light sensor to make it fast !
9. Next steps
Now that you have set up communications between your mangOH Yellow and Octave, and created an Observable and Edge Action to route and handle events, you are ready to explore our other guides:
- Experiment other combinations of observations in Routing Events from Observations
- Discover the other APIs available to process data at the edge
- Orchestrate data in the Cloud
- Connect to your sensor or asset setting up GPIO:
- Digital Output
- Digital Input
- Analg to Digital Converters
- Connect to your asset over Serial link using Octave Resource Protocol
- Connect an asset with modbus
- Connect an asset with CAN Open
Updated about 5 years ago
